A long time ago, I used PGP for signing my email, but I stopped using it. Probably because I didn't quite get the concept yet, but that has changed now.

Today I switched to GPG for signing my mail and files, with all the required files running from my memory stick.

One thing bothered me however, no Outlook 2007 support at all. There are some plugins around for older Outlook versions, but that didn't quite work out.

So I decided to develop my own! And after a few weeks of development and testing, it's done and ready to be set free upon the world.

Let's have a look at the functionality and how to set it up and use it.

Prerequisites

First of all, a working copy of GPG is required, so visit the GnuPG download page, scroll down and download the command line Windows version.

Install this somewhere on your machine and remember the path where you installed it.

If everything has gone correctly, you can now open a command prompt and type gpg --version and gpg --list-keys to see the version and your keys (which would be empty if you're using it for the first time).

Visit the Getting Started section of the GnuPG handbook to generate your own key if this is your first encounter.
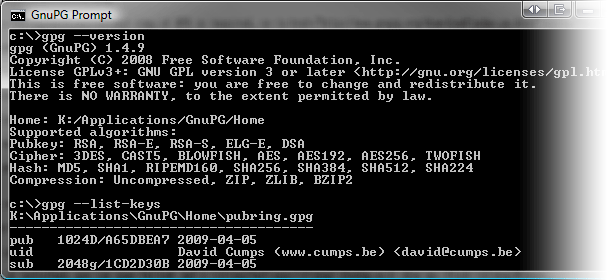
Command Line Interface

OutlookGnuPG

There are two main areas in the plugin, functionality for sending a mail (sign/encrypt) and for retrieving a mail (verify/decrypt).

At the moment only plain text emails are supported. No HTML mail or attachments, that's for a future version :)

To install the addin, start by adding www.cumps.be to your Trusted Sites (you can do this in Internet Explorer - Tools - Internet Options - Security - Trusted Sites - Sites).
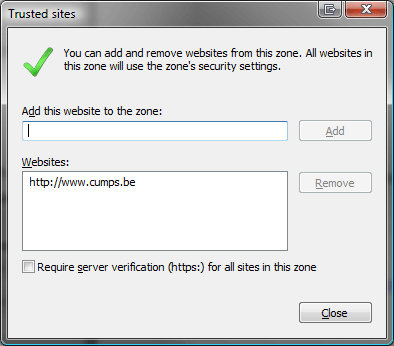
Trusted Sites

Download the OutlookGnuPG ClickOnce installer and execute it. (See Update 1 and 2 below)

This will give you a prompt asking you if everything is fine. Go ahead and install it. You might have to close Outlook before installing.
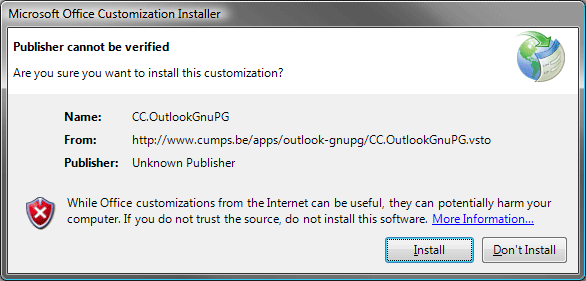
ClickOnce Installer

When the addin is installed, you can open Outlook and a Settings dialog will show up. Click Browse... and select the directory where your the gpg.exe you previously installed is located.

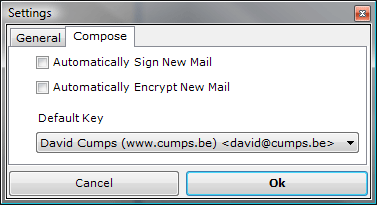
On the second tab you can select the default key you want to use to sign your mails. You will still have a choice to change your key upon sending the actual mail.
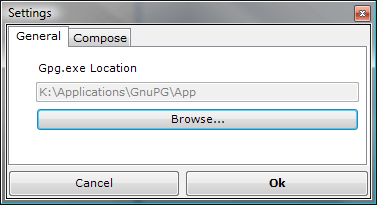
GnuPg Location

Default Key

Click Ok when done. At this point you can use your Outlook as before, since we haven't checked any auto-sign/encrypt functionality.

Sending Mail

When you compose a new mail, you will notice the Message ribbon has a new group on it, called OutlookGnuPG, with a Sign and Encrypt toggle button.
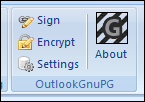
Compose Ribbon

Sending out a signed mail is as simply as turning on the Sign button, typing your mail and pressing Send. It will prompt you to select the private key you want to use to sign the mail, and your passphrase.
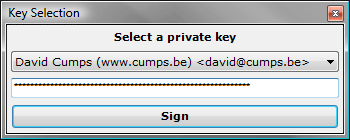
Passphrase Window

Creating an encrypted mail follows the same logic, toggle the Encrypt button and send your mail. You will have to select the intended recipients (multiple are possible) and it will encrypt the mail so only these people will be able to decrypt it.
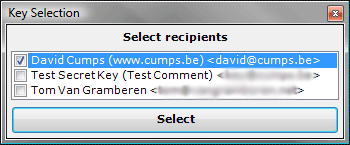
Recipient Window

To be absolutely safe, you can toggle both Sign and Encrypt button to send out an encrypted signed message.

Retrieving Mail

Reading mail can be done in two ways in Outlook, either by opening the mail item, or by using the preview pane. It only makes sense there are two ways to verify/decrypt a mail as well then.

The first is very identical to the send functionality. When you open an existing mail, you will notice a new ribbon group, OutlookGnuPG, with a Verify and Decrypt button.

Read Ribbon

Simply click Verify to check if a signed mail is valid or not. A messagebox will inform you of the status.
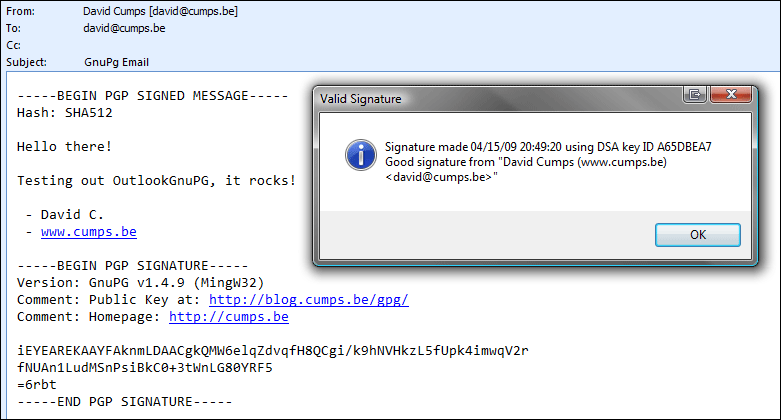
Valid Signature

Likewise, click Decrypt to decrypt an encrypted email. This will ask you for your private key to decrypt the message with. The message will be decrypted, and the decrypted content will be placed in the message. If the message was also signed, a messagebox will inform you of the status.

The second way is through the preview window. A new commandbar will have appeared on the preview window, with a Verify and Decrypt button, which work exactly the same as the previous buttons.

CommandBar

Credits

OutlookGnuPG is free, only supported by a donate button, so it's only fair to give the used resources some credits.

Silk Icon Set by Mark James OpenPGP wrapper by Starksoft Clipboard Wrapper by Alessio Deiana

AboutBox

Feedback

Got questions? Remarks? Feel free to leave a comment :)

Update: Since I won't have the time to maintain this, I'm releasing the source: cc.outlookgnupg-1.0.8.0.zip

Update 2: Philippe Teuwen and Thierry Walrant have taken it upon themselves to improve the code I posted above and made it available on github, using GPLv3 as a license. Check it out at: github.com/twalrant/OutlookGnuPG

 

In a previous article I have demonstrated how easy it is to decompile and reverse engineer .NET assemblies using Reflector and Reflexil. I've also shown that applying a strong name to your assembly does not protect your code from reverse engineering. So, what else is left?

A technique called obfuscating goes a long way in keeping your source code safe. An obfuscator will mangle your code, without changing the actual result, to make it increasingly harder for someone to decompile your code and actually understand it.

Keep in mind however that this is 'security through obscurity', and as such it does not provide solid security, it's just another layer. The more layers, the more walls there are around your assembly to demotivate others into breaking it, but never enough to demotivate 100% of the people. A similar tactic can be found in CD protection schemes, which stops a percentage of users from copying a disk, but not everyone.

There are several possibilities to obfuscate an assembly:

  • Renaming Classes, methods, parameters, namespaces, fields, ... are renamed to short names, making it much harder to deduct the working of a program from descriptive naming. Unicode characters can be used, making it even harder to understand.

    When there is a lot of code, an obfuscator can also rename different methods to the same name, due to taking advantage of overloading.

    For example, if you have a method GetCustomers without any parameters and GetCustomer(int customerNr), an obfuscator can rename them both to 'a', letting the .NET framework pick the correct one thanks to using overloads.

  • Control Flow Alternation

    An obfuscator can turn nicely structured code using if, while, for statements into a big spaghetti mess, by utilizing lots of goto statements. The more code you have, the more difficult it will be to understand the generated spaghetti end result.

  • String Encryption

    When code has been turned in to a complex obfuscated mess, it is still possible to find interesting parts due to the readability of strings used, limiting the attack vector to a smaller piece of obfuscated to be understood.

    Obfuscators provide the ability to encrypt strings and decrypt them at run time, making them unreadable in the source code.

  • Assembly Linking

    Calls made to .NET Framework methods will still be readable, because of this some obfuscators allow you to link in the .NET Framework assemblies being used, and obfuscating these as well, making it impossible to find anything 'normal' in the IL.

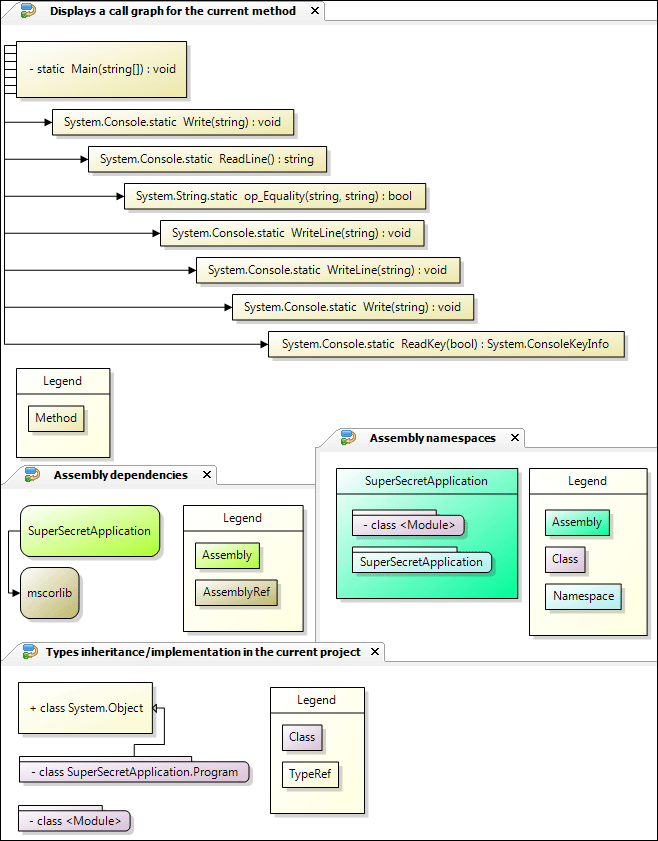
Besides protection features some obfuscator packages out there also provide nice diagram generators to analyze your assembly.

Assembly Information

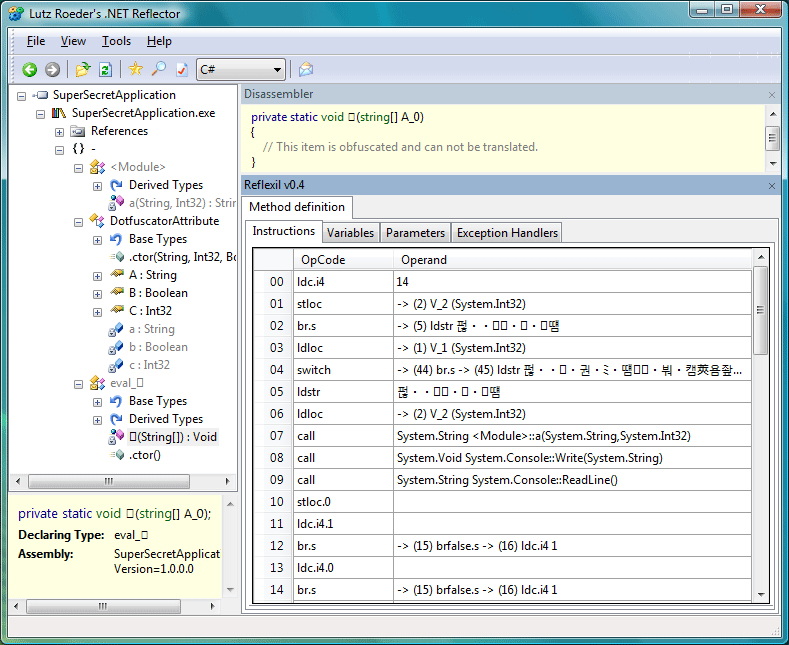
After applying an obfuscator on my previous CrackMe program, this is how it looks when opened with Reflector:

Reflector viewing obfuscated assembly

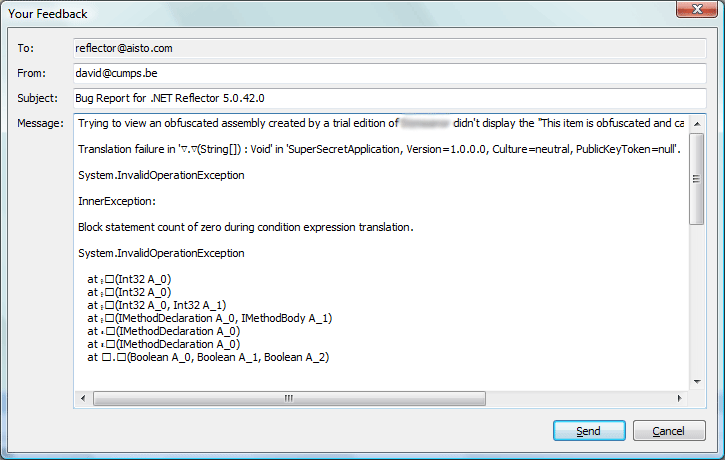
As you can see, Reflector is already unable to generate valid C# code for it. With some obfuscators it is even possible to make Reflector totally unable to output anything, besides IL. Trying to view in C# for example, made Reflector throw an exception.

Reflector bug report trying to open obfuscated assembly

Testing this on my SuperSecretApplication application, the obfuscator applied several methods on the IL of the assembly:

  • Method renaming, using Unicode characters which couldn't get displayed.
  • Parameter renaming, using a simply naming scheme.
  • Altered control flow, using several jump conditions, as displayed by the arrows in Reflexil.
  • String encryption, making it harder to find interesting sections.
 
.method private hidebysig static void รก(string[] A_0) cil managed
{
    .entrypoint
    .maxstack 3
    .locals init (
        [0] string str,
        [1] int32 num,
        [2] int32 num2)
    L_0000: ldc.i4 14
    L_0005: stloc num2
    L_0009: br.s L_0024
    L_000b: ldloc num
    L_000f: switch (L_00b7, L_0050, L_0071, L_0094)
    L_0024: ldstr "\ud382\ue484\uf486\ufa88\ufc8a\ue28c\ufd8e\uf590\ua992\ub594"
    L_0029: ldloc num2
    L_002d: call string <module>::a(string, int32)
    L_0032: call void [mscorlib]System.Console::Write(string)
    L_0037: call string [mscorlib]System.Console::ReadLine()
    L_003c: stloc.0
    L_003d: ldc.i4.1
    L_003e: br.s L_0043
    L_0040: ldc.i4.0
    L_0041: br.s L_0043
    L_0043: brfalse.s L_0045
    L_0045: ldc.i4 1
    L_004a: stloc num
    L_004e: br.s L_000b
    L_0050: ldloc.0
    L_0051: ldstr "\ue182\ue984\ue886\uee88\ua58a\uee8c\ufa8e\ufc90\ue392\ue694\ub996\ufb98\ufe9a"
    L_0056: ldloc num2
    L_005a: call string <module>::a(string, int32)
    L_005f: call bool [mscorlib]System.String::op_Equality(string, string)
    L_0064: brfalse.s L_0073
    L_0066: ldc.i4 2
    L_006b: stloc num
    L_006f: br.s L_000b
    L_0071: br.s L_0096
    L_0073: ldstr "\ucd82\uea84\ua686\ua988\uc58a\ue28c\uae8e"
    L_0078: ldloc num2
    L_007c: call string <module>::a(string, int32)
    L_0081: call void [mscorlib]System.Console::WriteLine(string)
    L_0086: ldc.i4 3
    L_008b: stloc num
    L_008f: br L_000b
    L_0094: br.s L_00b9
    L_0096: ldstr "\uda82\uea84\uf286\ua988\ue68a\uec8c\ue18e\uf090\uf492\uf094\uf396\ub998\uef9a\uf29c\ubf9e\uc4a0\ucda2\ud1a4\uc2a6\udba8\u8baa\ud9ac\uc7ae\ud4b0\u93b2\uc6b4\ud2b6\udab8\uc9ba\ud8bc\ucbbe\ue1c0\ua2c2\ub5c4\ub7c6\ua5c8\ua2ca\uaecc\uaece\ua5d0\ubad2\ubad4\ub9d6\uf8d8"
    L_009b: ldloc num2
    L_009f: call string <module>::a(string, int32)
    L_00a4: call void [mscorlib]System.Console::WriteLine(string)
    L_00a9: ldc.i4 0
    L_00ae: stloc num
    L_00b2: br L_000b
    L_00b7: br.s L_00b9
    L_00b9: ldstr "\ud382\uf784\ue286\ufa88\uf88a\uad8c\uee8e\uff90\uea92\ub594\ufc96\ufc98\ue29a\ubd9c\ueb9e\ucea0\u83a2\uc6a4\uc8a6\uc7a8\udfaa\uc4ac\uc1ae\uc4b0\ud6b2\u95b4\u99b6\u99b8\u95ba\u9dbc\u91be"
    L_00be: ldloc num2
    L_00c2: call string <module>::a(string, int32)
    L_00c7: call void [mscorlib]System.Console::Write(string)
    L_00cc: ldc.i4.1
    L_00cd: call valuetype [mscorlib]System.ConsoleKeyInfo [mscorlib]System.Console::ReadKey(bool)
    L_00d2: pop
    L_00d3: ret
}

As you can see, given enough time, it is possible to figure out the above code and still break it. The more code you have however, the harder it becomes due to the increasing complexity of the obfuscated code, added with the fact that obfuscators will be able to apply even more advanced methods.

Obfuscators also have some disadvantages though. When writing advanced code involving reflection, obfuscating an assembly might break your code, possibly due to class and namespaces being renamed. Debugging also becomes harder because the stacktrace will contain renamed method signatures.

A good obfuscator will offer features to work around these advantages though, by allowing you to mark sections which should be skipped for obfuscation and also providing tools to translate an obfuscated stack trace to the original methods, using a mapping file.

You can find a comparison between several obfuscators on How To Select Guides, including links to individual websites and details about which features they support.

This post is the third in a series on protecting intellectual property.

 
Deze post is geïmporteerd van de oude blog en is nog niet geconverteerd naar de nieuwe syntax.
In my last post I spoke about reverse engineering .NET assemblies upon which Gregory asked how to protect his code against it.

Initially I thought signing an assembly would be the easiest way to prevent this, and my first tests confirmed this. I signed the CrackMe from my previous post and tried modifying it again, unsuccessfully.

Visual Studio - Sign Assembly

After changing the code and saving it, Reflexil gave me several options. Adding it to the verification list, resigning it, or leaving it as is.

Reflexil - Save Tampered Assembly

None of the options proved to be usable for the following reason:

  • Adding it to the verification list.
    This won't work with fully signed assemblies. Shawn Farkas explained long ago why this doesn't work. The solution proposed doesn't work if we don't have the original key used to sign the file.
     

  • Resigning it.
    Logically this doesn't work, since we don't have the original key.
     

  • Leaving it as is.
    When trying to run the modified assembly, an exception will be thrown, preventing it from running.


FileLoadException Tampered Assembly

It seems we managed to protect our code, doesn't it? But we didn't!

I started thinking, since we can easily decompile an assembly, it couldn't be that hard to remove the signature and make it pass all checks again. After playing around with ildasm (Found at: Visual Studio - SDK - v2.0 - Bin) and ilasm (Found at: Microsoft.NET - Framework - v2.0.50727) for a while, my suspicions got confirmed. I managed to run the altered, now unsigned, assembly on my computer, defeating code signing.

This process wasn't error proof however, making round trips through ildasm and ilasm didn't always recreate the original assembly correctly. But why make the round trips in the first place? Why not edit the assembly directly, only removing the signature, instead of having to decompile and recompile the entire code.

A Google search quickly led me to the answer. This code project article describes code signing in great detail and provides a very nice utility to remove the strong name from an assembly, while also keeping into account referencing assemblies.

Using the tool on my CrackMe removed the signature without any problem, after which I could simply modify it as if it was an unsigned assembly using the instructions from my previous post.

Strong Name Remove

In conclusion, I'd say code signing offers no protection against others determined to modify your assemblies. It seems to be like copy protections on games, it will stop a certain percentage of people but not everyone. It's another layer in your protection, making it less attractive to others to even bother trying to break your security.

Should you use code signing? Yes, you should, everything helps and applying a strong name also serves other purposes such as solving versioning issues when using the Global Assembly Cache.

In my next post I'll take a look at another mechanism to protect your code from tampering, obfuscation.

This post is the second in a series on protecting intellectual property.
 
Deze post is geïmporteerd van de oude blog en is nog niet geconverteerd naar de nieuwe syntax.
I've always been a big fan of Reflector, allowing me to have a look in assemblies to learn new things, debug in case of problems and provide useful information when creating bug reports. Combined with the Reflexil Add-in it's now easy to also modify assemblies yourself.

To demonstrate this, I've created a small CrackMe sample program, which consists out of nothing more then a simple password check. This is how it looks when opened in Reflector, with Reflexil displaying the IL code below it.

Reflexil - CrackMe

Ignoring the fact that the password is out there in the open, let's have a look on how we could easily change the behavior of this assembly.

As you can see on the highlighted line in Reflexil, the instruction will jump to line 11 in case the provided password is false. Let's simply change this to jump when true. Right click the line, select 'Edit...' and change the OpCode to brtrue.s to modify the if statement.

Reflexil - Edit

I'm sure this brings back memories for people doing this years ago in assembler, JNE to JE  :)

To save this change, navigate to the .exe node in Reflector and select 'Save as ...' in the Reflexil dialog.

Reflexil - Save

If you open the new executable in Reflector and have a look at the password check, you'll notice the operator has changed, making all passwords valid except the correct one.

Reflexil - Cracked

I've attached the .zip of this project and the modified file as a small example to demonstrate how powerful good tools are.

This post is the first in a series on protecting intellectual property.
 
Deze post is geïmporteerd van de oude blog en is nog niet geconverteerd naar de nieuwe syntax.
Are you concerned about the confidentiality of your files? Take a look at TrueCrypt, a great tool to create encrypted volumes.

TrueCrypt is free open-source disk encryption software which allows you to create virtual encrypted disks in a file container or simply an entire physical device. Supporting various encryption algorithms, TrueCrypt can easily defend its place among commercial encryption software. Another nice to know is the fact that TrueCrypt doesn't require any installation at all, which makes it very nice to take along on portable devices.

As a small experiment, I decided to encrypt a spare USB stick I had lying around, on a partition level. I started by downloading the latest version (4.3a) of TrueCrypt and started the wizard to create a new volume. I selected a standard volume as a test. If you want to have plausible deniability, TrueCrypt allows you to create hidden volumes as well.

TrueCrypt Wizard Start

I chose to encrypt my USB stick on a partition level, making the entire stick unusable in case of loss. You could argue it would be less suspicious to carry around a normal looking USB stick with a TrueCrypt file-based volume stored on it, with a hidden volume inside of it. And I'd agree if I'd be serious about the sensitivity of the data I'd be carrying around, but for now, I wanted to play around with it on disk level :)

TrueCrypt Partition Selection

After going trough all choices and generating some random data, TrueCrypt formats the partition to make it look like a normal FAT partition, filled with random data on a low level.

TrueCrypt Formatting

When the wizard is finished, it's possible to mount the new volume to any free drive letter, after providing the password. From then on data will be encrypted and decrypted on the fly.

TrueCrypt Mount

Out of curiosity, I booted with my Ultimate Boot CD and had a look at the hard disk with PTS Disk Editor. The encrypted drive was filled with data from start till end, without any definable pieces.

TrueCrypt Encrypted Disk

Comparing this to my normal hard disk, I noticed several big empty gaps, repetitive blocks and even readable pieces.

Normal Disk

I'm very impressed by TrueCrypt, and it's definitely something I'll be keeping around in my tools archive just in case.