Today we'll have a look at a well known pattern, the Singleton Pattern. Most people have already heard about this one.

The definition: "Ensure a class has only one instance and provide a global point of access to it."

Why would you want to only have one instance of a class?

Well, you could have one Configuration class for example, which reads some configuration settings at runtime, after which they remain available to your application.

It makes sense to only have one instance of this class, since having multiple could cause you to suddenly end up with different configuration settings.

Now, there are different Singleton Pattern implementations out there, which makes it interesting to have a look at it anyway.

First of all, let's look at the basics of how a Singleton works. Since we're working with our game example, a good singleton would be a reference to our hardware, the GraphicsCard, we should have only one instance of it, who knows what would happen if we start mixing up various instances :)

To make sure there is only one instance of a certain class, we let that class itself manage it's instantiation, instead of creating it ourselves using the new() operator.

Preventing others from calling new() on our class is done by making the constructor private. This way nobody can instantiate the class directly.

But how do we get an instance back then?

We provide a static method in the class itself, returning an instance of itself. By doing this, we can create one instance upon the first request and keep returning the same instance upon further requests.

This is also a form of lazy loading, since it only gets created when it is requested for the first time.
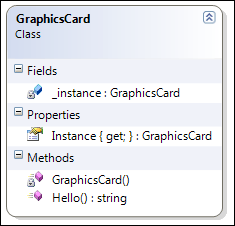
Basic Singleton

Where's the catch you might ask? Multi-threading! This simple implementation of a Singleton is not thread-safe!

It is possible for multiple threads to both execute the null check together, both evaluate it to true, since there is no instance yet, and then both threads create an instance, ending up with multiple instances instead of one.

Luckily, there's a solution. I'll cut straight to the point and give the thread-safe, lazy loading version. There are other thread-safe implementations out there, which you can read more about at Implementing the Singleton Pattern in C#.
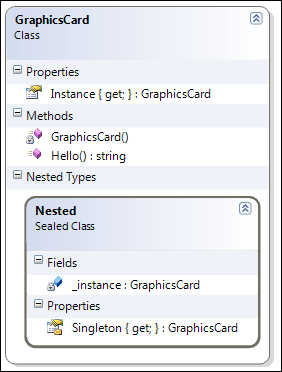
Thread-Safe Singleton

As you can see, the actual instance is held inside a private sealed nested class, which is inside the GraphicsCard class. When the Instance property is called for the first time, it will instantiate a GraphicsCard in a thread-safe way, thanks to the Nested class, and upon subsequent requests, the same instance will be returned.

It's elegant, and doesn't use any special language keywords like lock() in C# or synchronize in Java.

I think it's quite easy to set up a Singleton like this, once you've done it once, you can do it everywhere.

With C# and generics however, we can be even more lazy, which is why I tried out throwing the Singleton Pattern into the following code.
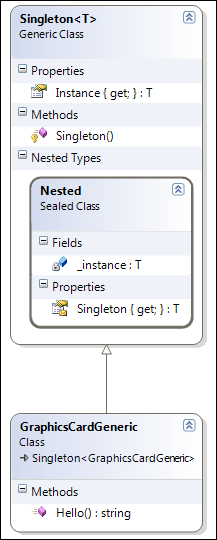
Generic Thread-Safe Singleton

Now the only thing we need to do when we want to create a singleton is create a class, inheriting from Singleton passing the class itself in as the generic T.

The usage of both classes is identical afterwards, as you can see from this small snippet:

Singleton Usage

That's it, one of the easiest to understand patterns conceptually, but with some common pitfalls when implementing it.

There is one big issue bothering me with the generics approach however, hopefully someone can help me out on this, in an elegant way.

As it is coded right now, you can do new GraphicsCardGeneric(), which is something I don't want, since you run the risk of ending up with multiple instances again.

I can't add a private constructor however, since the generics break down then, requiring a public parameterless constructor to do new T() inside the Nested class.

If anyone has a nice solution to get around this, while keeping generics, please comment and let me know. Personally I feel safer using the non-generics solution for now, since it locks down new() instantiation of the Singleton.

As usual, the project is available again to look at for further detail.

Some additional information on the Singleton pattern:


Time to continue from yesterday's Factory Method Pattern by exploring the Abstract Factory Pattern.

Right now, we have created separate classes for both factions' units (CyborgCommando and Ghostalker). Let's change this so each faction has identical base classes containing logic, but slightly different configuration depending on the faction they belong to.

We'll do this by implementing the Abstract Factory Pattern. I always mix this one up with the Factory Method Pattern, but it finally got through to me while writing the code for this post.

With Factory Method, we have an abstract base class containing logic and calling our abstract factory methods, which return a real implementation via subclasses.

While the Abstract Factory is passed into an object where it is used as composition, and the real factory is supplied at runtime, decoupling the usage of our factory from the real implementation.

Anyway, time for the definition and then some code to make everything clear. "Provide an interface for creating families of related or dependent objects without specifying their concrete classes."

First of all, let's get rid of our faction specific units and replace them by generic ones.

Generic Game Units

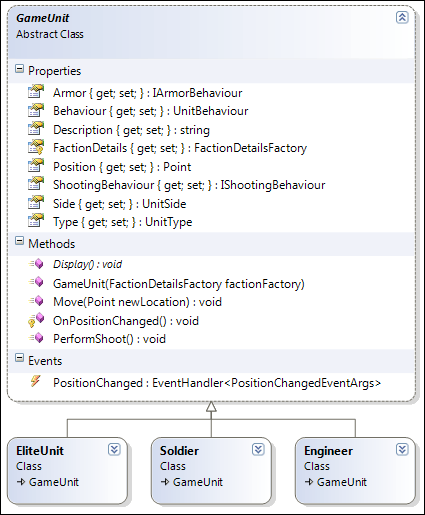
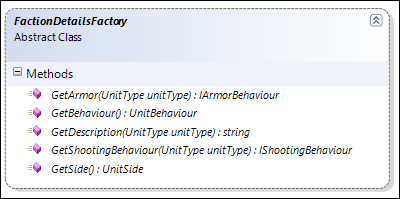
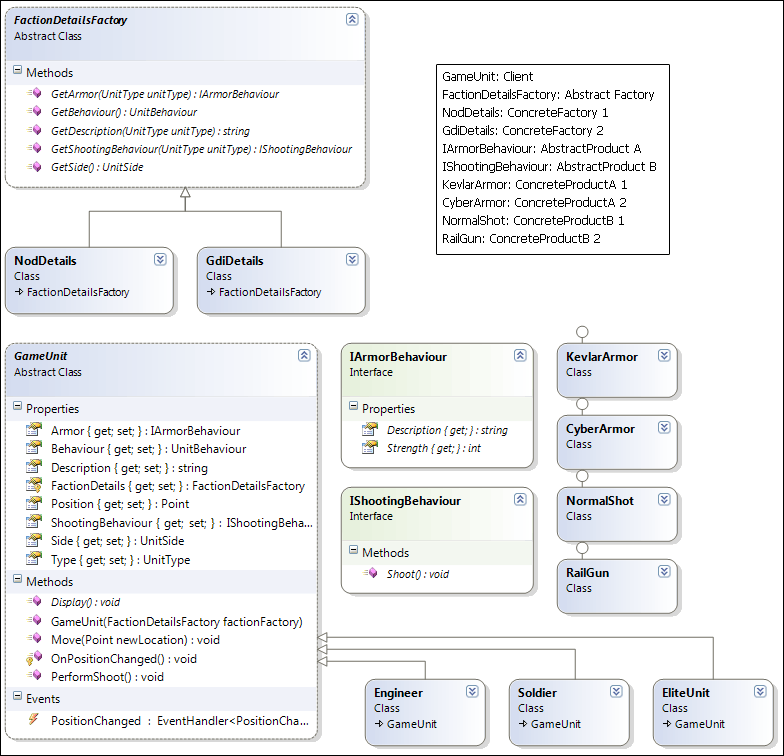
You'll notice the GameUnit has been given a new constructor, an abstract class containing only abstract methods.

This class forms the definition of the Abstract Factory Pattern, it's an interface to create related objects without specifying a concrete class.

Abstract Factory Class

Our GameUnit class is not working with a concrete type, but with an interface, decoupling it from a real faction implementation.

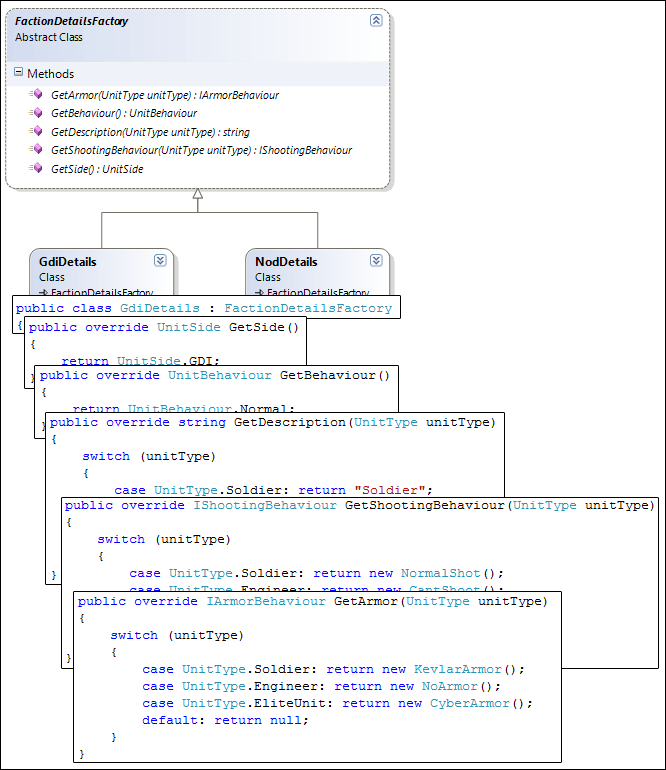
We aren't much with just this interface, so let's create an implementation.

Factory Implementation

As you can see, the classes we used to illustrate the Strategy Pattern have been moved to this factory implementation, which means our GameUnit and all other unit implementations are now working with interfaces rather than concrete implementations.

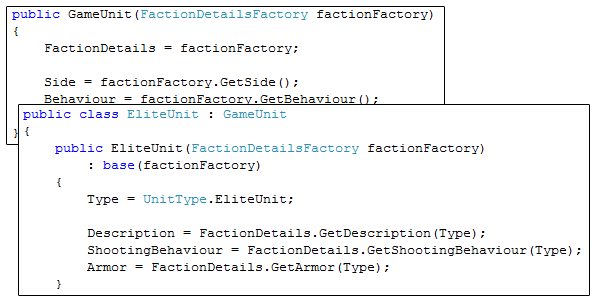
Another thing left to do, is to let the units get their information from the abstract factory.

Interrogating the Abstract Factory

All that is left, is a small change to our two InfantryFactories to pass in the correct FactionDetailsFactory to each unit, and our test case is ready to run again, without having to change it.

Providing a Factory Implementation

You might wonder what the IBuilding interface is suddenly doing there, well, I cleaned the code a bit up and decided to place everything in separate files as it should. Never done it before to keep it simple for these articles, but I didn't like the code adding up.

With the Abstract Factory Pattern implemented, our results looks like this:

Abstract Factory Pattern

So, here's the uploaded solution again, changed quite a bit since last time, take your time to have a look at it.

As usual, feedback is much appreciated.

Some additional information on the Abstract Factory pattern:

 
This post has been imported from the old blog and has not yet been converted to the new syntax yet.
I present you with the next pattern in our series, the Factory Method! It took a while to get it out due to a stay in the hospital. (All is fine now :p)

The chapter I'm currently reading deals with both factory patterns, Factory Method and Abstract Factory, in one chapter, but I'm going to write an article on each to limit the length.

First of all, the definition: "Define an interface for creating an object, but let the subclasses decide which class to instantiate. The Factory method lets a class defer instantiation to subclasses."

Today we were given specs to add a building to our game. This building will create infantry units, set their behaviour to a specific setting and send them to a given waypoint after creation.

We start with a simplistic approach of creating an InfantryFactory class, which represents a building and contains a building-specific waypoint and unit behaviour setting to be given to new units.

Simple Unit Factory Building

It does the job, a specific unit is created based on a runtime parameter, it is given its behaviour and sent to a specific destination.

However, when we need to add new units, we need to open up this class every time again and change inside of it, which violates the Open/Closed Principle we talked about last time.

Let's isolate what changes and move it to its own method, just to illustrate we understand the part that is most subject to change.

Isolating Change

Since the CreateUnit method is still inside the same class, we still have a problem. The BuildUnit method is a fine piece of code now however, it works with GameUnit objects instead of actual implementations.

Once this code passes our quality assurance it can be extended as much as wanted without having to modify it. Let's get this entire class to meet our quality standards now by implementing the Factory Method.

Our InfantryFactory class forms a nice base for creating units and performing various logic, let's lock it down for modification by making it abstract and throwing the CreateUnit implementation out as well.

To throw its implementation out, we are going to define CreateUnit as an abstract method, forcing subclasses to implement it. Let's create two factories for both our factions.

Factory Method Pattern

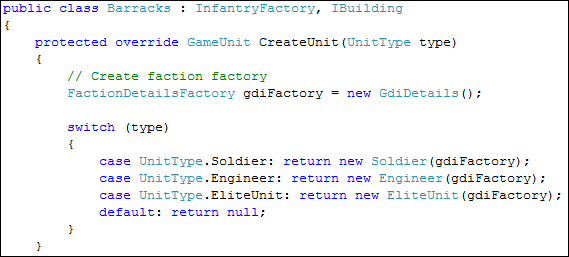
As you can see, I've taken the liberty to add some more units since last time, to illustrate how our two factories decide which class to instantiate in the CreateUnit method. Which is exactly what the Factory Method definition describes.

We defined an interface for creating an object, the abstract CreateUnit method, and let the subclasses, Barracks and HandOfNod, decide which class to instantiate. We made our InfantryFactory open for extension and closed for modification!

Factory Method Pattern - Code

When we test this code, you can see our objects are always using abstract classes or interfaces (an abstract class is also called an interface sometimes, in the sense of the English language, not in the C# keyword).

Factory Method Test Case

The result after all this coding is this little output, and the fact that we learned another pattern, the Factory Method.

Factory Method Test Case Output

I've uploaded the solution again. If you have any questions or feedback, please comment.

Some additional information on the Factory Method pattern:
 

Following up on the Observer/Event Pattern, it's time for the third pattern, the Decorator Pattern.

The definition: "Attach additional responsibilities to an object dynamically. Decorators provide a flexible alternative to subclassing for extending functionality."

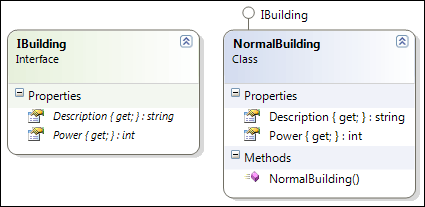
Continuing on our little game, let's say we are able to create buildings and have just an IBuilding interface and one building.

Simple Building

Each building has a description and a given power usage cost, which is simply hardcoded in the class right now.

After a while, our boss hired an external company to take over development with regards to the buildings and tasked them with making buildings upgradeable.

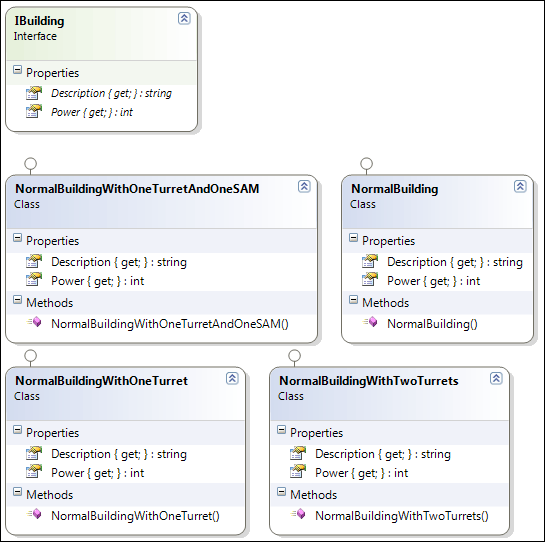
The first approach they took was too simply add new building classes to the game, for each possible upgrade.

Class Explosion

This however leads to an infinite amount of possibilities and a nightmare to maintain.

If we look at the definition of the Decorator Pattern, it seems to offer a good alternative to all this inheriting to add in new functionality.

Also, adding additional responsibilities dynamically means we don't have to change the code of the IBuilding and NormalBuilding either. By doing this we are honoring the Open/Closed Principle, which says "software entities (classes, modules, functions, etc.) should be open for extension, but closed for modification".

How are we going to add these additional things dynamically? We'll decorate our initial NormalBuilding with upgrades, giving us flexibility to equip a building with any upgrade combination we like.

When we mention decorating, think about wrapping. We are going to wrap an instance of IBuilding in a decorator, acting as a shell around the class, passing calls to our decorator along to the wrapped instance, modifying the results when needed.

It's also possible to chain decorators together, making it possible to decorate a NormalBuilding with two Turrets, a SAM installation and a Laser. This is done because a decorated object is still of the type IBuilding, and can be decorated again and again.

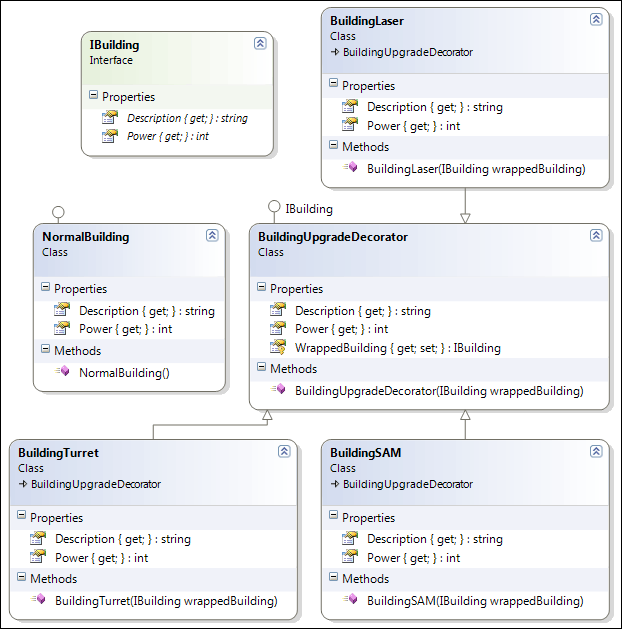
Eventually we'll end up with the following class diagram. Note, the WrappedBuilding has a protected getter and a private setter.

Decorator Pattern

Now we have a set of buildings, which implement IBuilding and one decorator base class, BuildingUpgradeDecorator, from which all possible decorations inherit. This decorator class has to implement IBuilding as well, so it can be re-decorated.

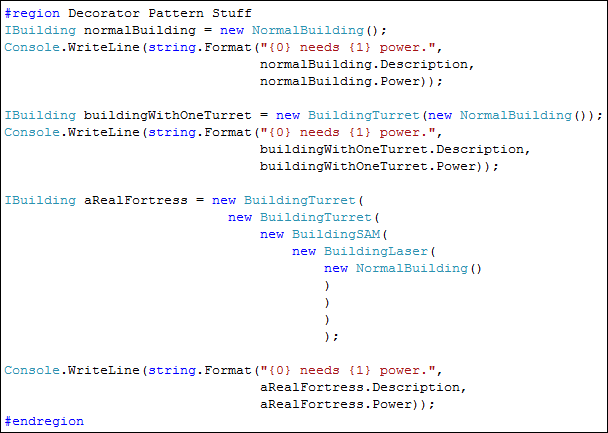
With the above classes, it's possible to compose buildings as we desire, as shown below.

Decorator Usage

When we run this code, the call to the Power property is being passed through all decorators to the lowest level, our NormalBuilding, and returned all the way back, getting incremented with the additional power usage for each decorator/upgrade in the mean time.

Decorator Output

I've uploaded the solution again so you can have a look on how the decorator base class and individual decorators are programmed.

Some additional information on the Decorator pattern:


Yesterday I described the Observer Pattern and mentioned that the .NET CLR provides this functionality through events and delegates.

Let's have a look on how to implement this right now.

First of all, we can get rid of our ISubject and IObserver interfaces. And we'll replace it by a push notification mechanism.

Push, because we'll pass the required information along to the observers when notifying them, as opposed to pull, where the observers had to extract it themselves from the subject.

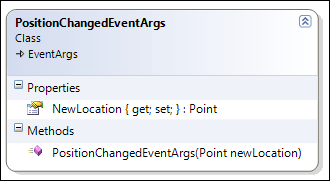
Since we'll be pushing out the information, we need a custom class defining which information is interesting. We'll create this by inheriting from the EventArgs class, by doing this it will be very easy to set up an event in the next step.

Custom EventArgs Class

As you can see, this is a very small class, with a descriptive name, containing the new location of our unit.

You can't see it on this diagram, but the NewLocation property only has a public getter, and a private setter, since our observers will only have to extract data from this class.

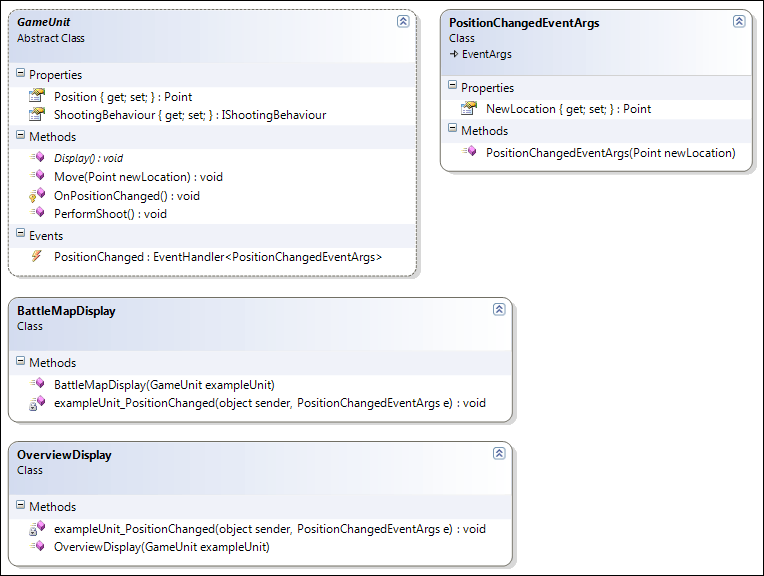
So, we got our small information holding class, now it's time to change our GameUnit class to get rid of all the logic of maintaining a list of observers and subscription logic.

We'll replace the ISubject logic by an event of the type EventHandler<PositionChangedEventArgs>. By doing this, we expose an event (PositionChanged) to our observers upon which they can subscribe themselves whenever they want as well as unsubscribe when needed.

Observer/Event Pattern

Note that this event is strongly typed, containing a strongly typed information set, making it easy for our observers to get the information they need.

Using this method, we can have a set of EventArgs classes as small data holders, after which subjects can expose events using those custom EventArgs to the outside world, making sending out notifications very easy.

Observers on their side can easily subscribe to any of the events exposed by using a single line of code, and perform their logic (_PositionChanged methods) whenever they get a notification.

Have a look at the the uploaded solution to see the exact syntax of this method. We're using delegates with generics, the += operator and throwing and handling events.

Again, if you have any questions, feel free to leave them behind.

Some additional information on the Observer/Event pattern: