A long time ago, I used PGP for signing my email, but I stopped using it. Probably because I didn't quite get the concept yet, but that has changed now.

Today I switched to GPG for signing my mail and files, with all the required files running from my memory stick.

One thing bothered me however, no Outlook 2007 support at all. There are some plugins around for older Outlook versions, but that didn't quite work out.

So I decided to develop my own! And after a few weeks of development and testing, it's done and ready to be set free upon the world.

Let's have a look at the functionality and how to set it up and use it.

Prerequisites

First of all, a working copy of GPG is required, so visit the GnuPG download page, scroll down and download the command line Windows version.

Install this somewhere on your machine and remember the path where you installed it.

If everything has gone correctly, you can now open a command prompt and type gpg --version and gpg --list-keys to see the version and your keys (which would be empty if you're using it for the first time).

Visit the Getting Started section of the GnuPG handbook to generate your own key if this is your first encounter.
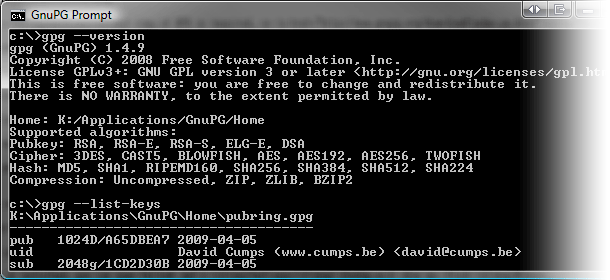
Command Line Interface

OutlookGnuPG

There are two main areas in the plugin, functionality for sending a mail (sign/encrypt) and for retrieving a mail (verify/decrypt).

At the moment only plain text emails are supported. No HTML mail or attachments, that's for a future version :)

To install the addin, start by adding www.cumps.be to your Trusted Sites (you can do this in Internet Explorer - Tools - Internet Options - Security - Trusted Sites - Sites).
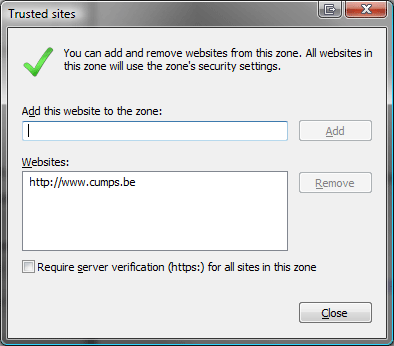
Trusted Sites

Download the OutlookGnuPG ClickOnce installer and execute it. (See Update 1 and 2 below)

This will give you a prompt asking you if everything is fine. Go ahead and install it. You might have to close Outlook before installing.
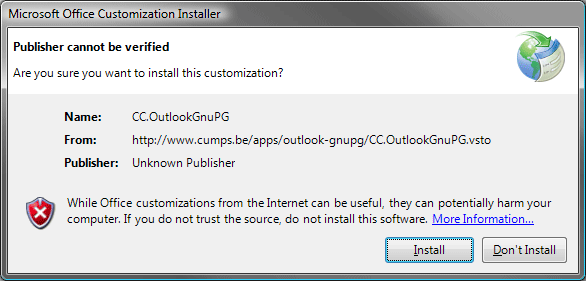
ClickOnce Installer

When the addin is installed, you can open Outlook and a Settings dialog will show up. Click Browse... and select the directory where your the gpg.exe you previously installed is located.

On the second tab you can select the default key you want to use to sign your mails. You will still have a choice to change your key upon sending the actual mail.
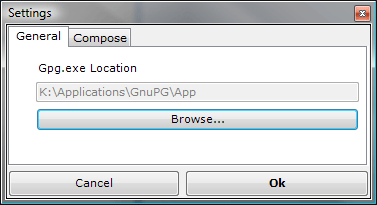
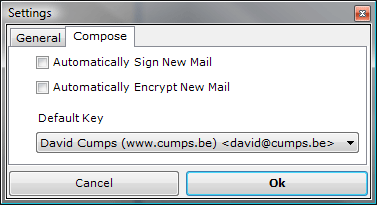
GnuPg Location

Default Key

Click Ok when done. At this point you can use your Outlook as before, since we haven't checked any auto-sign/encrypt functionality.

Sending Mail

When you compose a new mail, you will notice the Message ribbon has a new group on it, called OutlookGnuPG, with a Sign and Encrypt toggle button.
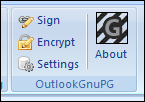
Compose Ribbon

Sending out a signed mail is as simply as turning on the Sign button, typing your mail and pressing Send. It will prompt you to select the private key you want to use to sign the mail, and your passphrase.
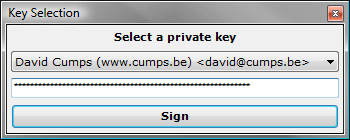
Passphrase Window

Creating an encrypted mail follows the same logic, toggle the Encrypt button and send your mail. You will have to select the intended recipients (multiple are possible) and it will encrypt the mail so only these people will be able to decrypt it.
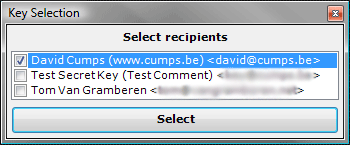
Recipient Window

To be absolutely safe, you can toggle both Sign and Encrypt button to send out an encrypted signed message.

Retrieving Mail

Reading mail can be done in two ways in Outlook, either by opening the mail item, or by using the preview pane. It only makes sense there are two ways to verify/decrypt a mail as well then.

The first is very identical to the send functionality. When you open an existing mail, you will notice a new ribbon group, OutlookGnuPG, with a Verify and Decrypt button.

Read Ribbon

Simply click Verify to check if a signed mail is valid or not. A messagebox will inform you of the status.
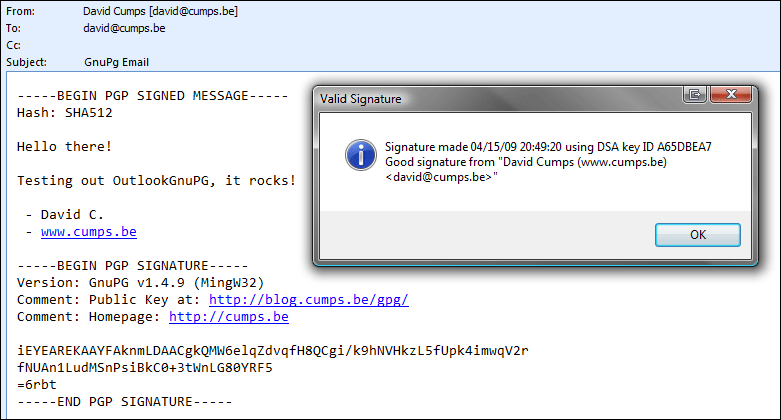
Valid Signature

Likewise, click Decrypt to decrypt an encrypted email. This will ask you for your private key to decrypt the message with. The message will be decrypted, and the decrypted content will be placed in the message. If the message was also signed, a messagebox will inform you of the status.

The second way is through the preview window. A new commandbar will have appeared on the preview window, with a Verify and Decrypt button, which work exactly the same as the previous buttons.

CommandBar

Credits

OutlookGnuPG is free, only supported by a donate button, so it's only fair to give the used resources some credits.

Silk Icon Set by Mark James OpenPGP wrapper by Starksoft Clipboard Wrapper by Alessio Deiana

AboutBox

Feedback

Got questions? Remarks? Feel free to leave a comment :)

Update: Since I won't have the time to maintain this, I'm releasing the source: cc.outlookgnupg-1.0.8.0.zip

Update 2: Philippe Teuwen and Thierry Walrant have taken it upon themselves to improve the code I posted above and made it available on github, using GPLv3 as a license. Check it out at: github.com/twalrant/OutlookGnuPG


By default, Windows Vista synchronizes once every 7 days with time.windows.com along with every other user out there.

Let's change this to sync every half day with several NTP servers to get a more reliable time.

First of all go to the NTP Pool Project and browse to the page of your country, I'll use the Belgium NTP Pool as an example.

Let's start with the simple change and click on your system clock and select change date and time settings...

On the tab Internet Time select Change settings... and as a server, enter the name of your country's main pool, be.pool.ntp.org for Belgium. Press Update now to test it, and finally close all windows again.

At this point you're randomly picking an NTP server in your country for your weekly update. Let's improve this a bit by adding multiple servers.

Open an administrative command prompt and enter the following command (replace the server names by the list of your country, space separated, surrounded by double quotes):

 
net time /setsntp:"0.be.pool.ntp.org 1.be.pool.ntp.org 2.be.pool.ntp.org 3.be.pool.ntp.org"
w32tm /query /peers
net stop w32time
net start w32time
w32tm /resync
w32tm /query /peers

You will have noticed there are now four NTP servers in the list.

 
C:\>w32tm /query /peers
#Peers: 4

Peer: 0.be.pool.ntp.org
State: Active
Time Remaining: 595.8760000s
Mode: 3 (Client)
Stratum: 3 (secondary reference - syncd by (S)NTP)
PeerPoll Interval: 10 (1024s)
HostPoll Interval: 10 (1024s)

Peer: 1.be.pool.ntp.org
State: Active
Time Remaining: 595.8760000s
Mode: 3 (Client)
Stratum: 2 (secondary reference - syncd by (S)NTP)
PeerPoll Interval: 10 (1024s)
HostPoll Interval: 10 (1024s)

Peer: 2.be.pool.ntp.org
State: Active
Time Remaining: 595.8760000s
Mode: 3 (Client)
Stratum: 2 (secondary reference - syncd by (S)NTP)
PeerPoll Interval: 10 (1024s)
HostPoll Interval: 10 (1024s)

Peer: 3.be.pool.ntp.org
State: Active
Time Remaining: 595.8760000s
Mode: 3 (Client)
Stratum: 2 (secondary reference - syncd by (S)NTP)
PeerPoll Interval: 10 (1024s)
HostPoll Interval: 10 (1024s)

When you run w32tm /query /configuration you will notice the SpecialPollInterval setting will list 604800, which is 7 days in seconds.

To change the interval, open up regedit, go to HKEY_LOCAL_MACHINE\SYSTEM\CurrentControlSet\Services\W32Time\TimeProviders\NtpClient and locate the SpecialPollInterval DWORD value.

Change this to Decimal 43200 (Hex 0000a8c0), which is equal to 12 hours in seconds.

Close regedit and execute the following commands:

 
net stop w32time
net start w32time
w32tm /query /configuration

This will now return a lot information, including the following lines:

 
SpecialPollInterval: 43200 (Local)
Type: NTP (Local)
NtpServer: 0.be.pool.ntp.org 1.be.pool.ntp.org 2.be.pool.ntp.org 3.be.pool.ntp.org (Local)

Congratulations, at this point you are succesfully syncing your computer every 12 hours against multiple NTP servers.

I've done this as a result of my previous IPv6 tunnel article, to make sure I'm running nearly equal with SixXS, which you can check at SixXS Time Check.

Update: Windows 7 deprecated net time /setsntp, use this instead:

 
w32tm /config /manualpeerlist:"0.be.pool.ntp.org 1.be.pool.ntp.org 2.be.pool.ntp.org 3.be.pool.ntp.org"
 

I used to have an IPv6 tunnel on my old machine, but since I moved to a new desktop I didn't get around to setting it up again. That's gonna change today.

First of all, why would you want it? Well, here's a start, as well as the fact that it's geeky and lets you learn more about IPv6.

Start by going to SixXS and sign up for an account, it took about a day for mine to get approved.

After you received your account, you can login and request a tunnel. Make sure you request a PoP close to you, and you will most likely want to request an ayiya tunnel.

While waiting for approval, we can already prepare some software parts for our tunnel.

Go to the OpenVPN Downloads Page and download the OpenVPN 2.1 RC15 installer. This is needed for the tap901 in Vista, since that one is signed.

Run the installer and deselect everything except the "TAP Virtual Ethernet Adapter". Go ahead and install it, it'll create a new network adapter, which I renamed to IPv6 for clarity.

Go into the properties of this new adapter and navigate to the IPv4 settings. Manually assign an IP address which is in the same subnet as your main network. E.g.: My main LAN hands out IPs via DHCP in the range of 192.168.123.100-200, subnet 255.255.255.0, so I assigned 192.168.123.99 to this IPv6 adapter.

Download the Aiccu console client, rename it to aiccu-console.exe and save it somewhere.

Also download the Windows 2003 Resource Kit and install it.

At this point we have to wait for our tunnel request to be approved before we can continue.

Once we received a mail, it's time to configure the aiccu client. Start by creating a file called aiccu.conf in the WINDOWS directory, containing the following:

 
username -SIXXS
password 

ipv6_interface IPv6
tunnel_id T

verbose true
daemonize true
automatic true
requiretls false

You can find your tunnel id on your SixXS Home Page.

Run the following commands as administrator to disable conflicting Vista IPv6 technologies:

 
netsh interface ipv6 6to4 set state state=disabled
netsh interface ipv6 isatap set state state=disabled
netsh interface ipv6 set teredo disable

Run the following command to speed up DNS requests, since Vista sometimes acts up when the IPv4 adapter doesn't have an IPv6 associated with it:

Cable is the name of my physical network adapter, you can copy the IPv6 listed, it doesn't really matter at this point.

 
netsh int ipv6 add address "Cable" 2002:81a8:102::

I also ran the following command to allow ICMP requests to come through over the tunnel, otherwise SixXS can not monitor it and will think it's inactive and it might get disabled.

 
netsh firewall set icmpsetting type=ALL mode=ENABLE

Run the following command to set your MTU to match the tunnel's MTU:

 
netsh int ipv6 set subinterface "IPv6" mtu=1280

At this point you can run aiccu-console.exe start as an administrator to test your tunnel.

This will provide a lot of output, and after a while you will see your network adapter listed as Identifying in Vista, after which it'll ask if this is a private or public network.

At this point you can open up a prompt and try to ping -6 ipv6.google.com to see if it all works. Normally everything should be fine.

You can now modify the aiccu.conf to state verbose false, since everything is alright now.

Now you can try surfing to Google IPv6 and [SixXS IPv6(http://www.ipv6.sixxs.net "SixXS IPv6") to check if that's working as well.

If all is fine, hit CTRL+C in the aiccu console to stop it. It's time to configure it as a service.

Navigate to the directory where you previously installed the Windows 2003 Resource Kit files and execute the following (mind the path):

 
instsrv.exe AICCU "C:\Program Files (x86)\Windows Resource Kits\Tools\srvany.exe"
sc description AICCU "Aiccu IPv6 Client"

Open up regedit, navigate to HKEY_LOCAL_MACHINE\SYSTEM\CurrentControlSet\Services\AICCU and create a new Key called Parameters.

Create a new String Value called Application below this key and as a value enter the full path to the aiccu console with the start command, e.g.: C:\IPv6\aiccu-console.exe start

Close regedit, go back to the prompt and type NET START AICCU and you will notice the IPv6 tunnel being set up.

Congratulations, you now got an IPv6 tunnel up and running, which automatically starts everytime you boot.

After a while you will be able to see graphs on the SixXS home page about your connection.

If you have any problems, please leave a comment and I'll see what I can do, as well as update the post to include possible additional steps.


A little side-track from the Continuous Integration Build Server series, but still related as it'll be part of my CI infrastructure.

A few weeks ago, I bought myself a ReadyNAS NV+ RAID enclosure and fitted it with 4x500GB in a RAID5 setup.

I've bought this because it's about time I started implementing a decent backup solution. Up to now I've been either backing up by copying to external disks, or to a RAID 1 on an old desktop.

Both solutions are only half as practical. The external disks on themselves can crash, while the desktop takes up a lot more space and noise, an issue for me since I don't have a basement to hide things in :)

Over time I've also acquired more and more machines, which started making backing up things a little more complex than they should be. So, the ReadyNAS now fulfills the role of a central file server, containing all my work-related data. Each machine still has it's Temp folder where I drop junk in of course, but if something is deemed useful, I give it a nice spot on the RAID.

Now, documents, pictures, drives, etc. are one thing, and were very easy to get on the RAID, drag and drop in Explorer, FTP over with FlashFXP, use WebDAV, it all works. But for source code however, I have no real ambition to develop on a remote copy of my source, not only that, but I'm spoiled by the benefits of version control that I don't want to go back to one single copy.

Solution? The ReadyNAS runs Linux, I can SSH to it, and it has apt-get on it, with some outdated SVN sources however, so it has everything needed to just compile Subversion myself :)

I will not go in detail on how to create an actual repository, only on how to set up the server. In my case, I had an existing repository running on a Windows svn 1.6.0 machine which I wanted to port over. The svn book will explain in detail how to use svnadmin to create a repository.

My SVN install is only using svnserve as the server daemon, no Apache, no tunneling over SSH, as it will only run on my local LAN for now, if the need arises later, I'll revisit this article and post an update, but for now: YAGNI. I'm also using FSFS as a backing store, no BerkeleyDB.

P.S.: Shell commands are marked italic.

Starting Point
  • I have a share called 'data'.
  • I created 2 directory trees on there: /Compile (will contain the SVN sources) and /Servers/Subversion/Repositories (will contain my ported repositories)
Prerequisites
Preparation
  • SSH into your ReadyNAS and navigate to the folder you want to compile in. (/c/data/Compile in my case)
  • Get the latest subversion source: wget http://subversion.tigris.org/downloads/subversion-1.6.0.tar.gz
  • Extract it: tar -xvzf subversion-1.6.0.tar.gz
  • Get the latest APT sources: apt-get update
Setting up Dependencies

To compile SVN we need build tools (gcc, autoconf, libtool) and various third party libs. I'm getting these through apt-get.

I'm putting the commands here with the -s switch. This will not do anything, simply simulate what would happen, when you're confident, remove the -s and run it, and select Yes when it asks to go ahead.

Out of safety (paranoia?) I'm also doing apt-get clean after each install, don't need all the downloads lying around.

  • apt-get -s install gcc autoconf libtool
  • apt-get -s install libapr1-dev
  • apt-get -s install libaprutil1-dev
  • apt-get -s install sqlite
  • apt-get -s install zlib1g-dev
  • apt-get -s install libdb4.2-dev
  • apt-get -s install nano
  • apt-get clean
  • Fix a symbolic link: ln /usr/lib/libaprutil-1.so.0.2.7 /usr/lib/libaprutil-1.so -s -i (On my system the libaprutil-1.so pointed to a non-existing version? Which made the SVN compile crash)
Compiling SVN
  • Go to your extracted sources: cd /c/data/Compile/subversion-1.6.0
  • Configure the sources for compilation: ./configure --build=sparc-linux --without-neon --without-berkeley-db --without-ssl
  • Compile SVN: make
  • Install the compiled binaries: make install
Configuring SVN
  • Create or Copy over a repository, in my case I copied an existing repo over to /c/data/Servers/Subversion/Repositories
  • Add svn to service, if it isn't in there yet, wasn't for me: nano /etc/services svn 3690/tcp # Subversion svn 3690/udp # Subversion
  • Make inetd handle SVN requests: nano /etc/inetd.conf svn stream tcp nowait david /usr/local/bin/svnserve svnserve -i -r /c/data/Servers/Subversion/Repositories david is the user which the svnserve runs under, in my case also the owner of the share. You could always create a separate svn user and svn share and set it up like that. -r /c/data/Servers/Subversion/Repositories indicates the root path for the svnserve, this will correspond with the root level you expose to clients, restrictive is good.
  • Restart inetd: killall -HUP inetd
Using SVN

On your client, open up an SVN client, like TortoiseSVN and enter svn://yournas/yourrepo as url, and everything should work! :)

Congratulations, you can now sleep at night again, knowing your source code is version controlled and stored on a RAID.


Right after I posted my previous post I noticed the Svn 1-Click Setup is running hopelessly behind in SVN versions.

Their default download link is still using SVN 1.3.2 and the latest link on the download page is only at 1.4.2, and both also have an old TortoiseSVN.

That'll teach me to try out an "all-in-one" package!

Let's just build everything with official binaries from now on, and get our source control upgraded to SVN 1.6.0, without losing any data. (Since I've already checked in quite a bit in my repository)

First of all, let's get rid of the old junk!

Take a copy of your repo folder as a backup, safety first.

  • Uninstall the 1-Click Setup through Add and Remove Programs
  • Go to Services and stop the service.
  • Open a command prompt and type sc delete SVNService
  • Throw away any files left in the directory.

Time to get the good stuff in, download the latest version from subversion.tigris.org, I grabbed svn-win32-1.6.0.zip

On my machine, I have my source control layout as follows:

  • C:\Servers
  • C:\Servers\Subversion
  • C:\Servers\Subversion\Server
  • C:\Servers\Subversion\Repositories
  • C:\Servers\Subversion\Repositories\Cumps

Unzip SVN 1.6.0 to the Server directory and add the bin directory to your PATH, to make future administration easier.

Copy the content of the repo you backed up to the new folder. You should end up with conf, dav, db, hooks, locks, format and README.txt in your new repository folder.

Open up a prompt and type svnadmin upgrade C:\Servers\Subversion\Repositories\Cumps, replace the last directory with your repository name. This will upgrade the repository layout to the latest. If you open up the format file in a text editor, it will say 5 as the version number.

Run the following command to create a new windows service for svn:

 
sc create SVN binpath= "C:\Servers\Subversion\Server\bin\svnserve.exe --service -r C:\Servers\Subversion\Repositories" displayname= "Subversion" depend= Tcpip start= auto

Pay attention to the single space after the equal signs!

At this point you can type NET START Svn and everything is working back as before, except you're on SVN 1.6.0 now, without any dependencies on installers and future upgrades will be a lot easier.

In the future we might upgrade this to work together with Apache too, when the need arises. Since I'm in my own private LAN, svnserve is perfectly fine, and I'm following the YAGNI (You Ain't Gonna Need It) Principle for this series.