A long time ago, I used PGP for signing my email, but I stopped using it. Probably because I didn't quite get the concept yet, but that has changed now.

Today I switched to GPG for signing my mail and files, with all the required files running from my memory stick.

One thing bothered me however, no Outlook 2007 support at all. There are some plugins around for older Outlook versions, but that didn't quite work out.

So I decided to develop my own! And after a few weeks of development and testing, it's done and ready to be set free upon the world.

Let's have a look at the functionality and how to set it up and use it.

Prerequisites

First of all, a working copy of GPG is required, so visit the GnuPG download page, scroll down and download the command line Windows version.

Install this somewhere on your machine and remember the path where you installed it.

If everything has gone correctly, you can now open a command prompt and type gpg --version and gpg --list-keys to see the version and your keys (which would be empty if you're using it for the first time).

Visit the Getting Started section of the GnuPG handbook to generate your own key if this is your first encounter.

Command Line Interface

OutlookGnuPG

There are two main areas in the plugin, functionality for sending a mail (sign/encrypt) and for retrieving a mail (verify/decrypt).

At the moment only plain text emails are supported. No HTML mail or attachments, that's for a future version :)

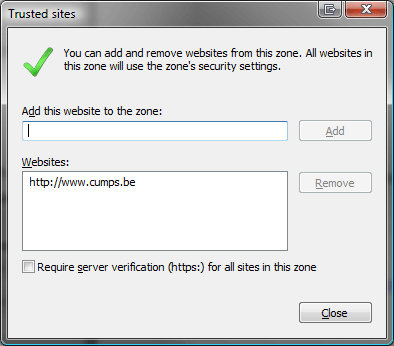
To install the addin, start by adding www.cumps.be to your Trusted Sites (you can do this in Internet Explorer - Tools - Internet Options - Security - Trusted Sites - Sites).

Trusted Sites

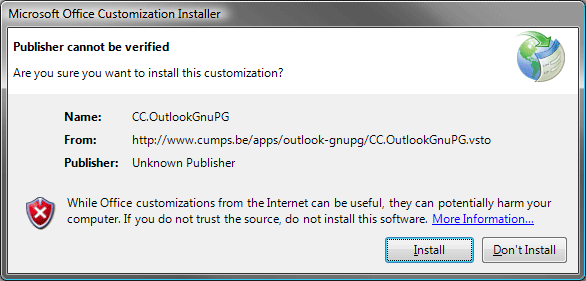
Download the OutlookGnuPG ClickOnce installer and execute it. (See Update 1 and 2 below)

This will give you a prompt asking you if everything is fine. Go ahead and install it. You might have to close Outlook before installing.

ClickOnce Installer

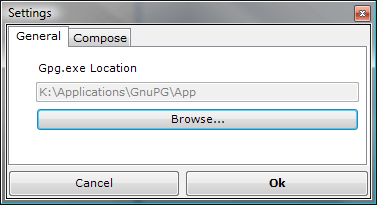
When the addin is installed, you can open Outlook and a Settings dialog will show up. Click Browse... and select the directory where your the gpg.exe you previously installed is located.

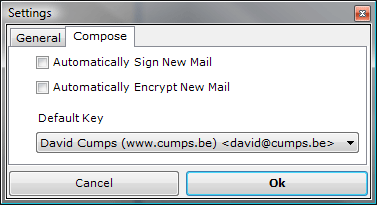
On the second tab you can select the default key you want to use to sign your mails. You will still have a choice to change your key upon sending the actual mail.

GnuPg Location

Default Key

Click Ok when done. At this point you can use your Outlook as before, since we haven't checked any auto-sign/encrypt functionality.

Sending Mail

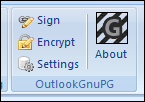
When you compose a new mail, you will notice the Message ribbon has a new group on it, called OutlookGnuPG, with a Sign and Encrypt toggle button.

Compose Ribbon

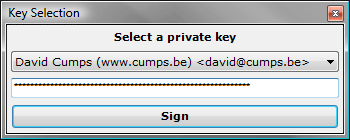
Sending out a signed mail is as simply as turning on the Sign button, typing your mail and pressing Send. It will prompt you to select the private key you want to use to sign the mail, and your passphrase.

Passphrase Window

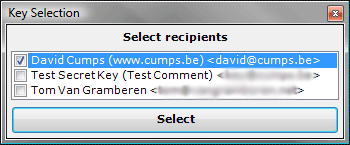
Creating an encrypted mail follows the same logic, toggle the Encrypt button and send your mail. You will have to select the intended recipients (multiple are possible) and it will encrypt the mail so only these people will be able to decrypt it.

Recipient Window

To be absolutely safe, you can toggle both Sign and Encrypt button to send out an encrypted signed message.

Retrieving Mail

Reading mail can be done in two ways in Outlook, either by opening the mail item, or by using the preview pane. It only makes sense there are two ways to verify/decrypt a mail as well then.

The first is very identical to the send functionality. When you open an existing mail, you will notice a new ribbon group, OutlookGnuPG, with a Verify and Decrypt button.

Read Ribbon

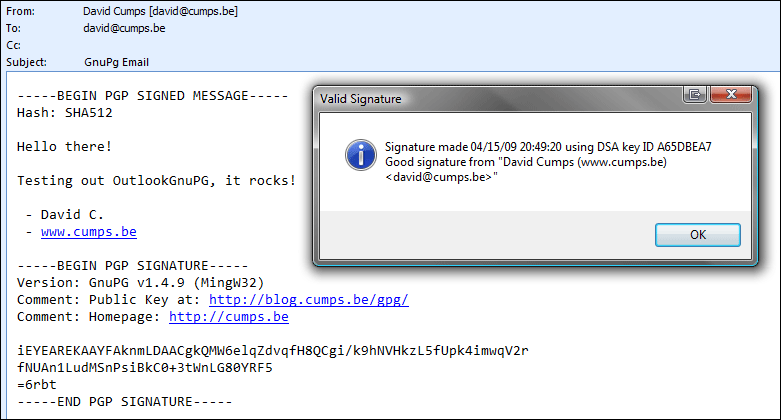
Simply click Verify to check if a signed mail is valid or not. A messagebox will inform you of the status.

Valid Signature

Likewise, click Decrypt to decrypt an encrypted email. This will ask you for your private key to decrypt the message with. The message will be decrypted, and the decrypted content will be placed in the message. If the message was also signed, a messagebox will inform you of the status.

The second way is through the preview window. A new commandbar will have appeared on the preview window, with a Verify and Decrypt button, which work exactly the same as the previous buttons.

CommandBar

Credits

OutlookGnuPG is free, only supported by a donate button, so it's only fair to give the used resources some credits.

Silk Icon Set by Mark James OpenPGP wrapper by Starksoft Clipboard Wrapper by Alessio Deiana

AboutBox

Feedback

Got questions? Remarks? Feel free to leave a comment :)

Update: Since I won't have the time to maintain this, I'm releasing the source: cc.outlookgnupg-1.0.8.0.zip

Update 2: Philippe Teuwen and Thierry Walrant have taken it upon themselves to improve the code I posted above and made it available on github, using GPLv3 as a license. Check it out at: github.com/twalrant/OutlookGnuPG


I just downloaded the ASP.NET MVC Preview 5 bits from Codeplex and started on my first experiment.

One of the first things I did was to modify the default AccountController to use the new Form Posting and Form Validation features of the Preview 5, somebody probably overlooked updating those :)

If anyone else wants the reworked code, feel free to copy paste.

Note this was something done during lunch break in a hurry, it seems to all work logically, but it's possible I'll have to tune it a bit later on.

Controller:

 
[HandleError]
[OutputCache(Location = OutputCacheLocation.None)]
public class AccountController : Controller
{
    public AccountController()
        : this(null, null)
    {
    }

    public AccountController(IFormsAuthentication formsAuth, MembershipProvider provider)
    {
        FormsAuth = formsAuth ?? new FormsAuthenticationWrapper();
        Provider = provider ?? Membership.Provider;
    }

    public IFormsAuthentication FormsAuth
    {
        get;
        private set;
    }

    public MembershipProvider Provider
    {
        get;
        private set;
    }

    [Authorize]
    [AcceptVerbs("GET")]
    public ActionResult ChangePassword()
    {
        ViewData["Title"] = "Change Password";
        ViewData["PasswordLength"] = Provider.MinRequiredPasswordLength;

        return View();
    }

    [Authorize]
    [AcceptVerbs("POST")]
    public ActionResult ChangePassword(string currentPassword, string newPassword, string confirmPassword)
    {
        // Basic parameter validation
        if (String.IsNullOrEmpty(currentPassword))
        {
            ViewData.ModelState.AddModelError("currentPassword", currentPassword, "You must specify a current password.");
        }
        if (newPassword == null || newPassword.Length < Provider.MinRequiredPasswordLength)
        {
            ViewData.ModelState.AddModelError("newPassword", newPassword, String.Format(CultureInfo.InvariantCulture,
                     "You must specify a new password of {0} or more characters.",
                     Provider.MinRequiredPasswordLength));
        }
        if (!String.Equals(newPassword, confirmPassword, StringComparison.Ordinal))
        {
            ViewData.ModelState.AddModelError("newPassword", newPassword, "The new password and confirmation password do not match.");
        }

        if (ViewData.ModelState.IsValid)
        {
            // Attempt to change password
            MembershipUser currentUser = Provider.GetUser(User.Identity.Name, true /* userIsOnline */);
            bool changeSuccessful = false;
            try
            {
                changeSuccessful = currentUser.ChangePassword(currentPassword, newPassword);
            }
            catch
            {
                // An exception is thrown if the new password does not meet the provider's requirements
            }

            if (changeSuccessful)
            {
                return RedirectToAction("ChangePasswordSuccess");
            }
            else
            {
                ViewData.ModelState.AddModelError("password", currentPassword, "The current password is incorrect or the new password is invalid.");
            }
        }

        // If we got this far, something failed, redisplay form
        ViewData["Title"] = "Change Password";
        ViewData["PasswordLength"] = Provider.MinRequiredPasswordLength;

        return View();
    }

    public ActionResult ChangePasswordSuccess()
    {
        ViewData["Title"] = "Change Password";

        return View();
    }

    [AcceptVerbs("GET")]
    public ActionResult Login()
    {
        ViewData["Title"] = "Login";
        ViewData["CurrentPage"] = "login";

        return View();
    }

    [AcceptVerbs("POST")]
    public ActionResult Login(string username, string password, bool? rememberMe)
    {
        // Basic parameter validation
        if (String.IsNullOrEmpty(username))
        {
            ViewData.ModelState.AddModelError("username", username, "You must specify a username.");
        }

        if (ViewData.ModelState.IsValid)
        {
            // Attempt to login
            bool loginSuccessful = Provider.ValidateUser(username, password);

            if (loginSuccessful)
            {
                FormsAuth.SetAuthCookie(username, rememberMe ?? false);
                return RedirectToAction("Index", "Home");
            }
            else
            {
                ViewData.ModelState.AddModelError("*", username, "The username or password provided is incorrect.");
            }
        }

        // If we got this far, something failed, redisplay form
        ViewData["Title"] = "Login";
        ViewData["CurrentPage"] = "login";
        ViewData["username"] = username;

        return View();
    }

    public ActionResult Logout()
    {
        FormsAuth.SignOut();
        return RedirectToAction("Index", "Home");
    }

    protected override void OnActionExecuting(ActionExecutingContext filterContext)
    {
        if (filterContext.HttpContext.User.Identity is WindowsIdentity)
        {
            throw new InvalidOperationException("Windows authentication is not supported.");
        }
    }

    [AcceptVerbs("GET")]
    public ActionResult Register()
    {
        ViewData["Title"] = "Register";
        ViewData["PasswordLength"] = Provider.MinRequiredPasswordLength;

        return View();
    }

    [AcceptVerbs("POST")]
    public ActionResult Register(string username, string email, string password, string confirmPassword)
    {
        // Basic parameter validation
        if (String.IsNullOrEmpty(username))
        {
            ViewData.ModelState.AddModelError("username", username, "You must specify a username.");
        }

        if (String.IsNullOrEmpty(email))
        {
            ViewData.ModelState.AddModelError("email", email, "You must specify an email address.");
        }

        if (password == null || password.Length < Provider.MinRequiredPasswordLength)
        {
            ViewData.ModelState.AddModelError("password", password, String.Format(CultureInfo.InvariantCulture,
                     "You must specify a password of {0} or more characters.",
                     Provider.MinRequiredPasswordLength));
        }

        if (!String.Equals(password, confirmPassword, StringComparison.Ordinal))
        {
            ViewData.ModelState.AddModelError("confirmPassword", confirmPassword, "The password and confirmation do not match.");
        }

        if (ViewData.ModelState.IsValid)
        {

            // Attempt to register the user
            MembershipCreateStatus createStatus;
            MembershipUser newUser = Provider.CreateUser(username, password, email, null, null, true, null, out createStatus);

            if (newUser != null)
            {
                FormsAuth.SetAuthCookie(username, false /* createPersistentCookie */);
                return RedirectToAction("Index", "Home");
            }
            else
            {
                ViewData.ModelState.AddModelError("*", username, ErrorCodeToString(createStatus));
            }
        }

        // If we got this far, something failed, redisplay form
        ViewData["Title"] = "Register";
        ViewData["PasswordLength"] = Provider.MinRequiredPasswordLength;
        ViewData["username"] = username;
        ViewData["email"] = email;

        return View();
    }

    public static string ErrorCodeToString(MembershipCreateStatus createStatus)
    {
        // See http://msdn.microsoft.com/en-us/library/system.web.security.membershipcreatestatus.aspx for
        // a full list of status codes.
        switch (createStatus)
        {
            case MembershipCreateStatus.DuplicateUserName:
                return "Username already exists. Please enter a different user name.";

            case MembershipCreateStatus.DuplicateEmail:
                return "A username for that e-mail address already exists. Please enter a different e-mail address.";

            case MembershipCreateStatus.InvalidPassword:
                return "The password provided is invalid. Please enter a valid password value.";

            case MembershipCreateStatus.InvalidEmail:
                return "The e-mail address provided is invalid. Please check the value and try again.";

            case MembershipCreateStatus.InvalidAnswer:
                return "The password retrieval answer provided is invalid. Please check the value and try again.";

            case MembershipCreateStatus.InvalidQuestion:
                return "The password retrieval question provided is invalid. Please check the value and try again.";

            case MembershipCreateStatus.InvalidUserName:
                return "The user name provided is invalid. Please check the value and try again.";

            case MembershipCreateStatus.ProviderError:
                return "The authentication provider returned an error. Please verify your entry and try again. If the problem persists, please contact your system administrator.";

            case MembershipCreateStatus.UserRejected:
                return "The user creation request has been canceled. Please verify your entry and try again. If the problem persists, please contact your system administrator.";

            default:
                return "An unknown error occurred. Please verify your entry and try again. If the problem persists, please contact your system administrator.";
        }
    }
}

// The FormsAuthentication type is sealed and contains static members, so it is difficult to
// unit test code that calls its members. The interface and helper class below demonstrate
// how to create an abstract wrapper around such a type in order to make the AccountController
// code unit testable.

public interface IFormsAuthentication
{
    void SetAuthCookie(string userName, bool createPersistentCookie);
    void SignOut();
}

public class FormsAuthenticationWrapper : IFormsAuthentication
{
    public void SetAuthCookie(string userName, bool createPersistentCookie)
    {
        FormsAuthentication.SetAuthCookie(userName, createPersistentCookie);
    }
    public void SignOut()
    {
        FormsAuthentication.SignOut();
    }
}

Login View:

 
<%@ Page Language="C#" MasterPageFile="~/Views/Shared/Site.Master" AutoEventWireup="true" CodeBehind="Login.aspx.cs" Inherits="GuildSite.Views.Account.Login" %>


Login

Please enter your username and password below. If you don't have an account, please <%= Html.ActionLink("register", "Register") %>.

<%= Html.ValidationSummary()%>
">
Username: <%= Html.TextBox("username") %>
Password: <%= Html.Password("password") %>
Remember me?

Register View:

 
<%@ Page Language="C#" MasterPageFile="~/Views/Shared/Site.Master" AutoEventWireup="true" CodeBehind="Register.aspx.cs" Inherits="GuildSite.Views.Account.Register" %>


Account Creation

Use the form below to create a new account.

Passwords are required to be a minimum of <%=Html.Encode(ViewData["PasswordLength"])%> characters in length.

<%= Html.ValidationSummary()%>
">
Username: <%= Html.TextBox("username") %>
Email: <%= Html.TextBox("email") %>
Password: <%= Html.Password("password") %>
Confirm password: <%= Html.Password("confirmPassword") %>
 

Since I started playing World of Warcraft again, I've taken a bit more of a developer approach to it this time, and after founding a little casual guild, I decided to create a site for it.

However, I'm a lazy developer, I don't intend to update the site regularly whenever someone joins or leaves the guild.

Also because I'm quite geeky when it comes to statistics, and a bit of a theory crafter, I planned to populate our guild site with lots of stats.

Where else would be a better place to get them from then the Armory? It contains everything I want!

After searching a little, I found various libraries for PHP, Perl and Ruby, but nothing for the .NET world. At least nothing that fetches everything I wanted, like Reputation and Skills.

So, I decided to just write it myself! :)

Over the last week, I've been developing ArmoryLib, and decided to release it under the LGPL and use Google Code to store the source in.

You can find version 0.1 at http://code.google.com/p/armorylib/ under Downloads.

Have a look at the Documentation to see more details on the API and some example output.

Please, feel free to beta test it and leave your comments! Let me know when you use it for your projects, and remember... LGPL requires you give prominent notice about using the library! (A link to this post will do)

I will make a future post showing how I've used it to integrate into our guild website.


Welcome back for another episode in the pattern series! This will also be the last article about Design Patterns, since I've finished reading the Head First Design Patterns book :)

It's been a very interesting journey, lots of new patterns learned, lots of knowledge gained, and now it's time to apply them in real projects.

As a summary, the overview of all articles about patterns, including the one we're going to see today:

Let's get started! Make sure you're seated comfortable, it's going to be a long one today!

The definiton, as usual: "Provide a surrogate or placeholder for another object to control access to it."

A new request popped up, we need to add in a multiplayer option in our game, featuring a Lobby where users can get in touch with each other.

This lobby is going to be running on another machine, or in our case, just another console application to illustrate it.

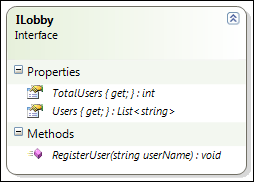
First of all, we're going to start by adding an interface ILobby to define our lobby.

ILobby Interface

We'll place this interface in a seperate library, to better illustrate the Proxy Pattern later on. This way you can clearly see on which machine a specific piece of code is located.

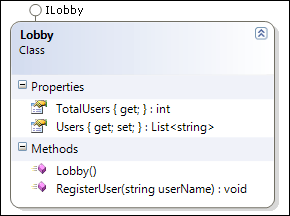
Time to create our actual Lobby implementation!

As mentioned before, we will create this in a seperate project to clearly show the code for the Lobby is not located on the same machine as our main client.

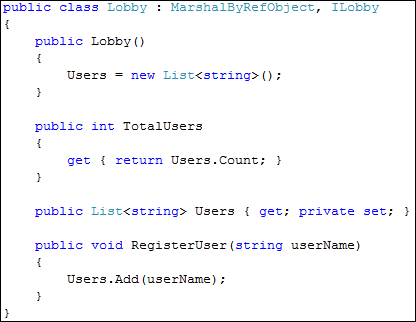
Lobby Implementation

A very simple Lobby implementation, containing nothing more than a List<string> of Users.

At this stage, we can have our Lobby on one machine, but how do we add users to it from another machine?

This is where the Proxy Pattern comes looking!

Just to make one thing clear, the Proxy pattern comes in many different shapes, we're using it to give a client access to a remote object, by means of a placeholder, reminds you of the definition, doesn't it?

In our case, it's called a 'remote proxy', there is also a 'virtual proxy', a 'protection proxy' and more.

A virtual proxy can for example serve as a placeholder for an object which is expensive to create, if you want to retrieve an image over the internet, you could display an icon via a proxy while the real image is loading in the background.

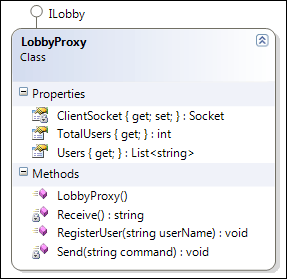
So, let's create this placeholder on the client side.

LobbyProxy Implementation

By placing a reference to our previously created ILobby, this proxy allows our client to work with, what it believes to be, a real lobby object.

In reality however, their is no Lobby implementation in our client code at all, it is merely a placeholder which implements the correct interface.

You might have noticed the notion of a Socket already :)

Our proxy object might implement the correct ILobby interface, if we want it working, we will eventually need to call our real Lobby object.

In a first step this is done using sockets to connect to the server and communicate with the real object.

Before you go screaming .NET Remoting, hold your horses! This is meant to illustrate what is going on behind the scenes with a remote proxy.

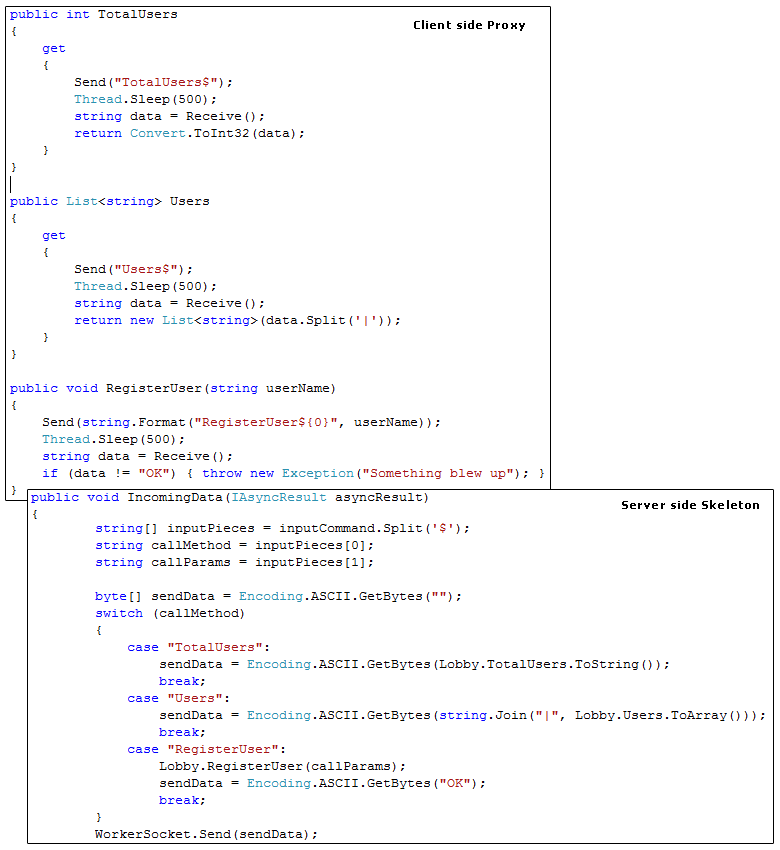
When you're coming from the Java world, you might have heard people mentioning a Skeleton.

This is not something creepy, but simply a class on the server side which intercepts call from the Proxy, talks to the real object and sends the results back.

Here's a small part of our Skeleton code:

Proxy and Skeleton Code

As you can see, the Proxy talks to the Skeleton, which talks to the Real Object, after which it sends the response back over the wire.

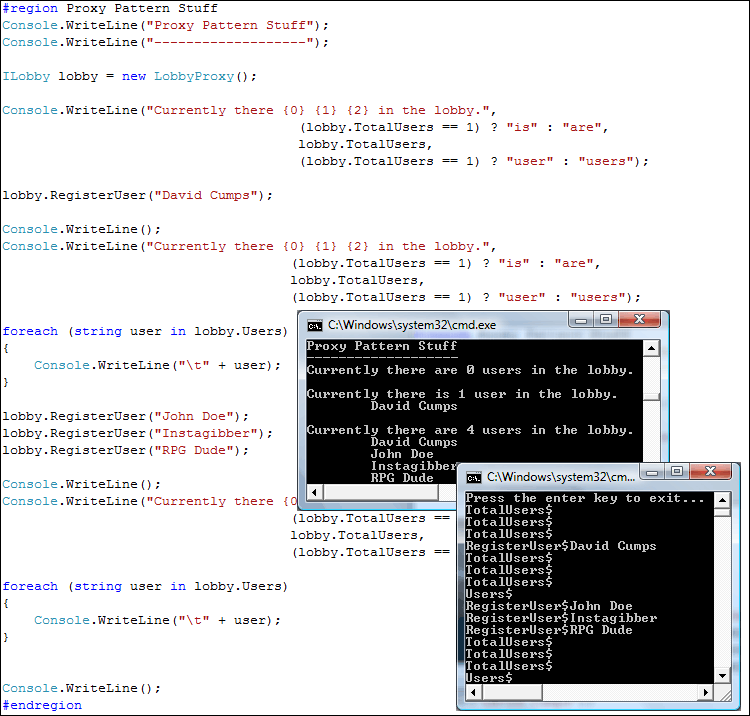
When we put all of this in action, we see the following happening:

Testing Proxy Pattern

Our main client talked to a remote Lobby and registered some users, great!

Now that we've seen how a proxy serves as a placeholder, it's time to clean this code and get rid of all the socket stuff.

Just a note, all the socket stuff in the project is highly unstable and not meant for production! Don't use it!! It's only meant for demo purposes :)

Let's work on the server side first by removing the Skeleton code, referencing System.Runtime.Remoting, and letting our Lobby class inherit MarshalByRefObject.

Lobby Remoting Implementation

Last step needed for our server is to expose the Lobby object through Remoting, which is nothing more than having something like our previous Skeleton code hidden behind the scenes.

Exposing Lobby Remoting

The only thing left to do now is to remove the Proxy class from our main project, and use Remoting to get an instance of ILobby, which acts as a proxy behind the scenes.

Utilizing Remoting Proxy

Resulting output when we run this version? Exactly the same! But a lot less work to implement :)

And that's it, another pattern in our heads!

I've uploaded the solution again to have a look at. When you run it, make sure your run the GameServer first, unblock it on your Windows Firewall, and then run the Proxy project.

Well, that's it, the last part of my series. I hope you liked them and learned a lot from it. Be sure to keep on visiting for some other tech subjects coming up soon.

You can always subscribe to the RSS feed to stay informed.

Thanks to the people who were generous enough to donate a little bit after reading some of these articles! (If you'd like to donate, simply use the PayPal button on the left :))

See you soon!

Some additional information on the Proxy Pattern:


It's been a while again, but it's time for another pattern. Today we'll look at the State Pattern.

First of all, the definition: "Allow an object to alter its behavior when its internal state changes. The object will appear to change its class."

An additional request has surfaced today, we need to keep track if a unit is alive or dead and let it respond differently based on the state it is in.

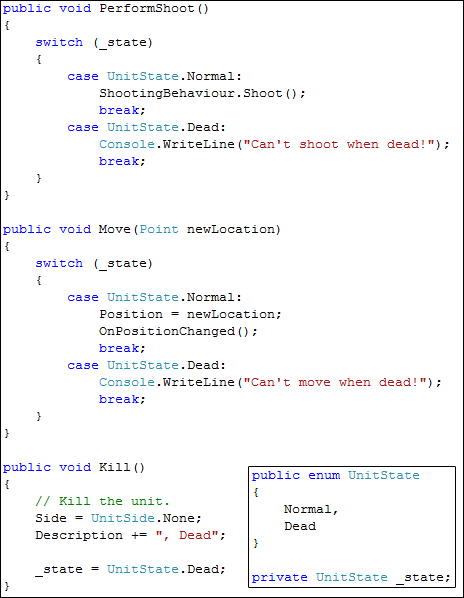
Initially we solved this by introducing a new enum called UnitState and adding lots of switch() statements to our code.

Initial State Implementation

In the long run however, this would mean we have to keep on going into those statements whenever a new state needs to get added, which isn't exactly following the Open/Closed Principle we talked about.

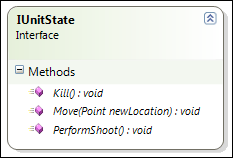
Let's refactor this and introduce a new interface called IUnitState.

State Interface

Instead of using an enum, we're going to introduce two new classes, which implement IUnitState to represent our different states.

Concrete States

By seperating the logic for different states in different classes, we can add a new state easily, by simply creating a new class, and we keep our code base structured.

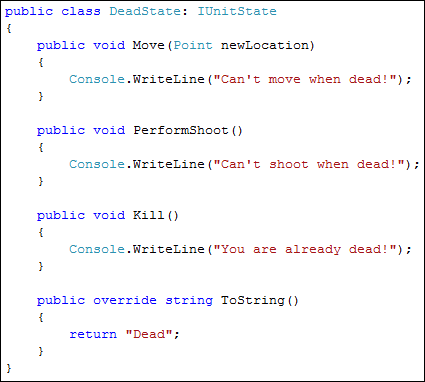
For example, the most simple state looks like this:

State Implementation

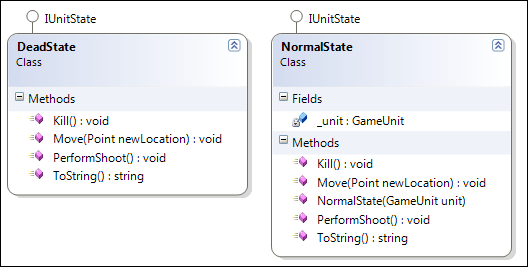
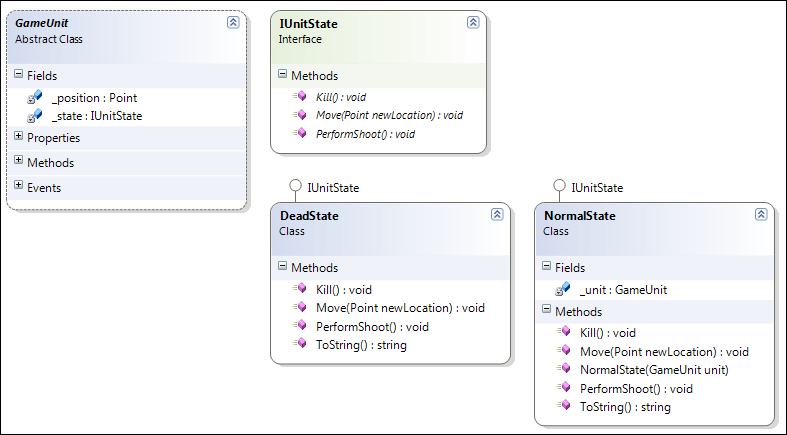
When we pull all of this together we get the following class diagram, illustrating two concrete states and the state interface.

State Pattern Class Diagram

To the outside, whenever the internal state changes, it looks like the object, GameUnit, changed it's type because a different concrete state is providing an implementation for the actions.

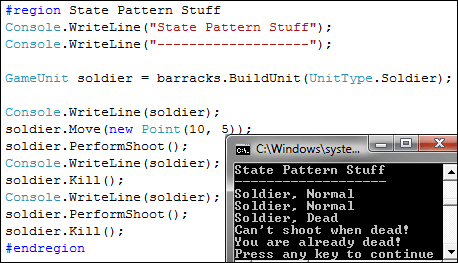
When we test this code, we can see the behaviour of internal state changing after the first Kill() command.

State Pattern Class Diagram

I realize this isn't the best example given to illustrate the State Pattern, I'm not quite that happy with it, stretching the game example like that, sometimes it works out, sometimes it feels a little forced, like today. I hope it made sense, be sure to check out the sites below for some other examples as well.

I've uploaded the solution again so you can have a look.

Some additional information on the State Pattern:


It's been a little while again. I blame myself for installing World Of Warcraft again, too addictive.

Anyway, time for the Composite Pattern. This is one I'm having a little trouble with to describe clearly.

Let's start with the definition: "Compose objects into tree structures to represent part-whole hierarchies. Composite lets clients treat individual objects and compositions of objects uniformly."

The easiest way to understand this pattern is the notion of the tree structure in the definition, if you can make a tree in code, you can apply this pattern :)

An additional requirement has popped up for our game yesterday. We used to only have TacticalMoves, but now it's needed to have those defined in a more granular way, where one move might exist out of several submoves.

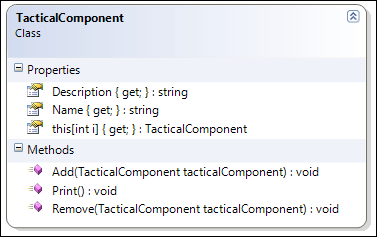
First of all, we define a new class, called TacticalComponent, which will serve as a base class for our TacticalMove and the new type we'll introduce.

Composite Pattern Component

As you can see, this class consists mainly out of two parts, the properties to hold some game-specific information and additional methods to deal with the new feature request of having submoves, which are nothing more then children.

This TacticalComponent is an abstract class, where each method and property throws an exception, and only defines them as virtual instead of abstract.

By doing this, we give the subclasses the choice which methods and properties they are going to override.

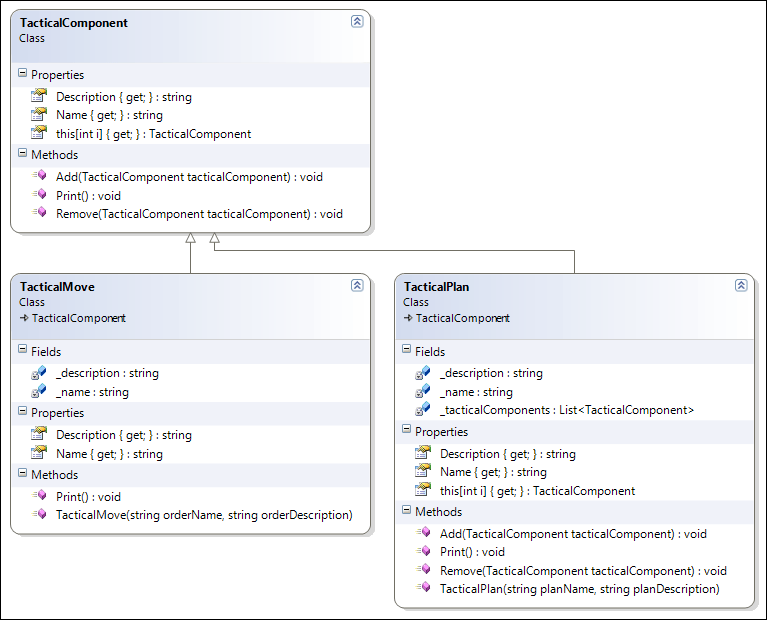
Composite Pattern Class Diagram

In our case both classes implement Description and Name, but only TacticalPlan implements the parent-child logic.

The nice part of all of this is, you have already encountered this pattern, for example when working in Windows Forms, where components are Controls and the Print method is used to render a control.

No matter which control you ask to render, it will render itself and all its children, without you having to walk the tree.

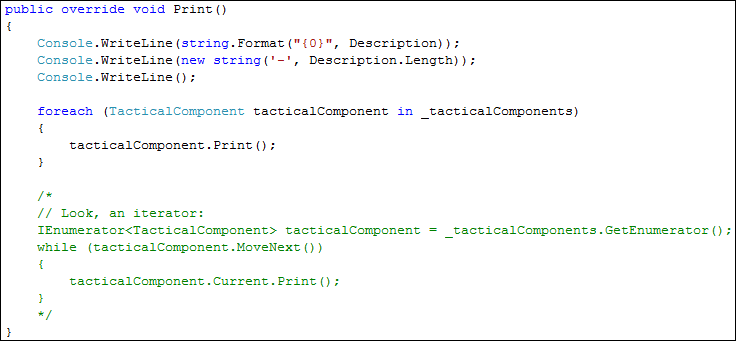
Likewise in our TacticalPlan, the Print method displays itself along with all its children.

Print

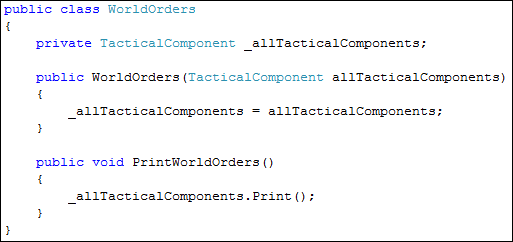
Having introduced these two new classes, we can now rewrite our WorldOrders class to only accept one TacticalComponent, and treat it as a whole.

Rewritten WorldOrders class

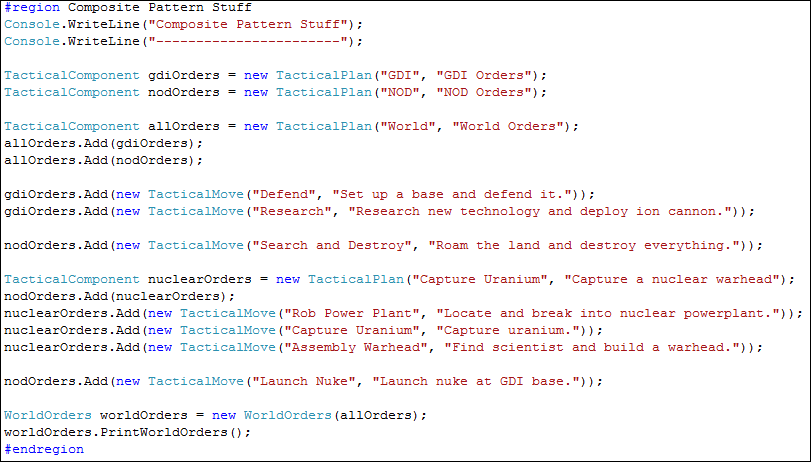
The test code to illustrate this now composes the tree as follows:

Test Code

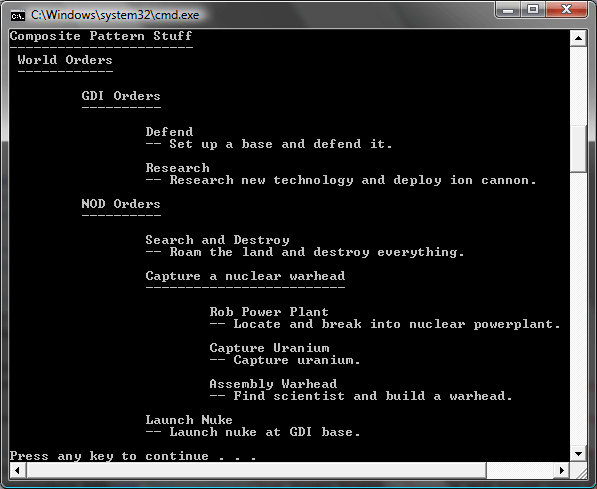
Resulting in the following orders:

Testing Composite Pattern

I've uploaded the solution again. This was one of the more difficult patterns to explain so far, so don't be too hard on me :)

Some additional information on the Composite Pattern:


Time for the next part in our series, the Iterator Pattern.

Let's start with the definition: "Provide a way to access the elements of an aggregate object sequentially without exposing its underlying representation."

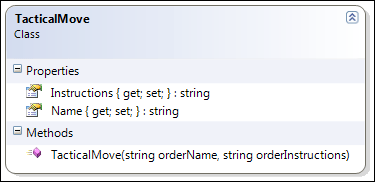
Recently, we have received a request to add the notion of orders to our game. To this end, we created a new class, called TacticalMove which represents an order.

TacticalMove Class

We have asked two of our junior developers to create a class for each faction which contains all orders for a given faction.

After a while, they came up with the following implementations:

EVA and LEGION Classes

As you can see, our developers both took a different approach to the problem.

One developer used a List to store the orders, while the other stored them in a fixed-size array.

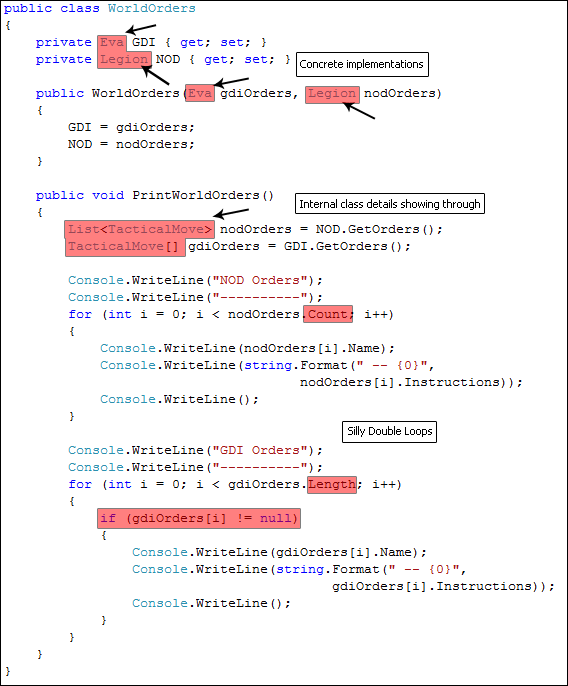
If we want to create a WorldOrders class, which is able to display all orders of both factions, it would look a bit like this:

Initial WorldOrders Class

As you notice from the red colors, this initial approach has quite a few flaws.

First of all, we are programming against concrete implementations again, Eva and Legion.

We are also showing the internals of our classes to the outside world, since we have both collection representations showing.

And lastly, because we are pushing our internal storage through, we have two different kind of loops to display them. (Forget the foreach operator exists for a moment)

Let's fix this last part by introducing a new interface, called Iterator which has a HasNext() and Next() method, designed to iterate over a collection.

When we have this interface, we need to create two new iterators for each implementation, one holding a List internally, while the other is storing the array.

Iterator Implementations

The only thing we need to change to our Eva and Legion class now is to remove the GetOrders() method and replace it by the GetIterator() method.

GetIterator Methods

Having done this change, allows us to go back to the WorldOrders and replace the two different loops by one identical loop.

Iterator Usage

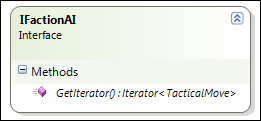
We still need to pull out the concrete Eva and Legion classes however. Let's do this by introducing a new interface, called IFactionAI.

IFactionAI

When we implement this new interface to our Eva and Legion classes, we have decoupled the WorldOrders class from them.

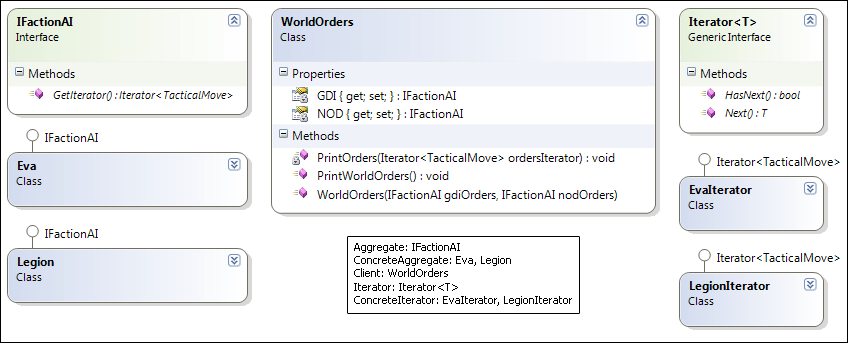
Taking a look at the class diagram, with the official names, we can now see WorldOrders is only working with Iterators and interfaces.

Iterator Pattern Class Diagram

And that's the Iterator Pattern in action!

But wait, just like the Observer Pattern, we can create it ourselves, or we can use some of the features from the .NET Framework!

Just like we used events earlier on, we can use IEnumerator and IEnumerable this time.

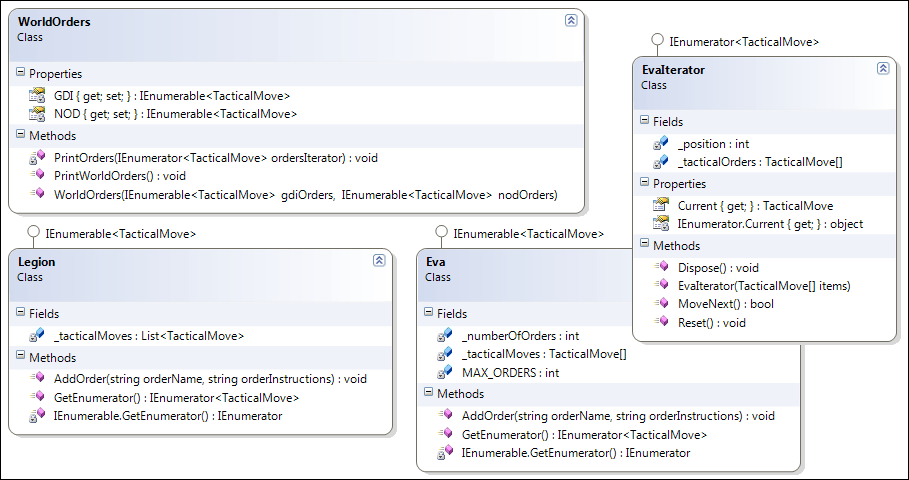
Refactoring our code to use these, results in the following classes remaining:

IEnumerable and IEnumerator

As you can see, there is no more LegionIterator either, since List provides a GetEnumerator method itself, which we simply call.

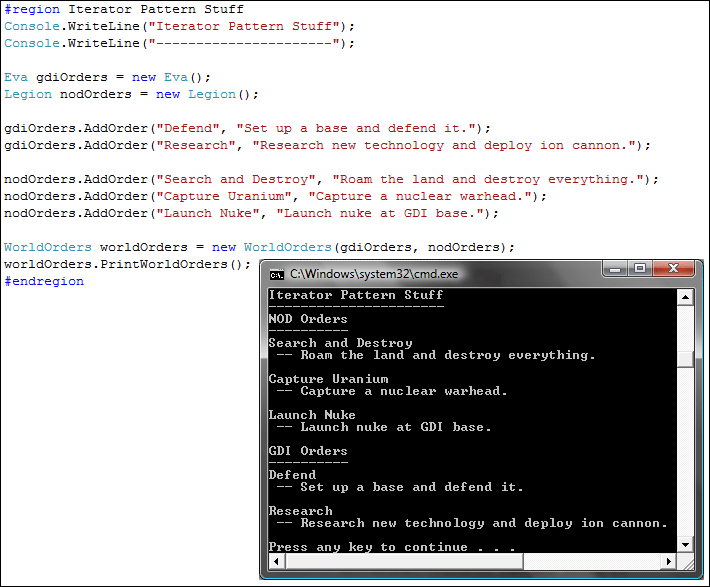
Time to test all this code we just wrote and try it out.

Testing IEnumerable and IEnumerator

I've uploaded the solution again. Since this was quite a long article, have a look at the code, I've placed the code for each step in seperate folders so you can compare the changes between steps.

Some additional information on the Iterator Pattern:


Time for yet another pattern, the Template Method Pattern. Have a look at all the other patterns in the series as well.

The definition: "Define the skeleton of an algorithm in an operation, deferring some steps to subclasses. Template Method lets subclasses redefine certain steps of an algorithm without changing the algorithm's structure."

Let's add an additional requirement to our game. We need different types of renderers for our GUI, the main screen is in 3D, while the map is displayed in 2D.

Both layouts follow a specific drawing order. First the background, then the units, on screen instructions, special effects and a border. If this order is wrong, it would be possible for the background to overlap the units, which we don't want.

We'll start by creating a new base class for our renderers, with some abstract methods which make up the algorithm of drawing the screen.

Base Class

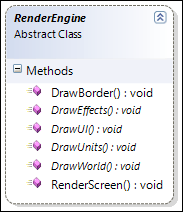
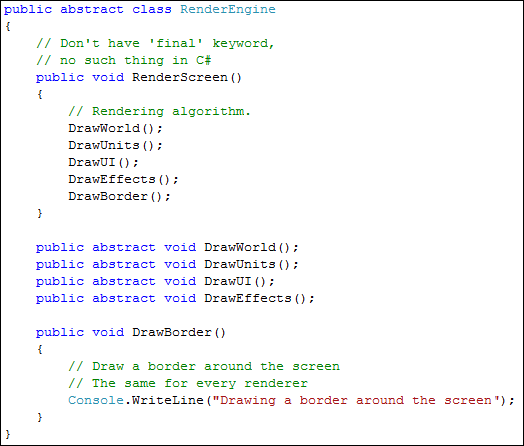
As you can see, there are two non-abstract methods. DrawBorder() which is common functionality for every render and RenderScreen() which is actually a Template Method.

The Template Method defines the steps used in the algorithm, without actually implementing the steps itself.

Template Method

As you can see from the comments, with the perfect implementation, RenderScreen() should be a method which can't be overridden by child classes. C# doesn't support this however.

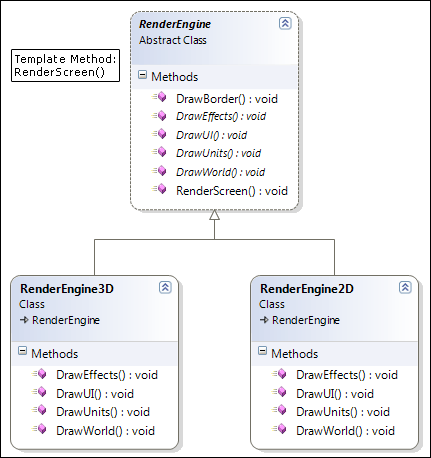
When we create our two renderers and have the discipline to not hide RenderScreen(), the class diagram for the Template Method Pattern looks like this:

Class Diagram Template Method Pattern

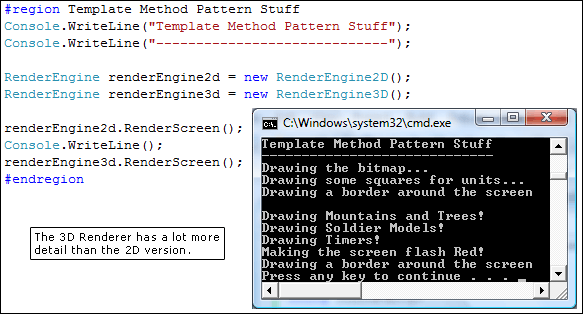
If we test this code, we notice that the order of rendering a screen is the same, but that each engine implements the steps differently, or not at all.

Testing Template Method Pattern

And that's the Template Method Pattern! I've uploaded the solution again to have a look at.

Some additional information on the Template Method Pattern:


Time for another, simple, design pattern. The Facade Pattern.

I'm going to need a break soon, getting a bit burned out, which never is a good thing.

Anyway, the definition of today's pattern: "Provide a unified interface to a set of interfaces in a subsystem. Facade defines a higher-level interface that makes the subsystem easier to use."

The hardest part of writing articles for this series isn't so much understanding the patterns itself, but coming up with examples with somewhat make sense in my gaming example. So, please forgive me if they sometimes are a bit far fetched, like today ;)

Let's say we have some complex subsystem which handles everything about storage. Some classes for our CD drive, some for our hard disk, memory and much more.

Complex Subsystem

If we need to load a new map, one way to do it would be to load up the cd, copy it to the hd, load it into memory and stop the cd from spinning.

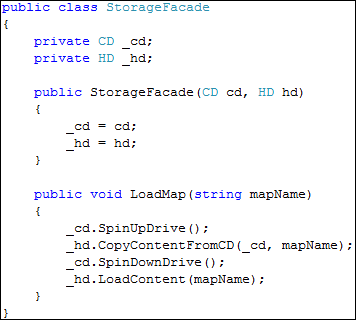
Or, we could also create a new class, which defines some more high-level operations such as LoadMap(), which takes care of dealing with the subsystem.

This way, our clients can use a simple interface, but if they really need to, can still go straight to the subsystem classes themselves, as opposed to the Adapter Pattern, where you only talked to the Adapter.

Facade Class

And that's it really, Facade and Adapter are very alike, and both very simple.

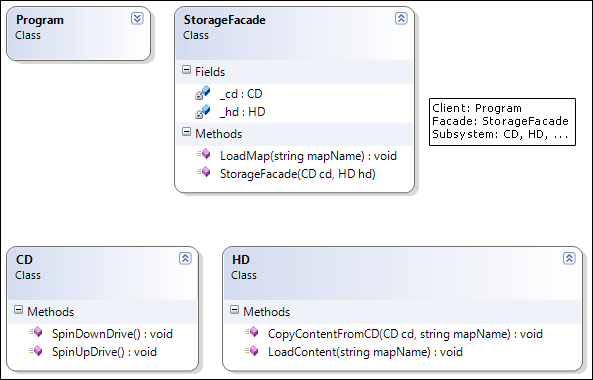
Let's have a look at the full diagram, and image the subsystem contains a lot more classes than I drew :)

Facade Pattern Class Diagram

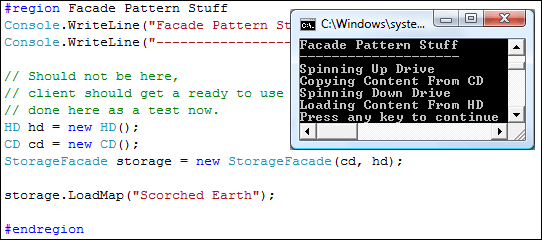
Time to test it and have our client use the StorageFacade directly, instead of the subsystem.

Testing Facade Pattern

I've uploaded the solution again, worth a look.

In my opinion, the Facade Pattern is a helper pattern to make your code easier to use and more user-friendly, other developers being the user.

Some additional information on the Facade Pattern:


We've seen quite a few patterns so far, and I'm glad so many people like them.

They turned out to be the most popular posts I've ever written when it comes to development. Thanks! :)

A little overview for the late joiners:

Today we'll have a look at the Adapter Pattern.

As usual, the definition: "Convert the interface of a class into another interface clients expect. Adapter lets classes work together that couldn't otherwise because of incompatible interfaces."

To continue on our little game, we received a third party library from another team, containing some buildings to include in our game.

The developers of this library didn't work with IBuildings however, but call it a Structure, making all of our code which interacts with IBuilding unusable.

If we look at the definition, we can see the Adapter Pattern is the perfect solution for this, since we need to convert the interface of the third party Structure into the IBuilding we expect, so that they can work together as if their interface was compatible.

Let's have a look on how their interface looks like first.

Third Party Library - Adaptee

There are some differences in the logic used in their implementation. We both have a Description, but the way we manage Power consumption is totally different.

Time to adapt their interface to the one we expect.

We'll do this by creating a new class, a so called adapter, which implements the IBuilding interface, since we expect that one, and which uses composition to encapsulate a Structure.

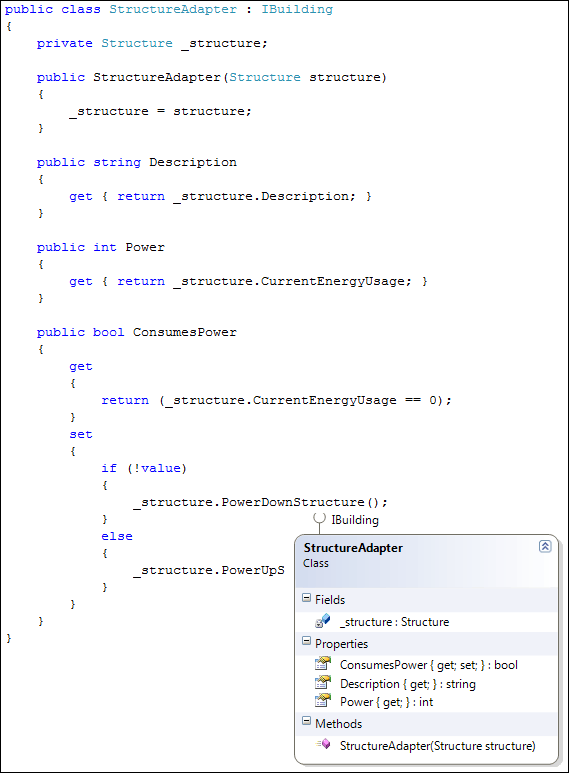
Adapter Class

As you can see, our Adapter is actually behaving as an IBuilding to the rest of our code, adapting the calls to our interface into the third party their interface.

And that's it really! The easiest way I remember this pattern is by thinking of electrical adapters, changing the socket from US to UK, or transforming the voltages.

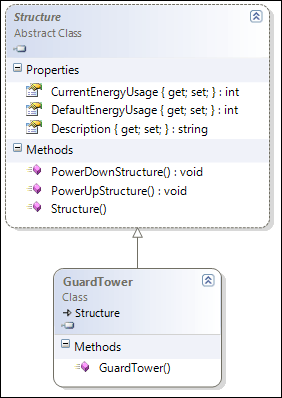
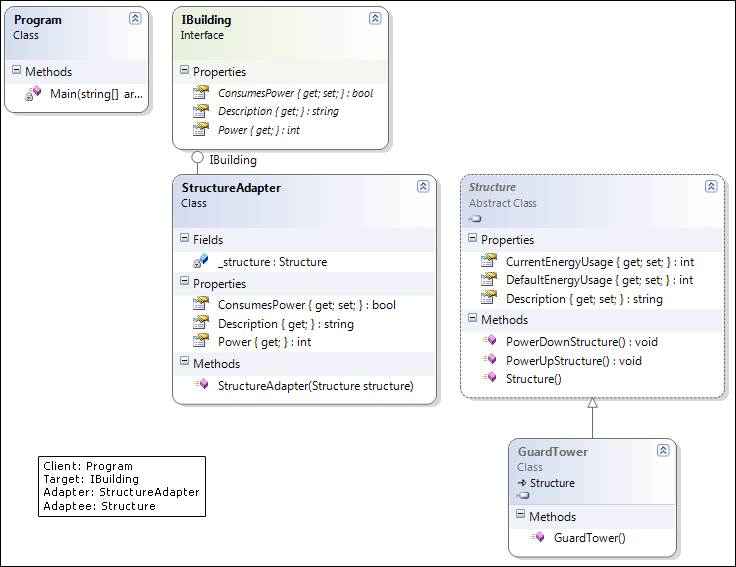
Time to have a look at the full diagram, with the official names written against it again:

Adapter Pattern Class Diagram

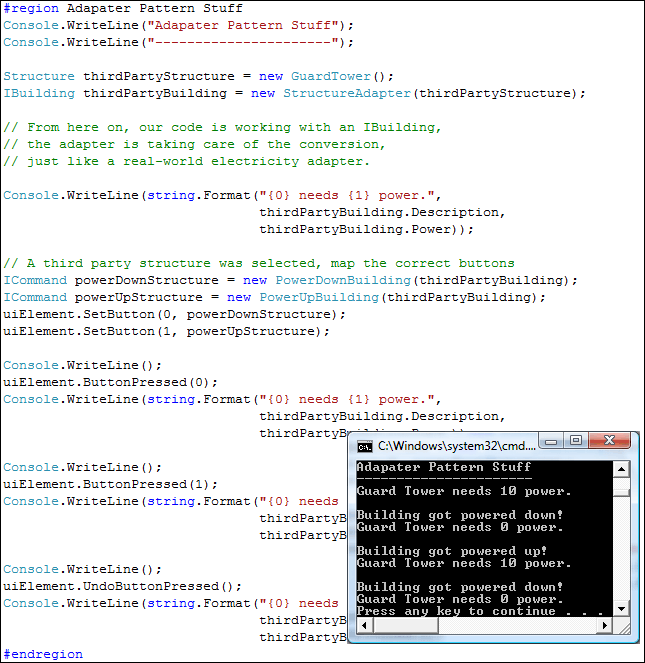
Let's also write some test code to see the Adapter Pattern in action.

Testing Adapter Pattern

We can re-use all of our existing code with the new Structures, since it's behaving like an IBuilding right now.

I've uploaded the solution again to have a look at.

Feel free to leave any feedback.

Some additional information on the Adapter Pattern:


What's a lonely geek to do late in the evening? Write about the Command Pattern of course...

Let's start with the definition: "Encapsulate a request as an object, thereby letting you parameterize clients with different requests, queue or log requests, and support undo-able operations."

And now, time for the spec I just made up: Our UI has three buttons at the bottom of the screen, which contain various actions. These actions are different depending on the selected item however. We need to implement this piece of UI code, without it having any knowledge of our game units.

How would we approach this? Let's say these buttons are nothing more than placeholders, to be filled with real buttons whenever a unit is selected. Our game engine will respond to a selected event and create and pass on the real buttons to our UI code.

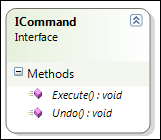
So, our UI code will only need to know about one thing, a button. Let's create an interface for this type of button, and coincidentally name it ICommand :)

Command Interface

We'll code our UI code against the ICommand, respecting to program against an interface and not an implementation.

At the end, we'll need some real implementations as well however. So let's create some "buttons", which I'll call Commands from now on.

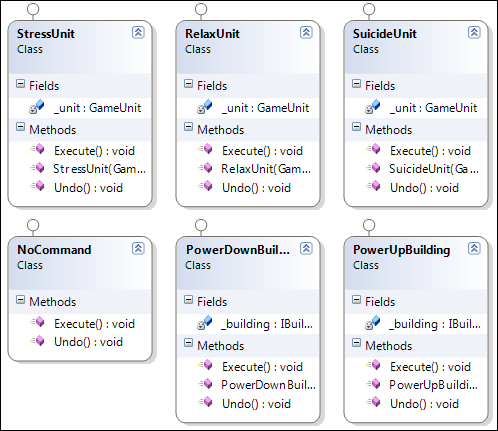
Right now we only have two types of items, GameUnits and IBuildings. Each Command will perform an action against one of these, encapsulating the object through composition.

For this example, we can make a GameUnit turn Aggressive, Normal and Suicidal. We can also power buildings on and off.

Command Objects

Notice these Commands themselves are written against interfaces as well, our good habits are already starting to pay off.

The NoCommand is a little tricky, it's just a dummy object, which sometimes is called a [Null Object(http://en.wikipedia.org/wiki/NullObjectpattern "Wikipedia - Null Object Pattern") as well. It's being used for buttons which don't do anything, basically their default value.

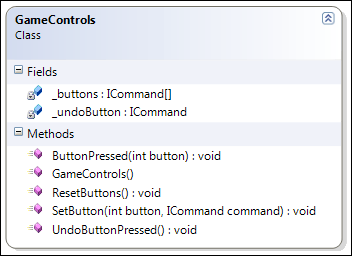
It's time to create our UI code, the GameControls class. This class will contain the three buttons, ICommands, and helper methods to assign real buttons into the placeholder slots, as well as triggering button clicks.

Additionally, there's another requirement which has surfaced. We want to be able to undo our last action, whenever possible, can't undo suicide ;)

We'll accomplish this by storing the last ICommand, and when an undo action is needed, call the Undo() method on it, since each command provides the exact opposite of Execute() in it's Undo() method.

Invoker Object

That's all the code that was needed to implement the Command Pattern actually.

Our GameControls class has no idea GameUnit or IBuilding exists, it's totally decoupled from them.

By using Command objects, we can treat them as little blocks which can be stored in a queue for multiple level undo, we can let several threads pop commands of a queue to process them in parallel, and much more.

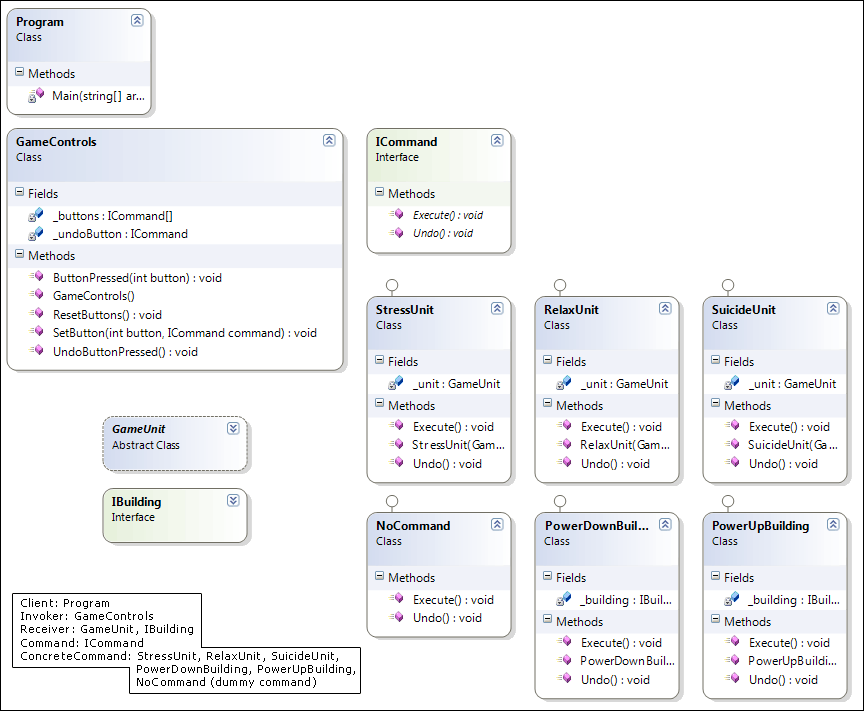
Let's have a look at the full diagram, with the official names written on them as well.

Command Pattern

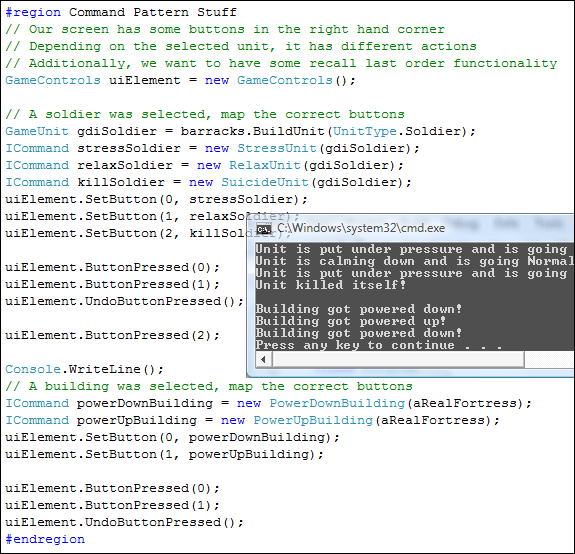
Time to put our code into action and test it.

Let's imagine we have a full blown engine, and when a unit is selected, various events get fired, resulting in the creation of the correct ICommand objects, being passed to our GameControls UI code, which causes buttons to be displayed on screen. We'll also simulate a click on the various buttons and the undo button.

Testing Command Pattern

That's it! I've uploaded the solution for the Command Pattern so you can have a look at the code of the Command Objects and the details of the GameControls.

Questions? Feedback? Comment!!

Some additional information on the Command pattern:


A little follow up from yesterday's Singleton Pattern, where I asked for some help on how you would approach a generic singleton.

With the help of Andrew Stevenson and ExNihilo, we came up with the following Generic Singleton Pattern:

Generic Singleton Pattern

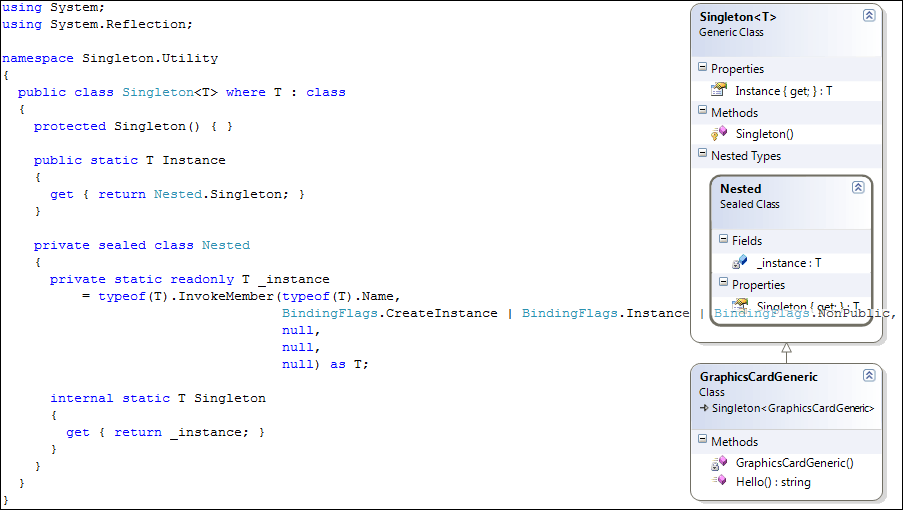
Using Reflection, the private constructor is called to create an instance of the class.

Whenever a Singleton is needed now, the only thing to do is to inherit Singleton and pass in the class itself as T, along with making the constructor private.

I've updated yesterday's solution to contain this new code as well, have a look.

I'd like this post to draw some attention from CLR guru's to have a look at the implementation and point out possible problems and how to solve them.


Today we'll have a look at a well known pattern, the Singleton Pattern. Most people have already heard about this one.

The definition: "Ensure a class has only one instance and provide a global point of access to it."

Why would you want to only have one instance of a class?

Well, you could have one Configuration class for example, which reads some configuration settings at runtime, after which they remain available to your application.

It makes sense to only have one instance of this class, since having multiple could cause you to suddenly end up with different configuration settings.

Now, there are different Singleton Pattern implementations out there, which makes it interesting to have a look at it anyway.

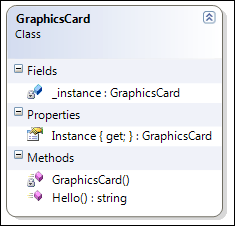
First of all, let's look at the basics of how a Singleton works. Since we're working with our game example, a good singleton would be a reference to our hardware, the GraphicsCard, we should have only one instance of it, who knows what would happen if we start mixing up various instances :)

To make sure there is only one instance of a certain class, we let that class itself manage it's instantiation, instead of creating it ourselves using the new() operator.

Preventing others from calling new() on our class is done by making the constructor private. This way nobody can instantiate the class directly.

But how do we get an instance back then?

We provide a static method in the class itself, returning an instance of itself. By doing this, we can create one instance upon the first request and keep returning the same instance upon further requests.

This is also a form of lazy loading, since it only gets created when it is requested for the first time.

Basic Singleton

Where's the catch you might ask? Multi-threading! This simple implementation of a Singleton is not thread-safe!

It is possible for multiple threads to both execute the null check together, both evaluate it to true, since there is no instance yet, and then both threads create an instance, ending up with multiple instances instead of one.

Luckily, there's a solution. I'll cut straight to the point and give the thread-safe, lazy loading version. There are other thread-safe implementations out there, which you can read more about at Implementing the Singleton Pattern in C#.

Thread-Safe Singleton

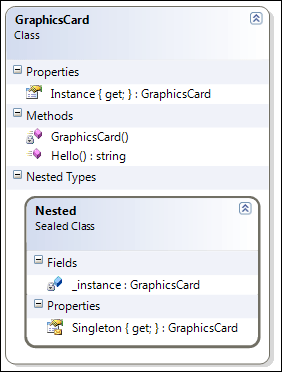
As you can see, the actual instance is held inside a private sealed nested class, which is inside the GraphicsCard class. When the Instance property is called for the first time, it will instantiate a GraphicsCard in a thread-safe way, thanks to the Nested class, and upon subsequent requests, the same instance will be returned.

It's elegant, and doesn't use any special language keywords like lock() in C# or synchronize in Java.

I think it's quite easy to set up a Singleton like this, once you've done it once, you can do it everywhere.

With C# and generics however, we can be even more lazy, which is why I tried out throwing the Singleton Pattern into the following code.

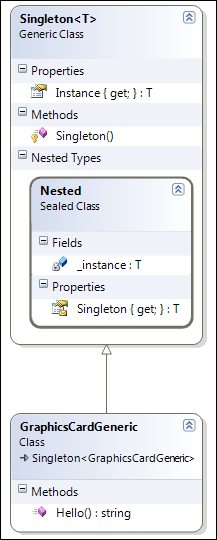
Generic Thread-Safe Singleton

Now the only thing we need to do when we want to create a singleton is create a class, inheriting from Singleton passing the class itself in as the generic T.

The usage of both classes is identical afterwards, as you can see from this small snippet:

Singleton Usage

That's it, one of the easiest to understand patterns conceptually, but with some common pitfalls when implementing it.

There is one big issue bothering me with the generics approach however, hopefully someone can help me out on this, in an elegant way.

As it is coded right now, you can do new GraphicsCardGeneric(), which is something I don't want, since you run the risk of ending up with multiple instances again.

I can't add a private constructor however, since the generics break down then, requiring a public parameterless constructor to do new T() inside the Nested class.

If anyone has a nice solution to get around this, while keeping generics, please comment and let me know. Personally I feel safer using the non-generics solution for now, since it locks down new() instantiation of the Singleton.

As usual, the project is available again to look at for further detail.

Some additional information on the Singleton pattern:


Time to continue from yesterday's Factory Method Pattern by exploring the Abstract Factory Pattern.

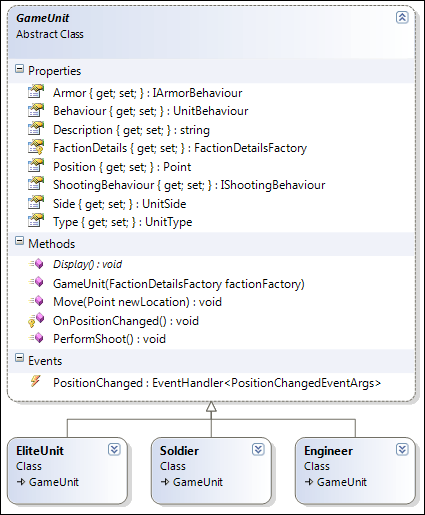
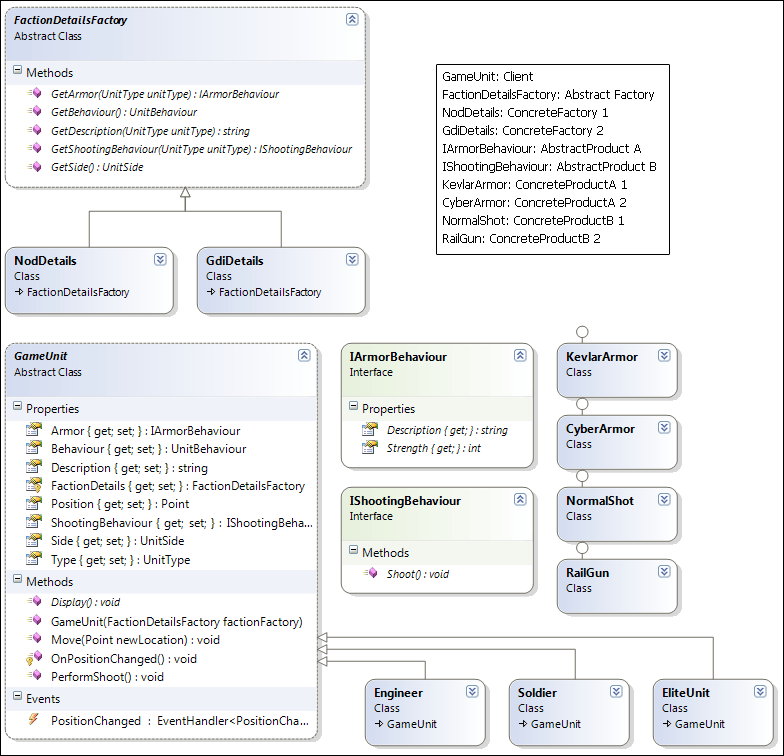
Right now, we have created separate classes for both factions' units (CyborgCommando and Ghostalker). Let's change this so each faction has identical base classes containing logic, but slightly different configuration depending on the faction they belong to.

We'll do this by implementing the Abstract Factory Pattern. I always mix this one up with the Factory Method Pattern, but it finally got through to me while writing the code for this post.

With Factory Method, we have an abstract base class containing logic and calling our abstract factory methods, which return a real implementation via subclasses.

While the Abstract Factory is passed into an object where it is used as composition, and the real factory is supplied at runtime, decoupling the usage of our factory from the real implementation.

Anyway, time for the definition and then some code to make everything clear. "Provide an interface for creating families of related or dependent objects without specifying their concrete classes."

First of all, let's get rid of our faction specific units and replace them by generic ones.

Generic Game Units

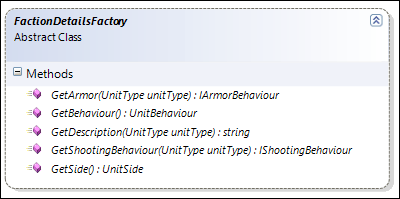
You'll notice the GameUnit has been given a new constructor, an abstract class containing only abstract methods.

This class forms the definition of the Abstract Factory Pattern, it's an interface to create related objects without specifying a concrete class.

Abstract Factory Class

Our GameUnit class is not working with a concrete type, but with an interface, decoupling it from a real faction implementation.

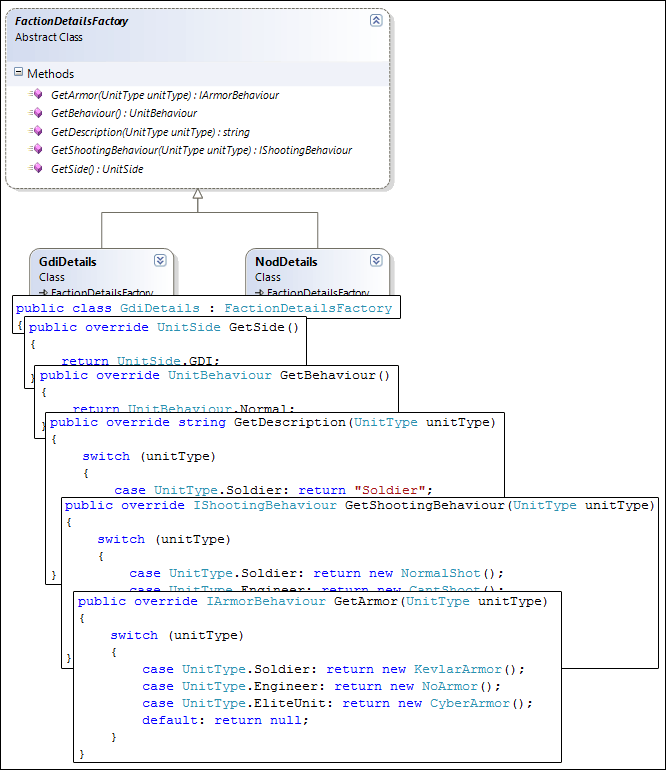
We aren't much with just this interface, so let's create an implementation.

Factory Implementation

As you can see, the classes we used to illustrate the Strategy Pattern have been moved to this factory implementation, which means our GameUnit and all other unit implementations are now working with interfaces rather than concrete implementations.

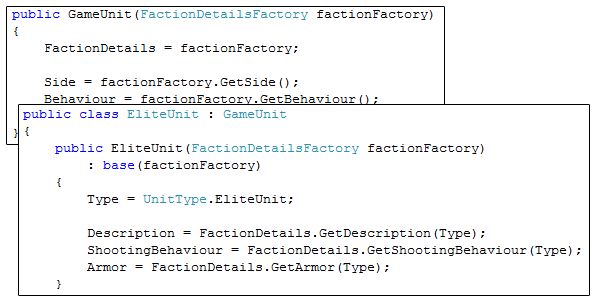
Another thing left to do, is to let the units get their information from the abstract factory.

Interrogating the Abstract Factory

All that is left, is a small change to our two InfantryFactories to pass in the correct FactionDetailsFactory to each unit, and our test case is ready to run again, without having to change it.

Providing a Factory Implementation

You might wonder what the IBuilding interface is suddenly doing there, well, I cleaned the code a bit up and decided to place everything in separate files as it should. Never done it before to keep it simple for these articles, but I didn't like the code adding up.

With the Abstract Factory Pattern implemented, our results looks like this:

Abstract Factory Pattern

So, here's the uploaded solution again, changed quite a bit since last time, take your time to have a look at it.

As usual, feedback is much appreciated.

Some additional information on the Abstract Factory pattern:

 
Deze post is geïmporteerd van de oude blog en is nog niet geconverteerd naar de nieuwe syntax.
I present you with the next pattern in our series, the Factory Method! It took a while to get it out due to a stay in the hospital. (All is fine now :p)

The chapter I'm currently reading deals with both factory patterns, Factory Method and Abstract Factory, in one chapter, but I'm going to write an article on each to limit the length.

First of all, the definition: "Define an interface for creating an object, but let the subclasses decide which class to instantiate. The Factory method lets a class defer instantiation to subclasses."

Today we were given specs to add a building to our game. This building will create infantry units, set their behaviour to a specific setting and send them to a given waypoint after creation.

We start with a simplistic approach of creating an InfantryFactory class, which represents a building and contains a building-specific waypoint and unit behaviour setting to be given to new units.

Simple Unit Factory Building

It does the job, a specific unit is created based on a runtime parameter, it is given its behaviour and sent to a specific destination.

However, when we need to add new units, we need to open up this class every time again and change inside of it, which violates the Open/Closed Principle we talked about last time.

Let's isolate what changes and move it to its own method, just to illustrate we understand the part that is most subject to change.

Isolating Change

Since the CreateUnit method is still inside the same class, we still have a problem. The BuildUnit method is a fine piece of code now however, it works with GameUnit objects instead of actual implementations.

Once this code passes our quality assurance it can be extended as much as wanted without having to modify it. Let's get this entire class to meet our quality standards now by implementing the Factory Method.

Our InfantryFactory class forms a nice base for creating units and performing various logic, let's lock it down for modification by making it abstract and throwing the CreateUnit implementation out as well.

To throw its implementation out, we are going to define CreateUnit as an abstract method, forcing subclasses to implement it. Let's create two factories for both our factions.

Factory Method Pattern

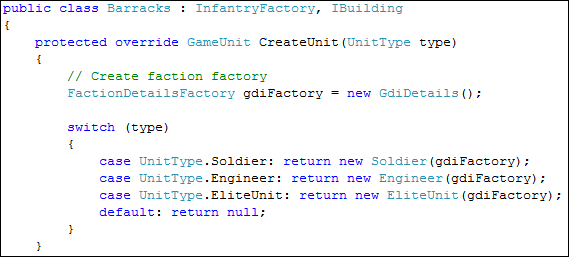
As you can see, I've taken the liberty to add some more units since last time, to illustrate how our two factories decide which class to instantiate in the CreateUnit method. Which is exactly what the Factory Method definition describes.

We defined an interface for creating an object, the abstract CreateUnit method, and let the subclasses, Barracks and HandOfNod, decide which class to instantiate. We made our InfantryFactory open for extension and closed for modification!

Factory Method Pattern - Code

When we test this code, you can see our objects are always using abstract classes or interfaces (an abstract class is also called an interface sometimes, in the sense of the English language, not in the C# keyword).

Factory Method Test Case

The result after all this coding is this little output, and the fact that we learned another pattern, the Factory Method.

Factory Method Test Case Output

I've uploaded the solution again. If you have any questions or feedback, please comment.

Some additional information on the Factory Method pattern:
 

Following up on the Observer/Event Pattern, it's time for the third pattern, the Decorator Pattern.

The definition: "Attach additional responsibilities to an object dynamically. Decorators provide a flexible alternative to subclassing for extending functionality."

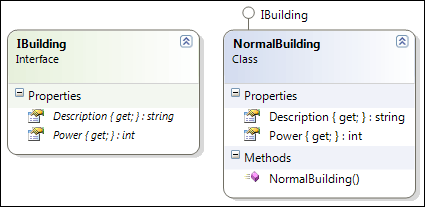
Continuing on our little game, let's say we are able to create buildings and have just an IBuilding interface and one building.

Simple Building

Each building has a description and a given power usage cost, which is simply hardcoded in the class right now.

After a while, our boss hired an external company to take over development with regards to the buildings and tasked them with making buildings upgradeable.

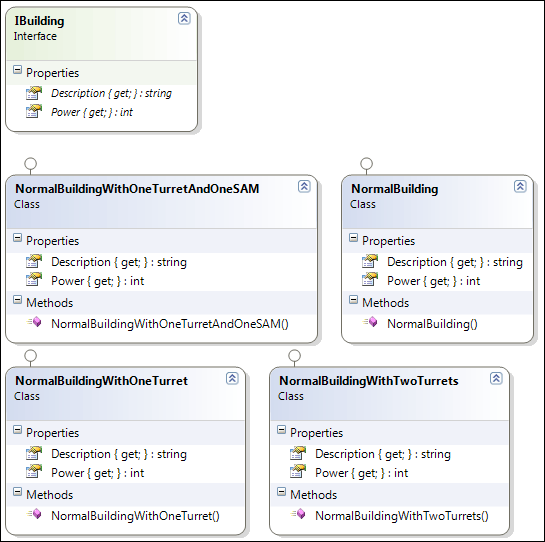
The first approach they took was too simply add new building classes to the game, for each possible upgrade.

Class Explosion

This however leads to an infinite amount of possibilities and a nightmare to maintain.

If we look at the definition of the Decorator Pattern, it seems to offer a good alternative to all this inheriting to add in new functionality.

Also, adding additional responsibilities dynamically means we don't have to change the code of the IBuilding and NormalBuilding either. By doing this we are honoring the Open/Closed Principle, which says "software entities (classes, modules, functions, etc.) should be open for extension, but closed for modification".

How are we going to add these additional things dynamically? We'll decorate our initial NormalBuilding with upgrades, giving us flexibility to equip a building with any upgrade combination we like.

When we mention decorating, think about wrapping. We are going to wrap an instance of IBuilding in a decorator, acting as a shell around the class, passing calls to our decorator along to the wrapped instance, modifying the results when needed.

It's also possible to chain decorators together, making it possible to decorate a NormalBuilding with two Turrets, a SAM installation and a Laser. This is done because a decorated object is still of the type IBuilding, and can be decorated again and again.

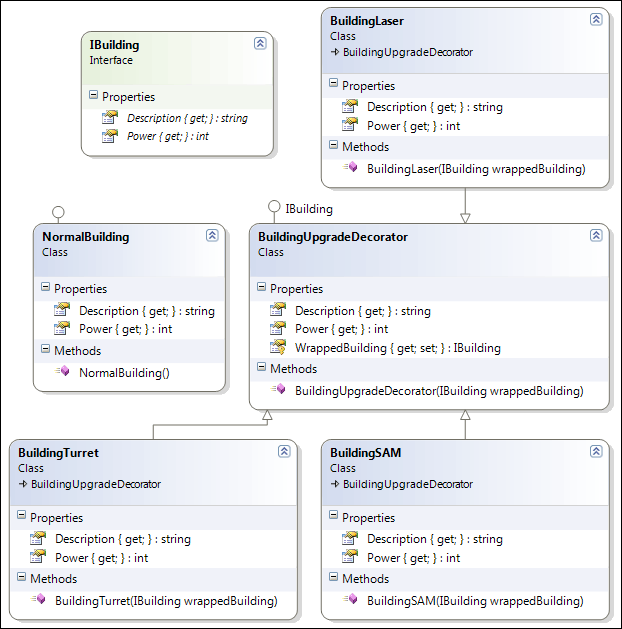
Eventually we'll end up with the following class diagram. Note, the WrappedBuilding has a protected getter and a private setter.

Decorator Pattern

Now we have a set of buildings, which implement IBuilding and one decorator base class, BuildingUpgradeDecorator, from which all possible decorations inherit. This decorator class has to implement IBuilding as well, so it can be re-decorated.

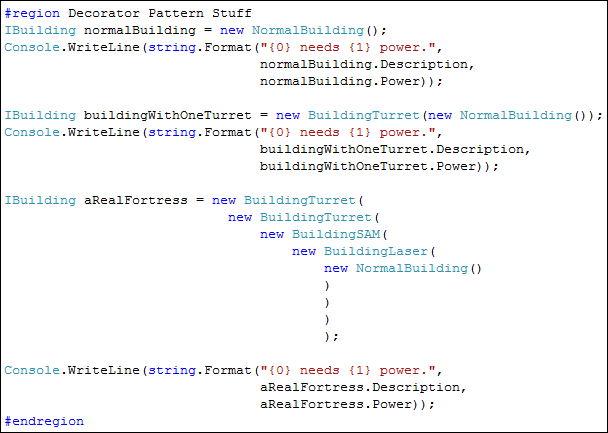
With the above classes, it's possible to compose buildings as we desire, as shown below.

Decorator Usage

When we run this code, the call to the Power property is being passed through all decorators to the lowest level, our NormalBuilding, and returned all the way back, getting incremented with the additional power usage for each decorator/upgrade in the mean time.

Decorator Output

I've uploaded the solution again so you can have a look on how the decorator base class and individual decorators are programmed.

Some additional information on the Decorator pattern:


Yesterday I described the Observer Pattern and mentioned that the .NET CLR provides this functionality through events and delegates.

Let's have a look on how to implement this right now.

First of all, we can get rid of our ISubject and IObserver interfaces. And we'll replace it by a push notification mechanism.

Push, because we'll pass the required information along to the observers when notifying them, as opposed to pull, where the observers had to extract it themselves from the subject.

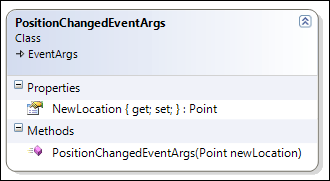
Since we'll be pushing out the information, we need a custom class defining which information is interesting. We'll create this by inheriting from the EventArgs class, by doing this it will be very easy to set up an event in the next step.

Custom EventArgs Class

As you can see, this is a very small class, with a descriptive name, containing the new location of our unit.

You can't see it on this diagram, but the NewLocation property only has a public getter, and a private setter, since our observers will only have to extract data from this class.

So, we got our small information holding class, now it's time to change our GameUnit class to get rid of all the logic of maintaining a list of observers and subscription logic.

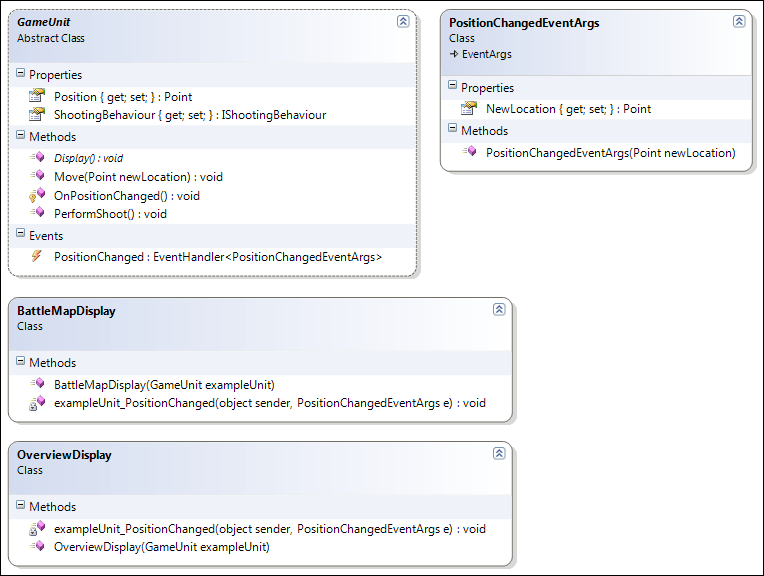
We'll replace the ISubject logic by an event of the type EventHandler<PositionChangedEventArgs>. By doing this, we expose an event (PositionChanged) to our observers upon which they can subscribe themselves whenever they want as well as unsubscribe when needed.

Observer/Event Pattern

Note that this event is strongly typed, containing a strongly typed information set, making it easy for our observers to get the information they need.

Using this method, we can have a set of EventArgs classes as small data holders, after which subjects can expose events using those custom EventArgs to the outside world, making sending out notifications very easy.

Observers on their side can easily subscribe to any of the events exposed by using a single line of code, and perform their logic (_PositionChanged methods) whenever they get a notification.

Have a look at the the uploaded solution to see the exact syntax of this method. We're using delegates with generics, the += operator and throwing and handling events.

Again, if you have any questions, feel free to leave them behind.

Some additional information on the Observer/Event pattern:


Yesterday we saw the Strategy Pattern. Today I want to talk about the Observer Pattern.

I got a bit of a mixed feeling about this pattern, since in the .NET world, we got events and delegates making this pattern somewhat unneeded.

However, it's good to know how it works, since it's used behind the scenes in the .NET CLR when working with events. Besides, better know too much than too little, knowledge is power.

Also, I'm planning to write a separate post after this to go into the C# specific implementation anyway.

First, the definition again: "Define a one-to-many dependency between objects so that when one object changes state, all its dependents are notified and updated automatically."

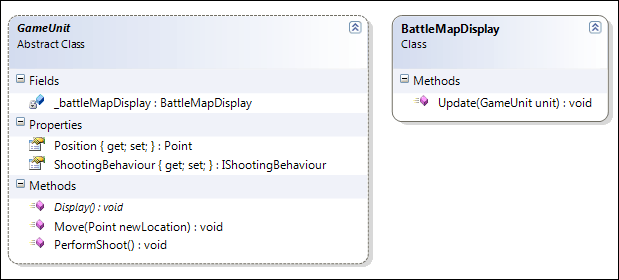
Let's continue with our example from yesterday, were we made an object model to describe some game characters. The next requirement came in, and we need to display movement of our units on the screen.

Initially, we are given one screen, a big overview of a battle map, where all units are displayed on and move around on.

An easy quick approach would be to simply add some coordinates information to our GameUnit class and add in a Move() method which gets called whenever the unit moves.

This Move() method would then simply call our BattleMapDisplay class to inform it of its new location.

Quick Hacky Notification

That would work, for now... But what if we want to add in a different type of display?

Let's say we want to add in a OverviewDisplay as our main view. Then we have to go and change our GameUnit class to inform this screen as well. Bad. Let's fix this up a little.

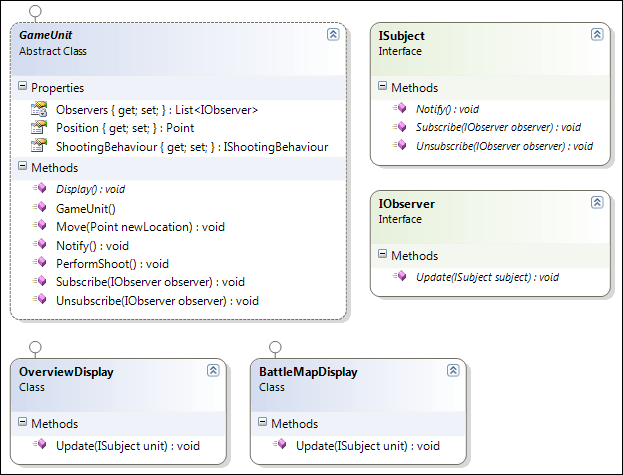
If we look at it from a higher level again, all our displays are doing is observing our game units and acting upon any change in them. So, one display is actually an Observer of our GameUnit, the Subject. And there we have it, our displays have a one-to-many relation with a GameUnit and want to be notified when it changes it state, the Observer Pattern's exact definition. :)

Remember from last time? Program to an interface, not an implementation.

When we set up a system to let objects communicate state changes to each other, the only thing these objects should know about each other is a common communication interface. Let's create that one by adding two additional interfaces, IObserver and ISubject.

Notification Interfaces

Now that we have our new interfaces, we can change the GameUnit class to hold a collection of IObserver objects. Together with providing two methods for additional observers to subscribe themselves so they can get notifications when the GameUnit changes.

By implementing it this way, we can easily add new displays or other objects to our application, which can easily stay informed about our units as long as they implement the IObserver interface and subscribe themselves with the units.

The GameUnit doesn't care about which kind of object is on the receiving end of the notification, and so won't have to be changed whenever an new Observer is added. The Observer however will have to make checks in its Update() method to determine which ISubject is being returned.

Observer Pattern

Whenever a GameUnit moves right now, it informs all screens about this, passing itself along so the observers can get information out of the object.

And that's it really, the Observer Pattern isn't all that hard, it's a simple notification mechanism. In a next post I'll talk more about delegates and events to have a look on how the Observer Pattern is implemented in the CLR.

If you have any questions about this pattern, please leave them in the comments, something you want to know, something I overlooked or was unclear about, just ask, it's from having a dialog we learn the most.

As usual, I uploaded the solution I used for this post so you have a detailed look at the code used.

Some additional information on the Observer pattern:


The first pattern I want to talk about is the Strategy pattern, which always reminds me about the Command & Conquer games so I'll simply use it as an example :)

First of all, the definition: "Define a family of algorithms, encapsulate each one, and make them interchangeable. Strategy lets the algorithm vary independently from clients that use it."

I'm bad at remembering definitions or trying to imagine what they really mean, so let's just go ahead and try to create something and learn as we go, eventually we'll end up implementing the Strategy pattern and you'll 'get it' for the rest of your life, without a definition.

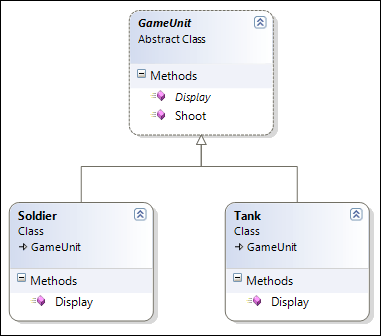
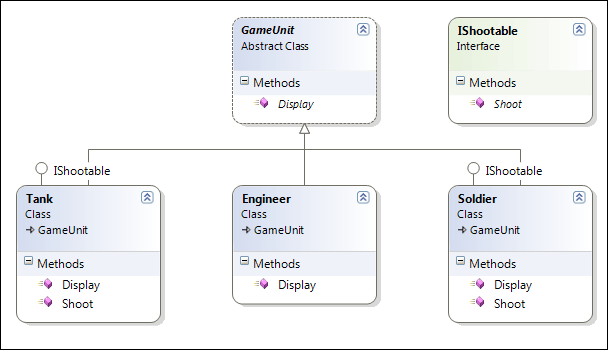
A long time ago, we made a simple strategy game, having only 2 units, a soldier and a tank, both were able to shoot at each other which we implemented as follows:

Simple Class Model

The Shoot() logic is contained in the base GameUnit class, since it's identical for both units. Each unit takes care of drawing itself.

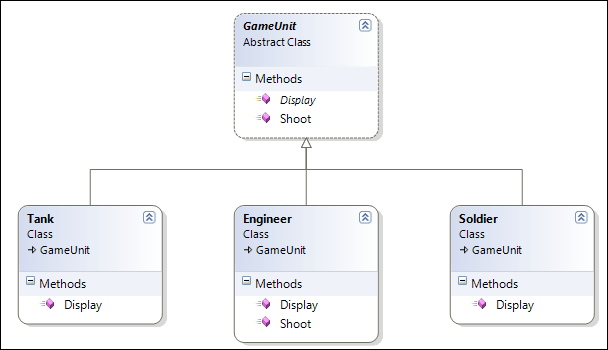
After a while, we receive a request to add in an Engineer, which is a unit used to take over buildings and more importantly, he can't shoot.

If we just added an Engineer class similar to the Soldier one, he would be able to shoot as well, which we don't want. We could for this once just override the Shoot() method for the Engineer and make it empty.

Hiding methods - Maintenance Hell

Can you already see where this is going to end up? Maintenance Nightmare!

Eventually we end up with lots of useless code being repeated for every class which has a different shooting logic, where you have to open up every class to figure out all the available implementations. Let's not implement it like this!

What if we were to get rid of the Shoot() logic in the GameUnit class and make an IShootable interface for the units that can actually shoot?

Interface - Code Duplication

That looks a bit cleaner, but wait! We simply shifted the nightmare, because now the Soldier and Tank have identically the same code in their Shoot() method. This isn't the solution either, let's take a look at what our higher level goal actually is.

We can see the part that changes is how a unit shoots. If we take a closer look at shooting and implementing future classes, it is very possible we'll end up with a class that has a very different shooting algorithm or has upgradeable parts, changing the way it shoots. You could say the way a unit shoots is a behaviour of a unit.

Remember the definition of the Strategy pattern? The shooting behaviour we have just defined is actually an algorithm, while the requirement of units being able to get upgraded implies the behaviours have to be changed at run time, making them interchangeable.

Making things interchangeable usually means having less things hard-coded in your application, which reminds of a great saying: Program to an 'interface', not an 'implementation'.

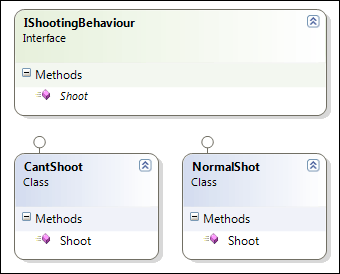
Let's separate all our shooting logic from our units and create a totally new set of classes defining all possible shooting behaviours.

Behaviour Set - Family of Algorithms

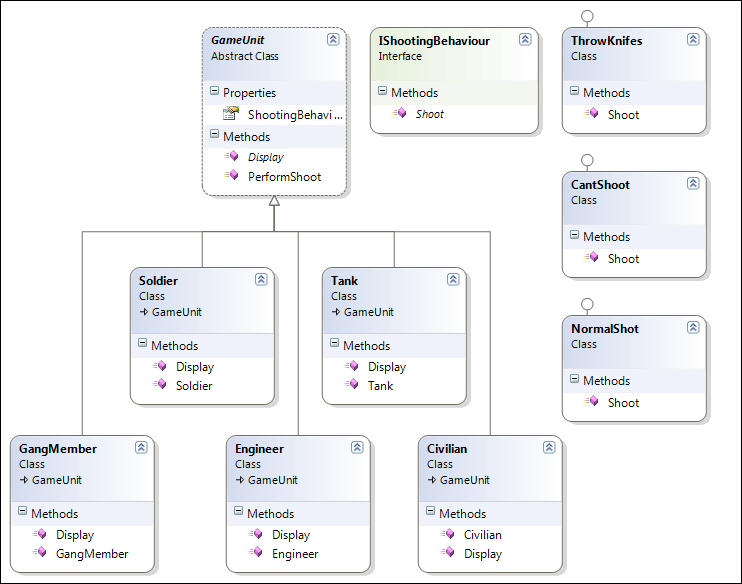
Now it's only a matter of letting our GameUnit use these behaviours. We'll do this by programming against the IShootingBehaviour interface instead of against an implementation. This way we can dynamically replace the behaviour at run time, and have a very flexible programming model towards the future.

Adding a new way of shooting is simply a matter of adding a new class implementing the IShootingBehaviour interface after which all our units could use it.

Strategy Pattern

And that's it! We've implemented the Strategy pattern. We defined a family of algorithms (IShootingBehaviour), we encapsulated each one (NormalShot, CantShoot, ThrowKnifes) and made them interchangeable (ShootingBehaviour property).

Each client can define his algorithm as we currently did in the constructor, by setting the property to the desired implementation. In a future pattern we'll see how to set this different, since it's not that pretty doing it in the constructor.

Note that even though we are setting a shooting implementation via the constructor, it is possible to change the way a unit shoots at runtime by setting the ShootingBehaviour property.

I've uploaded the sample project I have used while learning this pattern so you can have a look at the code representing the above diagrams yourself.

Some additional information on the Strategy pattern:


It's been a while again, real life issues managed to take over all time... But, I'm regaining ground and winning back some of it ;)

For the first time in years, I've managed to get around reading a real book again. Last week I picked up a copy of Head First Design Patterns and started on it yesterday. As far as I can tell, only read the first chapter so far, it's a great book!

It's not like a usual learning book, which tend to be pretty dull when it comes to formatting or the type of language used. This book reads like a great story, filled with images to clarify and explain concepts. The images aren't even optional, when you really want to learn, you have to read them to get the full picture.

As a form of learning, I plan to write a blog post about each pattern I finish, explaining it in my own words, so it 'sticks' a lot better for myself as well, helping others at the same time. Stay tuned!


In a previous article I have demonstrated how easy it is to decompile and reverse engineer .NET assemblies using Reflector and Reflexil. I've also shown that applying a strong name to your assembly does not protect your code from reverse engineering. So, what else is left?

A technique called obfuscating goes a long way in keeping your source code safe. An obfuscator will mangle your code, without changing the actual result, to make it increasingly harder for someone to decompile your code and actually understand it.

Keep in mind however that this is 'security through obscurity', and as such it does not provide solid security, it's just another layer. The more layers, the more walls there are around your assembly to demotivate others into breaking it, but never enough to demotivate 100% of the people. A similar tactic can be found in CD protection schemes, which stops a percentage of users from copying a disk, but not everyone.

There are several possibilities to obfuscate an assembly:

  • Renaming Classes, methods, parameters, namespaces, fields, ... are renamed to short names, making it much harder to deduct the working of a program from descriptive naming. Unicode characters can be used, making it even harder to understand.

    When there is a lot of code, an obfuscator can also rename different methods to the same name, due to taking advantage of overloading.

    For example, if you have a method GetCustomers without any parameters and GetCustomer(int customerNr), an obfuscator can rename them both to 'a', letting the .NET framework pick the correct one thanks to using overloads.

  • Control Flow Alternation

    An obfuscator can turn nicely structured code using if, while, for statements into a big spaghetti mess, by utilizing lots of goto statements. The more code you have, the more difficult it will be to understand the generated spaghetti end result.

  • String Encryption

    When code has been turned in to a complex obfuscated mess, it is still possible to find interesting parts due to the readability of strings used, limiting the attack vector to a smaller piece of obfuscated to be understood.

    Obfuscators provide the ability to encrypt strings and decrypt them at run time, making them unreadable in the source code.

  • Assembly Linking

    Calls made to .NET Framework methods will still be readable, because of this some obfuscators allow you to link in the .NET Framework assemblies being used, and obfuscating these as well, making it impossible to find anything 'normal' in the IL.

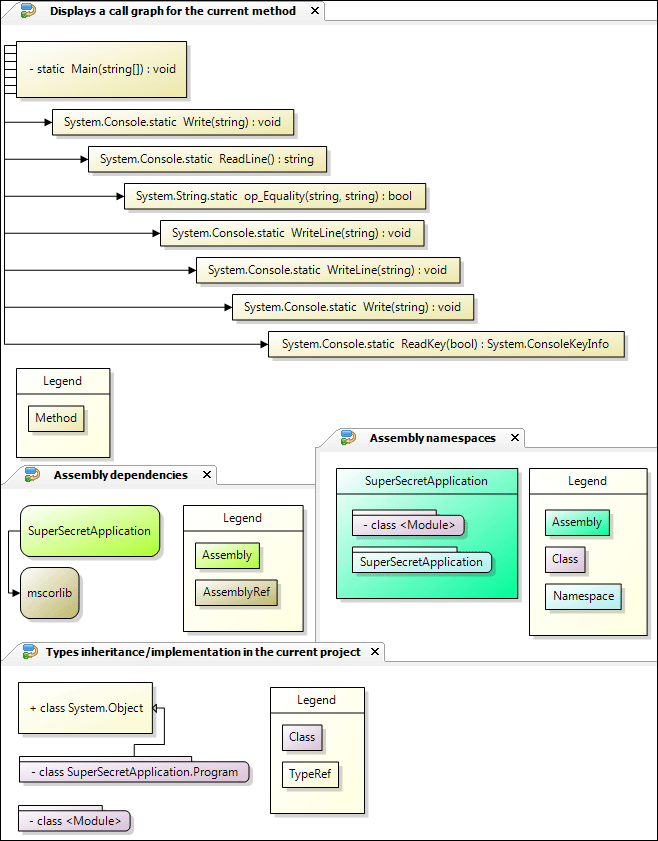
Besides protection features some obfuscator packages out there also provide nice diagram generators to analyze your assembly.

Assembly Information

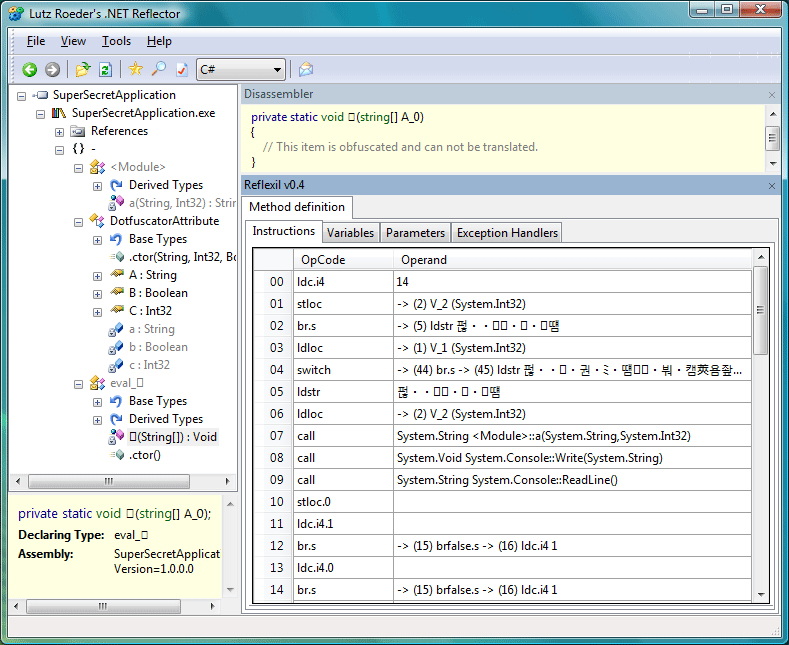
After applying an obfuscator on my previous CrackMe program, this is how it looks when opened with Reflector:

Reflector viewing obfuscated assembly

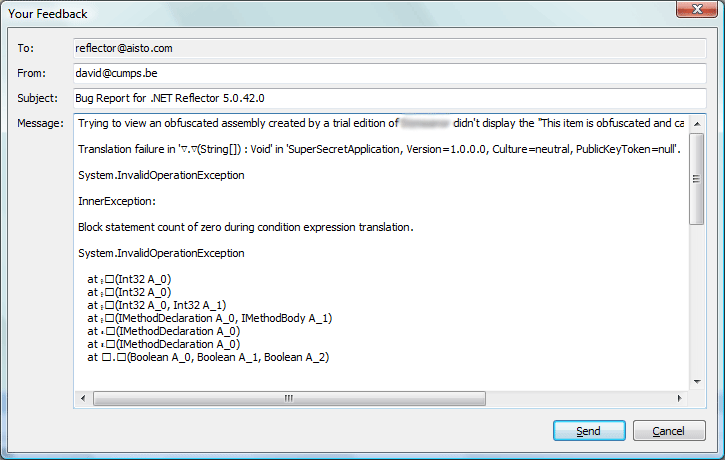
As you can see, Reflector is already unable to generate valid C# code for it. With some obfuscators it is even possible to make Reflector totally unable to output anything, besides IL. Trying to view in C# for example, made Reflector throw an exception.

Reflector bug report trying to open obfuscated assembly

Testing this on my SuperSecretApplication application, the obfuscator applied several methods on the IL of the assembly:

  • Method renaming, using Unicode characters which couldn't get displayed.
  • Parameter renaming, using a simply naming scheme.
  • Altered control flow, using several jump conditions, as displayed by the arrows in Reflexil.
  • String encryption, making it harder to find interesting sections.
 
.method private hidebysig static void á(string[] A_0) cil managed
{
    .entrypoint
    .maxstack 3
    .locals init (
        [0] string str,
        [1] int32 num,
        [2] int32 num2)
    L_0000: ldc.i4 14
    L_0005: stloc num2
    L_0009: br.s L_0024
    L_000b: ldloc num
    L_000f: switch (L_00b7, L_0050, L_0071, L_0094)
    L_0024: ldstr "\ud382\ue484\uf486\ufa88\ufc8a\ue28c\ufd8e\uf590\ua992\ub594"
    L_0029: ldloc num2
    L_002d: call string <module>::a(string, int32)
    L_0032: call void [mscorlib]System.Console::Write(string)
    L_0037: call string [mscorlib]System.Console::ReadLine()
    L_003c: stloc.0
    L_003d: ldc.i4.1
    L_003e: br.s L_0043
    L_0040: ldc.i4.0
    L_0041: br.s L_0043
    L_0043: brfalse.s L_0045
    L_0045: ldc.i4 1
    L_004a: stloc num
    L_004e: br.s L_000b
    L_0050: ldloc.0
    L_0051: ldstr "\ue182\ue984\ue886\uee88\ua58a\uee8c\ufa8e\ufc90\ue392\ue694\ub996\ufb98\ufe9a"
    L_0056: ldloc num2
    L_005a: call string <module>::a(string, int32)
    L_005f: call bool [mscorlib]System.String::op_Equality(string, string)
    L_0064: brfalse.s L_0073
    L_0066: ldc.i4 2
    L_006b: stloc num
    L_006f: br.s L_000b
    L_0071: br.s L_0096
    L_0073: ldstr "\ucd82\uea84\ua686\ua988\uc58a\ue28c\uae8e"
    L_0078: ldloc num2
    L_007c: call string <module>::a(string, int32)
    L_0081: call void [mscorlib]System.Console::WriteLine(string)
    L_0086: ldc.i4 3
    L_008b: stloc num
    L_008f: br L_000b
    L_0094: br.s L_00b9
    L_0096: ldstr "\uda82\uea84\uf286\ua988\ue68a\uec8c\ue18e\uf090\uf492\uf094\uf396\ub998\uef9a\uf29c\ubf9e\uc4a0\ucda2\ud1a4\uc2a6\udba8\u8baa\ud9ac\uc7ae\ud4b0\u93b2\uc6b4\ud2b6\udab8\uc9ba\ud8bc\ucbbe\ue1c0\ua2c2\ub5c4\ub7c6\ua5c8\ua2ca\uaecc\uaece\ua5d0\ubad2\ubad4\ub9d6\uf8d8"
    L_009b: ldloc num2
    L_009f: call string <module>::a(string, int32)
    L_00a4: call void [mscorlib]System.Console::WriteLine(string)
    L_00a9: ldc.i4 0
    L_00ae: stloc num
    L_00b2: br L_000b
    L_00b7: br.s L_00b9
    L_00b9: ldstr "\ud382\uf784\ue286\ufa88\uf88a\uad8c\uee8e\uff90\uea92\ub594\ufc96\ufc98\ue29a\ubd9c\ueb9e\ucea0\u83a2\uc6a4\uc8a6\uc7a8\udfaa\uc4ac\uc1ae\uc4b0\ud6b2\u95b4\u99b6\u99b8\u95ba\u9dbc\u91be"
    L_00be: ldloc num2
    L_00c2: call string <module>::a(string, int32)
    L_00c7: call void [mscorlib]System.Console::Write(string)
    L_00cc: ldc.i4.1
    L_00cd: call valuetype [mscorlib]System.ConsoleKeyInfo [mscorlib]System.Console::ReadKey(bool)
    L_00d2: pop
    L_00d3: ret
}

As you can see, given enough time, it is possible to figure out the above code and still break it. The more code you have however, the harder it becomes due to the increasing complexity of the obfuscated code, added with the fact that obfuscators will be able to apply even more advanced methods.

Obfuscators also have some disadvantages though. When writing advanced code involving reflection, obfuscating an assembly might break your code, possibly due to class and namespaces being renamed. Debugging also becomes harder because the stacktrace will contain renamed method signatures.

A good obfuscator will offer features to work around these advantages though, by allowing you to mark sections which should be skipped for obfuscation and also providing tools to translate an obfuscated stack trace to the original methods, using a mapping file.

You can find a comparison between several obfuscators on How To Select Guides, including links to individual websites and details about which features they support.

This post is the third in a series on protecting intellectual property.

 
Deze post is geïmporteerd van de oude blog en is nog niet geconverteerd naar de nieuwe syntax.
Over the years, plenty has been written about string performance, lots of comparisons between String.Concat and StringBuilder. Today I decided to do some of my own research into the subject and contribute to the knowledge already out there. More specifically, I'll be taking a look at the memory usage for various concatenation methods and compiler optimizations used to generate the IL.

The test scenario I defined consists out of several methods, each returning the same string. The string I created is supposed to resemble a real-life scenario. I identified five different ways of concatenating strings for my test. I will be taking a look at the numbers when calling each method once and inside a very small loop of 50 calls, which is another real-life number in my case.

Single line concatenation.

The easiest way of concatenating strings together, by simply putting a plus sign between them.

[csharp]
public string GetPlussedString()
{
string myString = "SELECT column1,"
+ " column2,"
+ " column3,"
+ " column4,"
+ " column5,"
+ " column6,"
+ " FROM table1 t1"
+ " JOIN table2 t2"
+ " ON t1.column1 = t2.column1";
return myString;
}
[/csharp]

Although it seems like we are creating 9 string instances, the compiler optimizes this into the following IL:

[code]
.method public hidebysig instance string GetPlussedString() cil managed
{
.maxstack 1
.locals init (
[0] string myString)
L_0000: ldstr "SELECT column1, column2, column3, column4, column5, column6, FROM table1 t1 JOIN table2 t2 ON t1.column1 = t2.column1"
L_0005: stloc.0
L_0006: ldloc.0
L_0007: ret
}
[/code]

In reality, we created one string instance and returned it, which is about the most efficient way we can achieve.

When profiling the test application, I couldn't even find a call to GetPlussedString in the profiler, which makes me believe the runtime even optimized this.

GetPlussedString Single Call

In total, our application created 113 string instances and barely used any memory.

Running this in the loop gives the following result:

GetPlussedString Multiple Calls

Important to note is the fact that we still have 113 string instances. This is because .NET used String Interning on my string and simply returns a reference to that instance over and over.

Variable concatenation.

Another frequently used way of concatenating strings is by appending a variable with the += operator for each line.

[csharp]
public string GetPlussedVarString()
{
string myString = "SELECT column1,";
myString += " column2,";
myString += " column3,";
myString += " column4,";
myString += " column5,";
myString += " column6,";
myString += " FROM table1 t1";
myString += " JOIN table2 t2";
myString += " ON t1.column1 = t2.column1";
return myString;
}
[/csharp]

Things become messy here, take a look at the generated IL for this code:

[code]
.method public hidebysig instance string GetPlussedVarString() cil managed
{
.maxstack 2
.locals init (
[0] string myString)
L_0000: ldstr "SELECT column1,"
L_0005: stloc.0
L_0006: ldloc.0
L_0007: ldstr " column2,"
L_000c: call string [mscorlib]System.String::Concat(string, string)
L_0011: stloc.0
L_0012: ldloc.0
L_0013: ldstr " column3,"
L_0018: call string [mscorlib]System.String::Concat(string, string)
L_001d: stloc.0
L_001e: ldloc.0
L_001f: ldstr " column4,"
L_0024: call string [mscorlib]System.String::Concat(string, string)
L_0029: stloc.0
L_002a: ldloc.0
L_002b: ldstr " column5,"
L_0030: call string [mscorlib]System.String::Concat(string, string)
L_0035: stloc.0
L_0036: ldloc.0
L_0037: ldstr " column6,"
L_003c: call string [mscorlib]System.String::Concat(string, string)
L_0041: stloc.0
L_0042: ldloc.0
L_0043: ldstr " FROM table1 t1"
L_0048: call string [mscorlib]System.String::Concat(string, string)
L_004d: stloc.0
L_004e: ldloc.0
L_004f: ldstr " JOIN table2 t2"
L_0054: call string [mscorlib]System.String::Concat(string, string)
L_0059: stloc.0
L_005a: ldloc.0
L_005b: ldstr " ON t1.column1 = t2.column1"
L_0060: call string [mscorlib]System.String::Concat(string, string)
L_0065: stloc.0
L_0066: ldloc.0
L_0067: ret
}
[/code]

Every += operation translates into a call to String.Concat() creating a new temporary string.

Looking at the profiler we end up with 129 string instances, which is 16 more than the our comparison base. These strings can be split up into 8 coming from the 8 calls to String.Concat and from having 8 more strings declared in code.

GetPlussedVarString Single Call

Calling this 50 times quickly shows the downside of this method. We end up with 408 additional string instances, 400 coming from 50*8 calls to String.Concat and our original 8 extra strings, which got Interned by the way.

GetPlussedVarString Multiple Calls

Note the explosion in memory size used for this simple example, 73kB vs 16kB.

I strongly discourage the use of the += operator for string concatenation in these scenarios.

String.Concat(array) concatenation.

A less used way of concatenating strings is by using one of the String.Concat overloads which accept a string array.

[csharp]
public string GetConcatedString()
{
string[] pieces = new string[] {
"SELECT column1,",
" column2,",
" column3,",
" column4,",
" column5,",
" column6,",
" FROM table1 t1",
" JOIN table2 t2",
" ON t1.column1 = t2.column1"
};
return String.Concat(pieces);
}
[/csharp]

This is a more efficient variation of String.Concat by using it explicitly with a string array, as can be seen in the following IL:

[code]
.method public hidebysig instance string GetConcatedString() cil managed
{
.maxstack 3
.locals init (
[0] string[] pieces,
[1] string[] CS$0$0000)
L_0000: ldc.i4.s 9
L_0002: newarr string
L_0007: stloc.1
L_0008: ldloc.1
L_0009: ldc.i4.0
L_000a: ldstr "SELECT column1,"
L_000f: stelem.ref
L_0010: ldloc.1
L_0011: ldc.i4.1
L_0012: ldstr " column2,"
L_0017: stelem.ref
L_0018: ldloc.1
L_0019: ldc.i4.2
L_001a: ldstr " column3,"
L_001f: stelem.ref
L_0020: ldloc.1
L_0021: ldc.i4.3
L_0022: ldstr " column4,"
L_0027: stelem.ref
L_0028: ldloc.1
L_0029: ldc.i4.4
L_002a: ldstr " column5,"
L_002f: stelem.ref
L_0030: ldloc.1
L_0031: ldc.i4.5
L_0032: ldstr " column6,"
L_0037: stelem.ref
L_0038: ldloc.1
L_0039: ldc.i4.6
L_003a: ldstr " FROM table1 t1"
L_003f: stelem.ref
L_0040: ldloc.1
L_0041: ldc.i4.7
L_0042: ldstr " JOIN table2 t2"
L_0047: stelem.ref
L_0048: ldloc.1
L_0049: ldc.i4.8
L_004a: ldstr " ON t1.column1 = t2.column1"
L_004f: stelem.ref
L_0050: ldloc.1
L_0051: stloc.0
L_0052: ldloc.0
L_0053: call string [mscorlib]System.String::Concat(string[])
L_0058: ret
}
[/code]

This method uses 9 more string instances than our base, which is already better than using += resulting in 16.

These 9 come from the 8 additional strings defined in the code and 1 coming from the single call to String.Concat().

GetConcatedString Single Call

Calling this 50 times will result in 58 additional strings compared to our base, coming from 50 calls to String.Concat() and our 8 additional strings in code (again, Interned @ work).

GetConcatedString Multiple Calls

Internally the array overload for String.Concat() will first count the needed length for the result and then create a temporary string variable of the correct length, where as the previous method could not use this optimization since it were 8 separate calls.

StringBuilder.Append() concatenation.

Method number four uses a StringBuilder to create a string, as demonstrated in plenty of tutorials.

[csharp]
public string GetBuildString()
{
StringBuilder builder = new StringBuilder();
builder.Append("SELECT column1,");
builder.Append(" column2,");
builder.Append(" column3,");
builder.Append(" column4,");
builder.Append(" column5,");
builder.Append(" column6,");
builder.Append(" FROM table1 t1");
builder.Append(" JOIN table2 t2");
builder.Append(" ON t1.column1 = t2.column1");
return builder.ToString();
}
[/csharp]

The not so interesting IL for this method simply shows the creation of the object and several method calls.

[code]
.method public hidebysig instance string GetBuildString() cil managed
{
.maxstack 2
.locals init (
[0] class [mscorlib]System.Text.StringBuilder builder)
L_0000: newobj instance void [mscorlib]System.Text.StringBuilder::.ctor()
L_0005: stloc.0
L_0006: ldloc.0
L_0007: ldstr "SELECT column1,"
L_000c: callvirt instance class [mscorlib]System.Text.StringBuilder [mscorlib]System.Text.StringBuilder::Append(string)
L_0011: pop
L_0012: ldloc.0
L_0013: ldstr " column2,"
L_0018: callvirt instance class [mscorlib]System.Text.StringBuilder [mscorlib]System.Text.StringBuilder::Append(string)
L_001d: pop
L_001e: ldloc.0
L_001f: ldstr " column3,"
L_0024: callvirt instance class [mscorlib]System.Text.StringBuilder [mscorlib]System.Text.StringBuilder::Append(string)
L_0029: pop
L_002a: ldloc.0
L_002b: ldstr " column4,"
L_0030: callvirt instance class [mscorlib]System.Text.StringBuilder [mscorlib]System.Text.StringBuilder::Append(string)
L_0035: pop
L_0036: ldloc.0
L_0037: ldstr " column5,"
L_003c: callvirt instance class [mscorlib]System.Text.StringBuilder [mscorlib]System.Text.StringBuilder::Append(string)
L_0041: pop
L_0042: ldloc.0
L_0043: ldstr " column6,"
L_0048: callvirt instance class [mscorlib]System.Text.StringBuilder [mscorlib]System.Text.StringBuilder::Append(string)
L_004d: pop
L_004e: ldloc.0
L_004f: ldstr " FROM table1 t1"
L_0054: callvirt instance class [mscorlib]System.Text.StringBuilder [mscorlib]System.Text.StringBuilder::Append(string)
L_0059: pop
L_005a: ldloc.0
L_005b: ldstr " JOIN table2 t2"
L_0060: callvirt instance class [mscorlib]System.Text.StringBuilder [mscorlib]System.Text.StringBuilder::Append(string)
L_0065: pop
L_0066: ldloc.0
L_0067: ldstr " ON t1.column1 = t2.column1"
L_006c: callvirt instance class [mscorlib]System.Text.StringBuilder [mscorlib]System.Text.StringBuilder::Append(string)
L_0071: pop
L_0072: ldloc.0
L_0073: callvirt instance string [mscorlib]System.Object::ToString()
L_0078: ret
}
[/code]

Note I am using a default StringBuilder, which defaults to a size of 16 characters.

GetBuildString Single Call

From the profiler we can see this approach created 13 more string instances than our base, from which 8 are again the extra strings in code, one is coming from the final ToString() call and 4 are coming from the internals of the StringBuilder, since it had to increase its capacity 4 times (At 16 characters, 32, 64 and 128).

Interesting to note here is the fact that the usage of a StringBuilder already uses less memory than concatenating with += when using 9 strings. Choosing a good estimate of the target size upon constructing the StringBuilder would have made the difference even bigger.

This becomes even more obvious when comparing the results from the loop:

GetBuildString Multiple Calls

Using 258 more than our base, 8 Interned strings, 50 ToString() calls and 200 increases inside StringBuilder, we can clearly see the StringBuilder being more efficient than += even taking StringBuilder object creation into account. It is however not as efficient than the String.Concat(array) method.

StringBuilder.AppendFormat() concatenation.

And lastly, for my own personal curiosity, I wanted to see the effect of using AppendFormat() versus Append().

[csharp]
public string GetBuildFormatString()
{
// AppendFormat will first parse your string to find {x} instances
// and then fill them in. Afterwards it calls .Append
// Better to simply call .Append several times.
StringBuilder builder = new StringBuilder();
builder.AppendFormat("SELECT {0},", "column1");
builder.AppendFormat(" {0},", "column2");
builder.AppendFormat(" {0},", "column3");
builder.AppendFormat(" {0},", "column4");
builder.AppendFormat(" {0},", "column5");
builder.AppendFormat(" {0},", "column6");
builder.AppendFormat(" FROM {0} t1", "table1");
builder.AppendFormat(" JOIN {0} t2", "table2");
builder.Append(" ON t1.column1 = t2.column1");
return builder.ToString();
}
[/csharp]

This method is the most inefficient method of the pack. First a look at the IL:

[code]
.method public hidebysig instance string GetBuildFormatString() cil managed
{
.maxstack 3
.locals init (
[0] class [mscorlib]System.Text.StringBuilder builder)
L_0000: newobj instance void [mscorlib]System.Text.StringBuilder::.ctor()
L_0005: stloc.0
L_0006: ldloc.0
L_0007: ldstr "SELECT {0},"
L_000c: ldstr "column1"
L_0011: callvirt instance class [mscorlib]System.Text.StringBuilder [mscorlib]System.Text.StringBuilder::AppendFormat(string, object)
L_0016: pop
L_0017: ldloc.0
L_0018: ldstr " {0},"
L_001d: ldstr "column2"
L_0022: callvirt instance class [mscorlib]System.Text.StringBuilder [mscorlib]System.Text.StringBuilder::AppendFormat(string, object)
L_0027: pop
L_0028: ldloc.0
L_0029: ldstr " {0},"
L_002e: ldstr "column3"
L_0033: callvirt instance class [mscorlib]System.Text.StringBuilder [mscorlib]System.Text.StringBuilder::AppendFormat(string, object)
L_0038: pop
L_0039: ldloc.0
L_003a: ldstr " {0},"
L_003f: ldstr "column4"
L_0044: callvirt instance class [mscorlib]System.Text.StringBuilder [mscorlib]System.Text.StringBuilder::AppendFormat(string, object)
L_0049: pop
L_004a: ldloc.0
L_004b: ldstr " {0},"
L_0050: ldstr "column5"
L_0055: callvirt instance class [mscorlib]System.Text.StringBuilder [mscorlib]System.Text.StringBuilder::AppendFormat(string, object)
L_005a: pop
L_005b: ldloc.0
L_005c: ldstr " {0},"
L_0061: ldstr "column6"
L_0066: callvirt instance class [mscorlib]System.Text.StringBuilder [mscorlib]System.Text.StringBuilder::AppendFormat(string, object)
L_006b: pop
L_006c: ldloc.0
L_006d: ldstr " FROM {0} t1"
L_0072: ldstr "table1"
L_0077: callvirt instance class [mscorlib]System.Text.StringBuilder [mscorlib]System.Text.StringBuilder::AppendFormat(string, object)
L_007c: pop
L_007d: ldloc.0
L_007e: ldstr " JOIN {0} t2"
L_0083: ldstr "table2"
L_0088: callvirt instance class [mscorlib]System.Text.StringBuilder [mscorlib]System.Text.StringBuilder::AppendFormat(string, object)
L_008d: pop
L_008e: ldloc.0
L_008f: ldstr " ON t1.column1 = t2.column1"
L_0094: callvirt instance class [mscorlib]System.Text.StringBuilder [mscorlib]System.Text.StringBuilder::Append(string)
L_0099: pop
L_009a: ldloc.0
L_009b: callvirt instance string [mscorlib]System.Object::ToString()
L_00a0: ret
}
[/code]

Inside the AppendFormat() calls is where the ugly stuff happens. The format is converted to a character array, after which it is scanned for occurrences of {x} and in the end it is being passed to StringBuilder.Append() anyway.

I didn't spent much time trying to extract a conclusion out of the results of this test, since it's bound to perform worse than the previous method anyway, since it's the same logic with extra operations.

GetBuildFormatString Single Call

Interesting to note are the results inside the loop, demonstrating it uses even more memory than += concatenating.

GetBuildFormatString Multiple Calls

Conclusion

The conclusions I made for myself and will be following in my future development are as follows:


  • If you can avoid concatenating, do it!
    This is a no brainer, if you don't have to concatenate but want your source code to look nice, use the first method. It will get optimized as if it was a single string.


  • Don't use += concatenating ever.
    Too much changes are taking place behind the scene, which aren't obvious from my code in the first place. I advise to rather use String.Concat() explicitly with any overload (2 strings, 3 strings, string array). This will clearly show what your code does without any surprises, while allowing yourself to keep a check on the efficiency.


  • Try to estimate the target size of a StringBuilder.
    The more accurate you can estimate the needed size, the less temporary strings the StringBuilder will have to create to increase its internal buffer.


  • Do not use any Format() methods when performance is an issue.
    Too much overhead is involved in parsing the format, when you could construct an array out of pieces when all you are using are {x} replaces. Format() is good for readability, but one of the things to go when you are squeezing all possible performance out of your application.


One conclusion I am not 100 percent sure of is the difference between using String.Concat(array) and using a StringBuilder. It seems using an array incurs less memory overhead than using a StringBuilder, unless the cost of array creation is big, which I couldn't determine in my tests. I'd be more than interested to know if someone could provide more detail on this.

The guidelines in Jouni Heikniemi's article seem to be accurate when comparing between String.Concat(string, string) and StringBuilder, and will be the ones I'll be following, until I get a clear picture of the String.Concat(array) implementation.

Once again, I've uploaded the solution I used as a .zip file, with an additional HTML page displaying the results below each other.
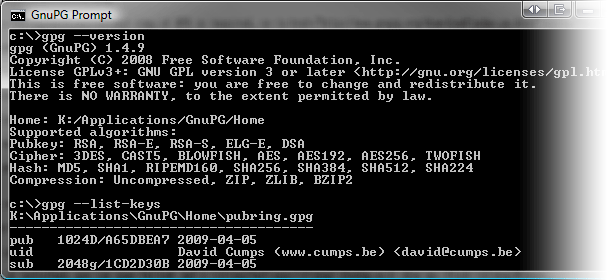
 
Deze post is geïmporteerd van de oude blog en is nog niet geconverteerd naar de nieuwe syntax.
In my last post I spoke about reverse engineering .NET assemblies upon which Gregory asked how to protect his code against it.

Initially I thought signing an assembly would be the easiest way to prevent this, and my first tests confirmed this. I signed the CrackMe from my previous post and tried modifying it again, unsuccessfully.

Visual Studio - Sign Assembly

After changing the code and saving it, Reflexil gave me several options. Adding it to the verification list, resigning it, or leaving it as is.

Reflexil - Save Tampered Assembly

None of the options proved to be usable for the following reason:

  • Adding it to the verification list.
    This won't work with fully signed assemblies. Shawn Farkas explained long ago why this doesn't work. The solution proposed doesn't work if we don't have the original key used to sign the file.
     

  • Resigning it.
    Logically this doesn't work, since we don't have the original key.
     

  • Leaving it as is.
    When trying to run the modified assembly, an exception will be thrown, preventing it from running.


FileLoadException Tampered Assembly

It seems we managed to protect our code, doesn't it? But we didn't!

I started thinking, since we can easily decompile an assembly, it couldn't be that hard to remove the signature and make it pass all checks again. After playing around with ildasm (Found at: Visual Studio - SDK - v2.0 - Bin) and ilasm (Found at: Microsoft.NET - Framework - v2.0.50727) for a while, my suspicions got confirmed. I managed to run the altered, now unsigned, assembly on my computer, defeating code signing.

This process wasn't error proof however, making round trips through ildasm and ilasm didn't always recreate the original assembly correctly. But why make the round trips in the first place? Why not edit the assembly directly, only removing the signature, instead of having to decompile and recompile the entire code.

A Google search quickly led me to the answer. This code project article describes code signing in great detail and provides a very nice utility to remove the strong name from an assembly, while also keeping into account referencing assemblies.

Using the tool on my CrackMe removed the signature without any problem, after which I could simply modify it as if it was an unsigned assembly using the instructions from my previous post.

Strong Name Remove

In conclusion, I'd say code signing offers no protection against others determined to modify your assemblies. It seems to be like copy protections on games, it will stop a certain percentage of people but not everyone. It's another layer in your protection, making it less attractive to others to even bother trying to break your security.

Should you use code signing? Yes, you should, everything helps and applying a strong name also serves other purposes such as solving versioning issues when using the Global Assembly Cache.

In my next post I'll take a look at another mechanism to protect your code from tampering, obfuscation.

This post is the second in a series on protecting intellectual property.
 
Deze post is geïmporteerd van de oude blog en is nog niet geconverteerd naar de nieuwe syntax.
I've always been a big fan of Reflector, allowing me to have a look in assemblies to learn new things, debug in case of problems and provide useful information when creating bug reports. Combined with the Reflexil Add-in it's now easy to also modify assemblies yourself.

To demonstrate this, I've created a small CrackMe sample program, which consists out of nothing more then a simple password check. This is how it looks when opened in Reflector, with Reflexil displaying the IL code below it.

Reflexil - CrackMe

Ignoring the fact that the password is out there in the open, let's have a look on how we could easily change the behavior of this assembly.

As you can see on the highlighted line in Reflexil, the instruction will jump to line 11 in case the provided password is false. Let's simply change this to jump when true. Right click the line, select 'Edit...' and change the OpCode to brtrue.s to modify the if statement.

Reflexil - Edit

I'm sure this brings back memories for people doing this years ago in assembler, JNE to JE  :)

To save this change, navigate to the .exe node in Reflector and select 'Save as ...' in the Reflexil dialog.

Reflexil - Save

If you open the new executable in Reflector and have a look at the password check, you'll notice the operator has changed, making all passwords valid except the correct one.

Reflexil - Cracked

I've attached the .zip of this project and the modified file as a small example to demonstrate how powerful good tools are.

This post is the first in a series on protecting intellectual property.
 
Deze post is geïmporteerd van de oude blog en is nog niet geconverteerd naar de nieuwe syntax.
The prompt is dead, long live the prompt! That's the feeling PowerShell should give you, the new command line shell from Microsoft. Today, I'll try to determine exactly what the Power part in PowerShell stands for.

What exactly makes it so powerful?

I belief it will gain its fair share of supporters from the fact that it's so extensible. To demonstrate it's flexibility, I'll be writing a small extension today, a so called Cmdlet. By the end of the post, this should be the result:

PowerShell - Layout - Cmdlet

As you can see, it looks just like a normal command prompt, on steroids however.

First of all, PowerShell has tab completion, not only for file and directory names, but also for commands and parameters. Typing 'Get-H' and hitting tab will cycle through 'Get-History', 'Get-Host' and 'Get-Help'. Typing a dash behind a command, indicating you want to add a property and hitting tab will cycle through all available properties for the command, for example typing 'Format-List -' and hitting tab will give you 'Format-List -Property' followed by all other properties.

Another thing which gives PowerShell its power is the fact that it runs on .NET, which enables you to write things like:

[code]
PS C:\> $arr = New-Object System.Collections.ArrayList
PS C:\> $arr.Add("David")
PS C:\> $arr.Add("Cumps")
PS C:\> $arr.Count
2
PS C:\> $arr
David
Cumps
[/code]

Besides typing these commands in the shell itself, you can also write them in a text file, with the extension .ps1, and execute these scripts in the shell. To execute script however, the security has to be changed first, since by default PowerShell will only run signed scripts, no matter where they come from.

To change the security to run your own unsigned scripts, but still require downloaded scripts to be signed, type the following into PowerShell:

[code]
Set-ExecutionPolicy RemoteSigned
[/code]

Just like known Linux shells, PowerShell always runs a script when you start it, the so called profile script. Typing $profile in PowerShell will display its location on your system. Initially no profile will exist yet, so let's set one up...

Type 'notepad $profile' in PowerShell to open a new Notepad instance. When you run Vista as a non-admin, this might give a 'file does not exist' message. You can safely ignore this, as long as you save your file to the correct location afterwards (the path that $profile displayed).

The first change will be a very simple one, changing the title and window colors. Paste the following into Notepad and save it:

[code]
# Set up PowerShell looks
(Get-Host).UI.RawUI.BackgroundColor = "Black"
(Get-Host).UI.RawUI.ForegroundColor = "White"
(Get-Host).UI.RawUI.WindowTitle = "David Cumps » PowerShell"

# And go!
cls
[/code]

If you now restart PowerShell, or type '. $profile', the profile will be applied and you'll notice we have a standard black and white prompt again, with our custom title. This is the first custom script PowerShell has run on your computer. To get more scripts, have a look at The Script Center Script Repository, which is filled with scripts for various system administration purposes.

Scripts are scripts however, they simple use commands available to them. To see a list of all available commands enter 'Get-Command' and have a look, typing 'Get-Alias' will give you a list of all familiar DOS commands, mapped to their respective commands. The nice part is that we can create our own custom commands, called Cmdlets, written in any .NET language and simply plug them in to PowerShell, available to help us automate tasks even easier.

By default, Microsoft ships a collection of Cmdlets, which you saw earlier, to provide all the known DOS commands for us. With these basic Cmdlets, we can already do some nice things, for example if you wanted to get all running processes ordered by CPU time, you could simply type the following:

[code]
PS C:\> Get-Process | Where-Object {$_.CPU -gt 0} | Sort-Object CPU -descending

Handles NPM(K) PM(K) WS(K) VM(M) CPU(s) Id ProcessName
------- ------ ----- ----- ----- ------ -- -----------
783 34 60768 62960 308 226,75 2040 explorer
404 15 112932 121448 243 163,38 5480 firefox
650 16 29720 25444 136 125,03 5052 winamp
53 2 1868 14292 48 34,22 2624 notepad
571 48 72824 67572 340 10,44 1964 devenv
[/code]

As you noticed, Cmdlets can easily be piped to each other to create powerful constructs. But, enough of the default things, let's build something!

The Cmdlet should support the following features:

  • Called stand-alone without parameters.

  • Called stand-alone with one parameter.

  • Called stand-alone with multiple parameters.

  • Called in a pipeline receiving input parameters.

  • Output its result to the pipeline.


A Cmdlet is nothing more then a Class Library which uses System.Management.Automation, inherits from Cmdlet and applies the Cmdlet attribute. Don't forget to add a reference to C:\Program Files\Reference Assemblies\Microsoft\WindowsPowerShell\v1.0\System.Management.Automation.dll when you create the new project, to get access to the Cmdlet base class and CmdletAttribute.

I'll let the code speak for itself, with a small recap afterwards.

[csharp]
using System;
using System.Management.Automation;

namespace CumpsD.HelloWorld
{
[Cmdlet(VerbsCommon.Get, "Hello")]
public class HelloCmdlet : Cmdlet
{
// An array is used to support the following scenario:
// Get-Process | Get-Hello
[Parameter(Position = 0, ValueFromPipelineByPropertyName = true, Mandatory = false, HelpMessage = "Name to greet.")]
public string[] Name { get; set; }

// Called when cmdlet is invoked.
protected override void BeginProcessing()
{
// You could open a database connection here for example.
base.BeginProcessing();
}

// Called when we have pipeline input.
protected override void ProcessRecord()
{
// this.Name could be null in BeginProcessing (no parameters passed)
// but could be filled when ProcessRecord gets called (parameters from pipeline)

if (this.Name == null)
{
// No arguments have been supplied, neither manual nor pipeline.
this.WriteObject("Hello World!");
}
else
{
foreach (string name in this.Name)
{
this.WriteObject(String.Format("Hello {0}!", name));
}
}
}

// Called after every record has been processed.
protected override void EndProcessing()
{
base.EndProcessing();
}

// Called when the user hits CTRL+C
protected override void StopProcessing()
{
base.StopProcessing();
}
}
}
[/csharp]

First of all, we define the name of our Cmdlet in the attribute, Get-Hello in this case. Then we create our only property as an array, to support multiple parameters being passed in, and specify that its allowed to retrieve its value from the pipeline. When it is called through the pipeline, it will take each object returned from the previous Cmdlet, look if there is a property called Name on there, and use that value for our property.

After this initial setup, it's time to implement the processing of the Cmdlet. The PowerShell infrastructure will always call BeginProcessing and ProcessRecord, even if you don't supply any parameters, as documented in the code above.

Simply coding up this class won't cut it however. Somehow it needs to get inserted into the PowerShell environment. For this, we create a very simple installer class, which will install all Cmdlets it can find in our assembly into PowerShell. Don't forget to add System.Configuration.Install as a reference to get access to the RunInstaller attribute.

[csharp]
using System;
using System.ComponentModel;
using System.Management.Automation;

namespace HelloWorld
{
[RunInstaller(true)]
public class HelloSnapIn : PSSnapIn
{
public override string Name
{
get { return "HelloSnapIn"; }
}

public override string Vendor
{
get { return "David Cumps"; }
}

public override string Description
{
get { return "This Windows PowerShell snap-in contains the Get-Hello cmdlet."; }
}
}
}
[/csharp]

That's all the code needed to create a Cmdlet! We could install it now, but let's make our lives easier first and configure Visual Studio to support debugging of this Cmdlet. Open the properties of the project and configure the Debug tab as follows:

Visual Studio PowerShell Debug Configuration

Start external program: C:\Windows\System32\WindowsPowerShell\v1.0\powershell.exe
Command line arguments: -noexit -command icmd HelloWorld.dll HelloSnapIn

This will start PowerShell and install the latest version of our Cmdlet whenever we go in Debug mode. When you run it at this stage, it'll throw an error however, because it doesn't know the icmd alias yet. Simply add the following to the PowerShell profile:

[code]
# Needed for some commands where administrator permissions are needed
function elevate
{
$file, [string]$arguments = $args;
$psi = new-object System.Diagnostics.ProcessStartInfo $file;
$psi.UseShellExecute = $true;
$psi.Arguments = $arguments;
$psi.Verb = "runas";

$p = new-object System.Diagnostics.Process;
$p.StartInfo = $psi;
$p.Start();
$p.WaitForExit();
$p.Close();
}

# Easily install new cmdlets
function InstallSnappin([string]$dll, [string]$snappin)
{
$path = Get-Location;
$assembly = $path.Path + "\" + $dll;
elevate C:\Windows\Microsoft.NET\Framework\v2.0.50727\installutil.exe $assembly | out-null;
Add-PSSnapin $snappin | out-null;
Get-PSSnapin $snappin;
}

set-alias icmd InstallSnappin
[/code]

At this stage, going in Debug mode will build the assembly, open PowerShell, execute installutil as an admin, with a UAC prompt under Vista, and install the Cmdlet, after which you are ready to test it and more importantly, use breakpoints! Don't forget to modify the command line arguments in the Debug properties to reflect your assembly name and installer class name when you create a new project.

Let's have a look if we managed to implement our requirements:

[code]
PS C:\> # Called stand-alone without parameters.
PS C:\> Get-Hello
Hello World!

PS C:\> # Called stand-alone with one parameter.
PS C:\> Get-Hello "David Cumps"
Hello David Cumps!

PS C:\> # Called stand-alone with multiple parameters.
PS C:\> Get-Hello "David", "Readers"
Hello David!
Hello Readers!

PS C:\> # Called in a pipeline receiving input parameters.
PS C:\> Get-Process | Where-Object {$_.CPU -gt 10} | Sort-Object CPU -desc | Get-Hello
Hello explorer!
Hello dwm!
Hello winamp!
Hello OUTLOOK!
Hello firefox!
Hello notepad!

PS C:\> # Output its result to the pipeline.
PS C:\> Get-Hello "A", "C", "B"
Hello A!
Hello C!
Hello B!
PS C:\> Get-Hello "A", "C", "B" | Sort-Object
Hello A!
Hello B!
Hello C!
[/code]

Hooray! We managed to set our development environment up to be productive, being able to easily install the latest version of our Cmdlet and having the ability to debug, and we wrote a Cmdlet offering all the nice features needed to incorporate it into our future scripts. Mission successful I'd say.

As usual, I've uploaded a .zip file which includes the solution to the above Cmdlet, including the Debug properties and the full PowerShell profile I'm using.

What do you think about PowerShell? Will it make your life easier as a system administrator?
 
Deze post is geïmporteerd van de oude blog en is nog niet geconverteerd naar de nieuwe syntax.
Yesterday I talked about personalizing Outlook Today to make it look more sexy. One of the things I had on my Outlook Today, was my picture with a direct link to my contact details. This link looked like this:

[html]
Contact Details
[/html]

As you can see, I'm pointing to 0000000031490E5EAED5DA4AAB47FD1B9F1E6BA7E43D2D00. This is the name Outlook internally assigned to my contact details, but how did I find it?

To figure this out, I wrote an Outlook Add-in which simply gives me the internal name of any selected item, be it a mail, appointment, contact or task, as shown here:

GuidFinder Result

Creating this Add-in was quite easy with Visual Studio 2008. I started by creating a new project of the type Office - 2007 - Outlook Add-in, which results in one class presenting you two important methods:

[csharp]
private void ThisAddIn_Startup(object sender, System.EventArgs e)
{
}

private void ThisAddIn_Shutdown(object sender, System.EventArgs e)
{
}
[/csharp]

Using the following MSDN resources, I quickly hacked a small Outlook Add-in together, which would give me an additional menu item.
GuidFinder Menu Item


To add a new button, I changed the code from the article a bit, to look as follows:

[csharp]
#region Add menu item
private void AddMenuBar()
{
try
{
// Get the current menu bar.
this.menuBar = this.Application.ActiveExplorer().CommandBars.ActiveMenuBar;

// Add a new item to the menu bar.
this.newMenuBar = (CommandBarPopup)menuBar.Controls.Add(
MsoControlType.msoControlPopup, missing,
missing, missing, false);

// Add the menu bar if it doesn't exist.
if (this.newMenuBar != null)
{
this.newMenuBar.Caption = "GuidFinder";
this.newMenuBar.Tag = this.menuTag;

// Add a new menu item to the menu.
this.getGuidButton = (CommandBarButton)newMenuBar.Controls.Add(
MsoControlType.msoControlButton, missing,
missing, 1, true);

// Layout the menu item.
this.getGuidButton.Style = MsoButtonStyle.msoButtonIconAndCaption;
this.getGuidButton.Caption = "Get GUID";
this.getGuidButton.FaceId = 25; // Looking Glass icon
this.getGuidButton.Click += new _CommandBarButtonEvents_ClickEventHandler(this.getGuid_Click);

// Make our result visible.
this.newMenuBar.Visible = true;
}
}
catch (System.Exception ex)
{
MessageBox.Show("Error: " + ex.Message.ToString(), "Error Message Box", MessageBoxButtons.OK, MessageBoxIcon.Error);
}
}
#endregion
[/csharp]

The FaceId property defines the icon which will be displayed next to your menu item. To get a list of possible icons, have a look at these images.

When you run the Add-in at this stage, buttons will keep on adding themselves to Outlook every time you run it. Therefore we need to write some code which removes the button in case it already exists:

[csharp]
#region Remove Menu item
private void RemoveMenubar()
{
// If the menu already exists, remove it.
try
{
CommandBarPopup foundMenu = (CommandBarPopup)
this.Application.ActiveExplorer().CommandBars.ActiveMenuBar.
FindControl(MsoControlType.msoControlPopup,
missing, menuTag, true, true);

if (foundMenu != null)
{
foundMenu.Delete(true);
}
}
catch (System.Exception ex)
{
MessageBox.Show("Error: " + ex.Message.ToString(), "Error", MessageBoxButtons.OK, MessageBoxIcon.Error);
}
}
#endregion
[/csharp]

Clicking on the Get GUID button should give us the internal name of the item, for which we use the following code to display it:

[csharp]
#region Display the Guid
private void getGuid_Click(CommandBarButton ctrl, ref bool cancel)
{
try
{
// Get the selected item in Outlook and determine its type.
Selection outlookSelection = this.Application.ActiveExplorer().Selection;

if (outlookSelection.Count > 0)
{
string itemGuid = string.Empty;
object selectedItem = outlookSelection[1];

if (selectedItem is MailItem)
{
MailItem mailItem = (selectedItem as MailItem);
itemGuid = mailItem.EntryID;
}
else if (selectedItem is ContactItem)
{
ContactItem contactItem = (selectedItem as ContactItem);
itemGuid = contactItem.EntryID;
}
else if (selectedItem is AppointmentItem)
{
AppointmentItem apptItem = (selectedItem as AppointmentItem);
itemGuid = apptItem.EntryID;
}
else if (selectedItem is TaskItem)
{
TaskItem taskItem = (selectedItem as TaskItem);
itemGuid = taskItem.EntryID;
}
else if (selectedItem is MeetingItem)
{
MeetingItem meetingItem = (selectedItem as MeetingItem);
itemGuid = meetingItem.EntryID;
}

if (itemGuid != String.Empty)
{
MessageBox.Show(String.Format("The GUID of this item is {0}", itemGuid), "Guid", MessageBoxButtons.OK, MessageBoxIcon.Information);
}
else
{
MessageBox.Show("The item type could not be determined.", "Error", MessageBoxButtons.OK, MessageBoxIcon.Error);
}
}

}
catch (System.Exception ex)
{
MessageBox.Show("Error: " + ex.Message.ToString(), "Error", MessageBoxButtons.OK, MessageBoxIcon.Error);
}
}
#endregion
[/csharp]

Wiring up everything in the end, is as simple as first checking if our menu already exists and removing it, to afterwards add it to Outlook again.

[csharp]
private void ThisAddIn_Startup(object sender, System.EventArgs e)
{
this.RemoveMenubar();
this.AddMenuBar();
}
[/csharp]

Once again, I uploaded a zip file, containing the source code, together with the files from my previous Outlook Today article. The solution is created with Beta 2 of Visual Studio 2008 and works with Outlook 2007. This small GuidFinder Add-in is a nice start to discover the full potential of Outlook Add-ins.

If you aren't interested in the code, but would like to have this Add-in installed in Outlook 2007, run the ClickOnce installer to deploy it on your computer. This installer will get all prerequisites needed to run the Add-in (.NET 3.5) and the Add-in itself. If you get an error about an untrusted certificate, add wiki.cumps.be to your Trusted Sites zone.

I belief this is a very powerful technology to use inside a company and provide added value to your employees, making them more productive through useful add-ins. Thanks to the ClickOnce technology it's easy to deploy add-ins to clients and keep them updated.

What do you think about .NET Outlook Add-ins and ClickOnce?
 
Deze post is geïmporteerd van de oude blog en is nog niet geconverteerd naar de nieuwe syntax.
Yesterday I explained how you could manage your iPod through Windows Explorer. Having this ability opens up more powerful ways of managing your iPod. One of these ways for example is the ability to automatically sync your master archive stored on your computer, with your iPod. In my case it's stored in FLAC format to retain all it's quality, since FLAC is a lossless format.

Armed with TagLib#, LAME, FLAC and a nice function to recursively search through a directory for files, I slapped together a small synchronization application for myself.

On my iPod I have the following batch file, EncodeLibrary.bat, stored:

[code]@ECHO OFF
ECHO Running: '%~d0\LibrarySync.exe %~d0\ C:\Media\Music %~d0\Music'
ECHO Encodes to MP3 with: -V 4 --vbr-new
%~d0\LibrarySync.exe %~d0\ C:\Media\Music %~d0\Music
ECHO Done.[/code]

This file simply calls my utility, LibrarySync.exe, and passes in the drive it is running on (%~d0), The Archive and the target directory. In my application I then simply scan for all available FLAC files, through a wildcard search, in the archive and trigger an action whenever a file is found.

[csharp]static void Main(string[] args)
{
/* Note to blog reader: These used to be constants, never properly refactored it since it was a quick and dirty personal app. */
DRIVE = args[0];
FROMDIR = args[1];
TODIR = args[2];

ScanDirectory scanDirectory = new ScanDirectory();

scanDirectory.FileEvent += new ScanDirectory.FileEventHandler(scanDirectory_FileEvent);
scanDirectory.SearchPattern = "*.flac";

scanDirectory.WalkDirectory(FROMDIR);
}
[/csharp]

Whenever a FLAC file is found, I check if the target MP3 already exists, and in case it doesn't exist yet, I call a Convert.bat file. I've chosen to use an external batch file to handle the copying, this way I can simply open it up in a text editor and change the encoding quality or the paths to the encoder.

After encoding the file, I take the meta data from the original FLAC file and place it in the target MP3 ID3v1 and ID3v2 tags. This way my iPod can read out the file details and organize it easily in it's catalog.

[csharp]static void scanDirectory_FileEvent(object sender, FileEventArgs e)
{
string from = e.Info.FullName;
string to = TODIR + e.Info.FullName.Remove(0, FROMDIR.Length).Replace(".flac", ".mp3");
string toDir = TODIR + e.Info.DirectoryName.Remove(0, FROMDIR.Length);

if (!IO.File.Exists(to))
{
if (!IO.Directory.Exists(toDir))
{
IO.Directory.CreateDirectory(toDir);
}

Console.WriteLine("Writing " + to);

Process convertFile = new Process();
convertFile.StartInfo.UseShellExecute = false;
convertFile.StartInfo.RedirectStandardOutput = false;

convertFile.StartInfo.FileName = DRIVE + "Convert.bat";
convertFile.StartInfo.Arguments = "\"" + from + "\" \"" + to + "\"";
convertFile.Start();

convertFile.WaitForExit();

Flac.File flacFile = new Flac.File(from);
TagLib.Tag flacTag = flacFile.GetTag(TagLib.TagTypes.FlacMetadata, false);

TagLib.File mp3File = TagLib.File.Create(to);
MP3.Tag mp3Tag = mp3File.GetTag(TagLib.TagTypes.Id3v2) as TagLib.Id3v2.Tag;
MP3Old.Tag mp3OldTag = mp3File.GetTag(TagLib.TagTypes.Id3v1) as TagLib.Id3v1.Tag;

if (flacTag.Album != null) { mp3Tag.Album = flacTag.Album; }
if (flacTag.FirstPerformer != null) { mp3Tag.Performers = new string [] { flacTag.FirstPerformer }; }
if (flacTag.Title != null) { mp3Tag.Title = flacTag.Title; }
if (flacTag.Year != 0) { mp3Tag.Year = flacTag.Year; }
if (flacTag.FirstGenre != null) { mp3Tag.Genres = new string [] { flacTag.FirstGenre }; }
if (flacTag.Track != 0) { mp3Tag.Track = flacTag.Track; }

if (flacTag.Album != null) { mp3OldTag.Album = flacTag.Album; }
if (flacTag.FirstPerformer != null) { mp3OldTag.Performers = new string [] { flacTag.FirstPerformer }; }
if (flacTag.Title != null) { mp3OldTag.Title = flacTag.Title; }
if (flacTag.Year != 0) { mp3OldTag.Year = flacTag.Year; }
if (flacTag.FirstGenre != null) { mp3OldTag.Genres = new string [] { flacTag.FirstGenre }; }
if (flacTag.Track != 0) { mp3OldTag.Track = flacTag.Track; }

mp3File.Save();

Console.WriteLine();
}
}[/csharp]

The content of my Convert.bat file looks like this:

[code]@ECHO OFF
"%~d0\Tools\FLAC\flac.exe" --decode --stdout --silent %1 | "%~d0\Tools\LAME\latest\lame.exe" -V 4 --vbr-new - %2[/code]

It simply encodes the FLAC file to a VBR MP3 with a target bitrate of 165kbps.

All said and done, this is how the tool looks like in action:

Encoding FLAC files to MP3

When I connect my iPod, I usually follow these steps from now on:

  • Run reTune to manage my songs in Windows Explorer.

  • Run EncodeLibrary to encode possible missing songs.

  • Run reTune to organize them back into my iPod.

  • Disconnect and listen to music.


I created a small zip file for anyone who would like to set something like this up for himself as well. To use it, simply follow the following steps:

  • Extract the zip file to the root of your iPod.

  • Edit EncodeLibrary.bat to point to your master archive, and the target folder.

  • Get the FLAC and LAME files and place them in a folder called Tools. Look at Convert.bat to determine the exact paths.

  • Run EncodeLibrary.bat from a command prompt, and with a bit of luck it'll work for you. If not, leave a comment and I'll see what I can do for you.


Do you know of other cool things I could create for my iPod? Comment and let me know!
 
Deze post is geïmporteerd van de oude blog en is nog niet geconverteerd naar de nieuwe syntax.
Visual Studio is a great editor! But when editing other file formats I miss the coloring.

When working with PHP files, it's great to be able to make a solution to organize php sources, and having code open in tabs, but when they all look black and white, I find it requires more focus on my part when coding.

Long ago, I wrote a piece on getting coloring to work in Visual Studio 2002 and 2003. Somehow I managed to skip doing any PHP development during the entire lifetime of Visual Studio 2005, but recently I had to create something small, and I missed my nice colors. I tried to apply my old method in Visual Studio 2008 (Orcas), and this is the result:

Visual Studio 2008 - PHP

Looks pretty appetizing, doesn't it?

To get this in Visual Studio 2008, do the following:

  • Download vs-php.zip and extract it somewhere.

  • Execute the preferred registry file (php_edit2008.reg for Visual Studio 2008 ofcourse).

  • This will create a File Extension association for PHP files, treating them as C++ files.

  • Copy the usertype.dat to your VS.NET directory. (default C:\Program Files\Microsoft Visual Studio 9.0\Common7\IDE)

  • Restart Visual Studio if it was opened.

  • Open a .php file and admire the colors!


For this to work, you need to have C++ support installed! Otherwise the usertype.dat file will not work, since this is specific to .cpp files. You don't need to install everything for C++, only the following will already work:

Visual Studio 2008 - Setup C++

When you look in the registry, you will see that the .php extension looks exactly like the .cpp one, you can also try experimenting with applying the .cs or .html filter to a .php file, but I found them both lacking. Using the .cs value, you will get coloring from C#, but it will also give you lots of syntax warnings. When using the .html one, it doesn't always color the entire file.

If you want to color more keywords, open up the usertype.dat file in a text editor, and simply add more words to it.

Enjoy the extra productivity gain!
 
Deze post is geïmporteerd van de oude blog en is nog niet geconverteerd naar de nieuwe syntax.
DebugView is a very nice tool from Microsoft (by SysInternals), which allows you to see debug output from the kernel or Win32, local and remote!

Providing debug messages trough this system has been available from Windows 95, so you can trust having debug capabilities everywhere. I strongly belief this to be a very powerful way to provide information about your application, without having to write to logfiles, or attaching a debugger. Debugging ASP.NET applications should also be easier when incorporating this.

But how do you make C# use this? You use the System.Diagnostics namespace!

I have created a small demonstration program which writes two messages and a third one conditionally. Putting a prefix in front of the messages will help you filtering them out in DebugView afterwards, since other applications might be writing to it as well.

[csharp]using System;
using System.Diagnostics;

namespace CumpsD.Demo.DebugView
{
class Program
{
static void Main(string[] args)
{
Console.WriteLine("Demonstrating System.Diagnostics");
Console.WriteLine("--------------------------------" + Environment.NewLine);

Console.WriteLine("Turn on DebugView to look at results.");
Console.WriteLine("http://www.microsoft.com/technet/sysinternals/utilities/debugview.mspx");
Console.WriteLine();
Console.Write("Press any key to continue . . .");
Console.ReadKey(true);
Console.WriteLine(Environment.NewLine);

Debug.Write("DemoCategory: This is written trough System.Diagnostics.Debug.Write.");
Console.WriteLine("This is written trough System.Diagnostics.Debug.Write.");

Trace.Write("[DemoCategory: This is written trough System.Diagnostics.Trace.Write.");
Console.WriteLine("This is written trough System.Diagnostics.Trace.Write.");

bool inDebug = (new Random().Next(0, 2) == 1);
Debug.WriteIf(inDebug, "This is written because inDebug is true.");

if (inDebug)
{
Console.WriteLine("This is written because inDebug is true.");
}
Console.WriteLine(Environment.NewLine + "Look in DebugView to see the messages.");
}
}
}
[/csharp]

When you run this program, you will get the following output in DebugView:

DebugView Output

It’s also possible to connect to a remote computer, and intercept these debug messages remotely.

DebugView Remote

This tool is completely free, which is really amazing for such a powerful and useful tool.
 
Deze post is geïmporteerd van de oude blog en is nog niet geconverteerd naar de nieuwe syntax.
When the Windows Service was successfully running, a way had to be found to control it. There was a ServiceController class which allowed controlling a service and sending messages to it trough the ExecuteCommand method. This method was limited to sending integers without getting anything back. A better solution was to use Remoting to control the service.

Remoting allows for interproces communication, making objects available between different processes. An object is passed from server to client by reference, where the client can work with it as if it was a real object at the client. Remoting takes care of collecting information about the client calls and sending it to the server, where it is passed to the server object which performs the action on the client’s behalf. The result of this operation is then sent back to the client.

Remoting can transport this information over different channels, such as TCP and HTTP for example. In the project, a TCP channel was used, with the following code:

[csharp]
using System.Runtime.Remoting;
using System.Runtime.Remoting.Channels;
using System.Runtime.Remoting.Channels.Tcp;

namespace MediaService.Player {
public class PlayerService : System.ServiceProcess.ServiceBase {
private TcpChannel tcpChannel;

private void SetupRemoting() {
this.tcpChannel = new TcpChannel(this.configData.RemotingPort);
ChannelServices.RegisterChannel(this.tcpChannel);
RemotingConfiguration.ApplicationName = "MediaServicePlayer";
[/csharp]


After a channel had been setup, there were different possibilities to make a certain object available. But first, the object had to be created. This was a simple class, which inherited from MarshalByRefObject, and implemented a custom interface.

[csharp]
using System;
namespace MediaService.Player {
public class PlayerServiceController: MarshalByRefObject,
IPlayerServiceController {
[/csharp]

The interface was used, to make it possible to only make the assembly with the interface available to consumers of the remote object, instead of the implementation.

After an object was created, it was possible to register this type as a WellKnowType. There were two possibilities for this. It could be registered as a Singleton, which would make sure only instance of the object lived on the server at a given time. The other possibility was to register it as SingleCall, which would create a new object for each call. None of these two proved to be successful, because they both were unable to call methods from the service. The solution was to instantiate a new object when the service started, and to make this instance remotely available. This allowed the object to be in contact with the Windows Service, making it possible to control it. The following code published the object on tcp://host:port/MediaServicePlayerController:

[csharp]
RemotingServices.Marshal(this.playerController,
"MediaServicePlayerController");
[/csharp]

At the end, when the service was stopped, everything had to be cleaned up. The published object got disconnected and the channel got unregistered.

[csharp]
private void TearDownRemoting() {
RemotingServices.Disconnect(this.playerController);
ChannelServices.UnregisterChannel(this.tcpChannel);
} /* TearDownRemoting */
[/csharp]
 
Deze post is geïmporteerd van de oude blog en is nog niet geconverteerd naar de nieuwe syntax.
In the .NET Framework there is a feature called boxing, which goes hand in hand with unboxing. Boxing is an implicit conversion of a value-type to the object type. While this is a very nice feature when programming normal applications, this overhead becomes a big performance hit when working with algorithms that need to do lots of operations, such as path finding.

When you create a value-type, it’s originally placed on the stack. If you box this value-type, the required memory is allocated on the heap, the value gets copied and an object is placed on the stack, pointing to the boxed value on the heap.

Boxing an int
Boxing an int

Unboxing the int again
Unboxing


In a pathfinder I created long ago, in the .NET 1.1 era, a list of points had to be maintained. While this was possible using an ArrayList, it proved faster to write a typed list. The main reason behind this was because the ArrayList’s method signatures all work with objects, causing implicit boxing when using them. Retrieving items from an ArrayList also required unboxing, because that had to be cast back into their Point type.

I wrote a small application to demonstrate the boxing and unboxing taking place, and the performance impact. The test data were 10 million random Point values.

[csharp]// Adding to an ArrayList
for (int i = 0; i < itemsToGenerate; i++) {
arrayList.Add(rndCosts[i]);
}[/csharp]

When we take a look at the IL code this piece generates, we would see the following:

[code]ldobj [System.Drawing]System.Drawing.Point
box [System.Drawing]System.Drawing.Point
callvirt instance int32 [mscorlib]System.Collections.ArrayList::Add(object)[/code]

On the second line, you can see it uses the box operation to box our value-type Point (stored in the typed Point array rndCosts) before calling the Add method.

The solution to this is using generics, available from .NET 2.0 onwards, or writing your own typed list object. As .NET 1.1 had to be used, I chose the second solution. To do this, I used Reflector to look at the ArrayList code, and use that code to create a new list, replacing all instances of object with our required type, Point in this example.

Now we use the same piece of test code with our PointList.
[csharp]// Adding to a typed PointList
for (int i = 0; i < itemsToGenerate; i++) {
pointList.Add(rndCosts[i]);
}[/csharp]

If we look at the IL this piece generates, we notice the following:

[code]ldobj [System.Drawing]System.Drawing.Point
callvirt instance int32 [PointList]CumpsD.Collections.PointList::Add(
valuetype [System.Drawing]System.Drawing.Point)[/code]

The Framework does not use the box operation anymore, effectively getting rid of the overhead we had with our first solution. When we take a look at the test results, we can clearly see the difference between the first solution and the second.

[code]ArrayList: added 10000000 items.
00:00:03.1845792 seconds
PointList: added 10000000 items.
00:00:00.2804032 seconds[/code]

By using the strong typed PointList it was possible to get just a bit more performance out of the code, making the project operate better in the long run. Just for fun, I revisited this test using .NET 3.5, with generics and created a List to store the items. I ended up having similar performance (00:00:00.2915599 seconds) as the typed list I created in .NET 1.1, pretty good considering I wrote it two years ago ;)

The main conclusion here is to avoid any non-typed collection when performance is an issue. Some browny points for our Bits & Bytes Religion when it comes to the happy feeling you get when working with generics :)

 
Deze post is geïmporteerd van de oude blog en is nog niet geconverteerd naar de nieuwe syntax.
Some time ago I saw something about Alternate Data Streams, but I can't find the source anymore to give credit :(


Alternate Data Streams are a "feature" of NTFS, making it possible for one file to store data in multiple streams, attached to the file.

I have made a small BlogCast about Alternate Data Streams, demonstrating them using a cmd, and a C# program.

It's 8 minutes in length, 6.2 MB in size and I also included the used source code.

This is my first attempt at a BlogCast, and in English, if you have any comment on how to improve it, please tell me :)


Deze post is geïmporteerd van de oude blog en is nog niet geconverteerd naar de nieuwe syntax.
Right, about 2 weeks ago Jon Lech Johansen released Justeport, a tool to stream your Apple music files to your Airport Express. <

His site went down almost as soon as the big news sites picked it up, and the source of Justeport couldn't be downloaded.

I also didn't see much blogging about this, which is strange, because his tool is written in C#!

A few days ago I got an Airport Express and now I'm streaming .mp3 to it from iTunes (on Windows) but I have to use iTunes, and that's not something I like, making me go away from Winamp...

But JustePort can not stream .mp3 files to it, but the source is available (and here is a mirror), so maybe there is someone with a better understanding of handling music files in C# who could write something to stream .mp3 to it.

Hopefully there will be a Winamp plugin someday to do this.

It's a great piece of technology, a very small WiFi AP which you can plug in to an electric outlet and to your stereo and stream music to it through the air.

I guess if someone has too much time on his hands and wants a challenge, this is one, writing an mp3 player that can stream to the Airport Express (with volume control, play, pauze, prev, next and playlist support of course ;))

If someone is up to it, and needs someone testing it with an Airport Express, contact me and I'm willing to help you.
 
Deze post is geïmporteerd van de oude blog en is nog niet geconverteerd naar de nieuwe syntax.
For everyone who received .NET Magazine #5, there's an article in there at page 53 about cleaning up your code.

Jan Tielens mentions a ConvertToProperties macro, which is really sweet!

But there has been a printing error or something, the link went missing on page 55 in the bottom box. (http://xxx/...)

So, here is it: Create Property Macro for C#.

The version on the site doesn't correspond to the screenshots, it doesn't use mVariable (any more?), but replaces it with _variable (which I prefer).

Be sure to get this macro! It saves you a lot off time ;)
 
Deze post is geïmporteerd van de oude blog en is nog niet geconverteerd naar de nieuwe syntax.
Everyone who has ever used a Regex knows this form of parameter:

[csharp]
Regex r = new Regex("", RegexOptions.Singleline | RegexOptions.IgnoreCase);
[/csharp]

I often wondered how to do that as well and because nobody ever taught me that at school, I had to figure it out myself. And today I did, and I'm sharing :)


This is very useful if you have a class that takes a lot of options and you don't want to add a bool for each possible option.

First you need to create an enum with the possible options, and number them binary. (eg: 1, 2, 4, 8, 16, ...)

[csharp]
public enum Pars {
One = 1,
Two = 2,
Three = 4,
Four = 8,
Five = 16,
Six = 32,
Seven = 64
} /* Pars */
[/csharp]

Next you need to have a method which takes this enum as a parameter, after which you can extract each of the possible options from it with a bitwise AND:

[csharp]
private static void TestPars(Pars options) {
if ((options & Pars.One) == Pars.One) { Console.WriteLine("One"); }
if ((options & Pars.Two) == Pars.Two) { Console.WriteLine("Two"); }
if ((options & Pars.Three) == Pars.Three) { Console.WriteLine("Three"); }
if ((options & Pars.Four) == Pars.Four) { Console.WriteLine("Four"); }
if ((options & Pars.Five) == Pars.Five) { Console.WriteLine("Five"); }
if ((options & Pars.Six) == Pars.Six) { Console.WriteLine("Six"); }
if ((options & Pars.Seven) == Pars.Seven) { Console.WriteLine("Seven"); }
} /* TestPars */
[/csharp]

When all this is done, you call the method, passing the options you want with a bitwise OR between them, like this:

[csharp]
static void Main(string[] args) {
TestPars(Pars.Three | Pars.Five | Pars.Seven);
}
[/csharp]

This example will print Three, Five and Seven.

How does it work internally?

Here are the rules for the bitwise operators:

Bitwise OR:
0101 (expression1)
1100 (expression2)
----
1101 (result)

Bitwise AND:
0101 (expression1)
1100 (expression2)
----
0100 (result)

Now, our enum has the following binary values:

1 - 0001
2 - 0010
3 - 0100
4 - 1000
...

If for example we pass the options One and Two along, we combine them with the bitwise OR, creating 0011.

And if we want to check if Four was passed along, in our if we check if the options combined bitwise with Four result in Four.

0011
0100
----
0000

Four was not passed.

If we check with Two we get the following:

0011
0010
----
0010

And 0010 = Two, our if = true, and Two was passed along.

A lot of you will say "well duh, that's basics". Could be true, but I never learned it at school, and never ever had the need for it, but now I wanted to know, and I guess there are more people out there who haven't learned it either.
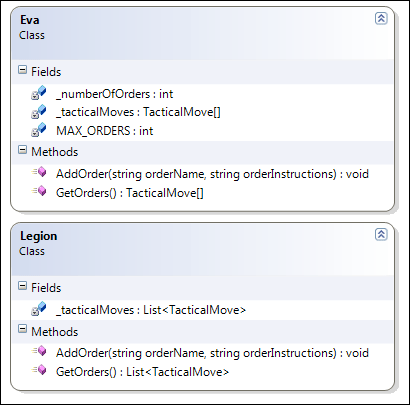
 
Deze post is geïmporteerd van de oude blog en is nog niet geconverteerd naar de nieuwe syntax.
I started working with NUnit a couple of days ago and here is my first attempt at creating something in this new style:

Error Reporting To The EventLog - NUnit.

It's very weird to switch to Test Driven Development, still have to get the hang of it.

If anybody has any comments on what I created so far, if it's good or bad, please say so, I'd like to know if that's the way others use NUnit.
 
Deze post is geïmporteerd van de oude blog en is nog niet geconverteerd naar de nieuwe syntax.
For this article, we're going to write a class to write to the EventLog. To allow us for easy error logging.

I'm going to use NUnit as well to test our class. You can get NUnint at http://www.nunit.org/. Install it.

Start by creating a new project called 'EventLogTests', this is a class library. Add a reference to nunit.framework.dll located in the NUnit bin directory.

Throw out the constructor and add the attribute TestFixture to the class. This will tell NUnit about a new set of tests.

[csharp]
namespace EventLogTests {
using System;
using NUnit.Framework;
using CumpsD.Tools;
using System.Diagnostics;

[TestFixture()]
public class EventLogTests {

} /* EventLogTests */
[/csharp]

Now we'll add a method called Initialise, which we mark with the SetUp attribute. This method will be run at the beginning of each test. In here we will create our EventLogger object (which doesn't exist yet).

[csharp]
private EventLogger _ErrorLog;

[SetUp]
public void Initialise() {
this._ErrorLog = new EventLogger("MyCatastrophicError");
}
[/csharp]

Next thing is setting up NUnit. You can find Visual Studio add-ins for NUnit, but as I'm having some problems with getting them to work properly I'm using an alternate method. Go to the project properties, configuration properties, debugging. And set Debug Mode to Program, and Start Application to nunit-gui.exe, each time we'll press F5 NUnit will now launch.

The way of test driven development is to first write a test that fails and then add some code to make the test pass. We have already written a failing SetUp, because the EventLogger class doesn't exist yet, this counts as a failed test as well. So, let's make it pass.

Create a new class library called EventLogger and create the constructor.

[csharp]
namespace CumpsD.Tools {
using System;
using System.Diagnostics;
using System.Runtime.Serialization;
using System.Runtime.Serialization.Formatters.Binary;
using System.Security;
using System.Security.Permissions;
using System.Globalization;

public class EventLogger {
private string _ApplicationName;
private EventLog _Log;

public string ApplicationName {
get { return this._ApplicationName; }
} /* ApplicationName */

private EventLog Log {
get { return this._Log; }
} /* Log */

public EventLogger(string applicationName) {
this._ApplicationName = applicationName;
this._Log = new EventLog();
this.Log.Source = this.ApplicationName;
} /* EventLogger */
} /* EventLogger */
} /* CumpsD.Tools */
[/csharp]

Let's create our first test. We want to read an EventLog.

[csharp]
[Test]
[ExpectedException(typeof(InvalidEventLogException))]
public void ReadLog1() {
EventLogEntry[] EventLogs = this._ErrorLog.ReadLog(this._BadLog);
}
[/csharp]

We mark our method with the Test attribute, along with the ExcpectedException, because this._BadLog contains a non-existant logfile, and we want our class to throw an exception when trying that.

This test fails, because the ReadLog method doesn't exist yet. Let's create it, this requires some more coding, we'll have some private helper methods. SetLog to specify the EventLog we want to read from, and IsLog to check if the EventLog actually exists.

[csharp]
private bool IsLog(string logName) {
return EventLog.Exists(logName);
} /* IsLog */

private void SetLog(string logName) {
if (this.IsLog(logName)) {
this._Log.Log = logName;
} else {
throw new InvalidEventLogException("Invalid Logfile.");
}
} /* SetLog */

public EventLogEntry[] ReadLog(string logName) {
this.SetLog(logName);
EventLogEntry[] EventLogs = new EventLogEntry[this.Log.Entries.Count];
this.Log.Entries.CopyTo(EventLogs, 0);
return EventLogs;
} /* ReadLog */
[/csharp]

This code on it's own will still fail, because there is no InvalidEventLogException! Let's add a class in the same file defining the Exception.

[csharp]
[Serializable()]
public class InvalidEventLogException: Exception, ISerializable {
public InvalidEventLogException(): base() { }

public InvalidEventLogException(string message): base(message) { }

public InvalidEventLogException(string message, Exception innerException): base (message, innerException) { }

protected InvalidEventLogException(SerializationInfo info, StreamingContext context): base(info, context) { }

[SecurityPermissionAttribute(SecurityAction.Demand,SerializationFormatter=true)]
public new void GetObjectData(SerializationInfo info, StreamingContext context) {
base.GetObjectData(info, context);
}
} /* InvalidEventLogException */
[/csharp]

When we run our test now, the EventLogger will throw an Exception and our test will pass, because we were expecting an exception.

Write a test with a valid EventLog name as well, and make it pass, the code shown above will work.

We also want a WriteLog method, to actually log our errors, so let's make a test for that.

[csharp]
[Test]
[ExpectedException(typeof(InvalidEventLogException))]
public void WriteLog1() {
this._ErrorLog.WriteLog(this._BadLog, "This is a test entry");
}

[Test]
public void WriteLog2() {
string ErrorMessage = this._ErrorLog.WriteLog(this._GoodLog, "I have encountered a catastrophic error!");
EventLogEntry[] EventLogs = this._ErrorLog.ReadLog(this._GoodLog);
Assert.AreEqual(ErrorMessage, EventLogs[EventLogs.Length-1].Message, "Wrong Error.");
}
[/csharp]

The WriteLog1 method is similar to the ReadLog1 method, it tries to write to an invalid EventLog and will fail. The WriteLog2 method however tries to write to a valid EventLog, and checks if the error is actually written afterwards.

Both tests will fail, because we'll write the methods now.

I have created an enum for the three types of EventLogEntries, Information, Warning and Error. Along with an overload for WriteLog so it would write an Error by default.

[csharp]
public enum ErrorType { Information, Warning, Error }

public string WriteLog(string logName, string errorMessage) {
return this.WriteLog(logName, errorMessage, ErrorType.Error);
} /* WriteLog */
[/csharp]

Our real WriteLog method will check for a valid EventLog and then write the Entry to the EventLog and return the error message it has written, so we can compare in our test.

[csharp]
public string WriteLog(string logName, string errorMessage, ErrorType errorType) {
this.SetLog(logName);
EventLogEntryType LogType;
switch (errorType) {
case ErrorType.Information: LogType = EventLogEntryType.Information; break;
case ErrorType.Warning: LogType = EventLogEntryType.Warning; break;
case ErrorType.Error: LogType = EventLogEntryType.Error; break;
default: LogType = EventLogEntryType.Error; break;
}
this.Log.WriteEntry(String.Format(CultureInfo.InvariantCulture, "{0} caused the following error:\n{1}", this.ApplicationName, errorMessage), LogType);
return String.Format(CultureInfo.InvariantCulture, "{0} caused the following error:\n{1}", this.ApplicationName, errorMessage);
} /* WriteLog */
[/csharp]

If we run our tests now, we'll see they succeed. I have added some more tests to check if the Entry type was written correctly.

At the end you should have something like this:


And when you check eventvwr.msc you will see something like:


As always, I've uploaded the sources so you can check them on your own.
 
Deze post is geïmporteerd van de oude blog en is nog niet geconverteerd naar de nieuwe syntax.
Currently I'm playing around with IIS and C#, and something I discovered is the following:

First, take a look at the FrontPageWeb property available in the IIS Metabase.

This says 'Setting FrontPageWeb to true causes FrontPage Manager to create the files required for FrontPage Server Extensions. Setting FrontPageWeb to false causes these files to be deleted.'.

Everything seems alright, just like every other property I set this to true and except it to work. Like this:

[csharp]
// First we get the AD object representing our webserver
DirectoryEntry iisServerRoot = new DirectoryEntry("IIS://localhost/W3SVC");

// We create a new site on the specified siteId
DirectoryEntry deNewWwwSite = (DirectoryEntry)iisServerRoot.Invoke("Create", "IIsWebServer", 10);

// Takes care of FrontPage Manager providing files for FrontPage Extensions
deNewWwwSite.Properties["FrontPageWeb"][0] = true;

deNewWwwSite.Invoke("SetInfo");
deNewWwwSite.CommitChanges();

deNewWwwSite.Close();
deNewWwwSite.Dispose();
[/csharp]

(Most stuff left out)

Well, it didn't work. In IIS it would still say FrontPage Extensions were not present, and the directories didn't get made.

I looked everywhere to find something else involving FrontPage, without any luck.

But then I found this KB article (300543). And although it's talking about IIS 4.0, 5.0 and 5.1, it does work on IIS 6.0 as well.

So here you go, to install FrontPage Extensions you have to run:

"C:\Program Files\Common Files\Microsoft Shared\web server extensions\50\bin\owsadm.exe" -o install -p /LM/W3SVC/SITEID -u USERNAME -sp publish

And to uninstall them:
"C:\Program Files\Common Files\Microsoft Shared\web server extensions\50\bin\owsadm.exe" -o fulluninstall -p /LM/W3SVC/SITEID -u USERNAME
 
Deze post is geïmporteerd van de oude blog en is nog niet geconverteerd naar de nieuwe syntax.
Today I was looking over a project I'm working on currently, more specifically, at the SQL queries in it.

I come from a PHP background, where there is no such thing as parameterized queries. You simply build your own SQL string and make sure it doesn't contain anything harmful.

So, not having heard of such thing as parameterized queries, I created my SQL statements the same way in C#, until I read about this practice being "not done". So, I wanted to fix it.

I'm using MySQL with the MyODBC driver. But MySQL is tricky, it doesn't support named parameters, so you have to use a question mark and add parameters in the right order.
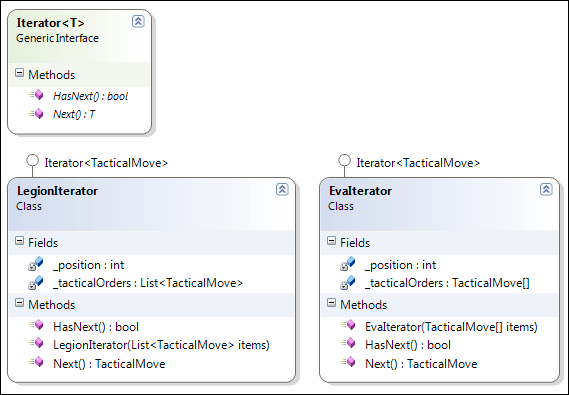
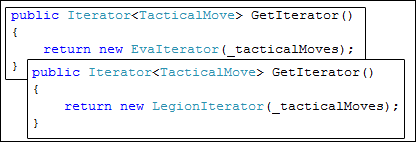
No problem I thought, this would be a one-minute fix.
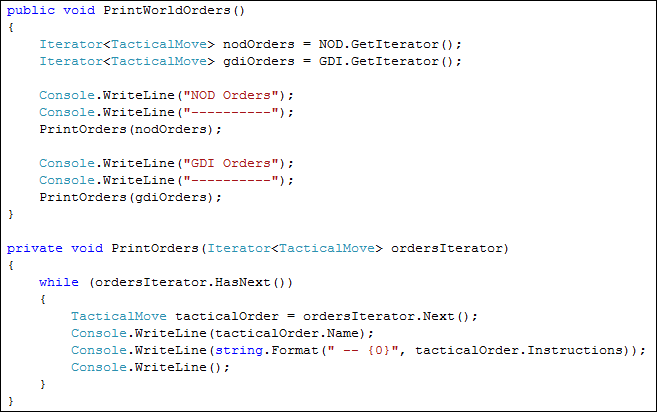
This is what I had (I returned an SQL query string at first):

[csharp]
return String.Format("INSERT INTO zosa_Users(UserVNaam, UserNaam, UserKlasNr, UserKlas) VALUES('{0}', '{1}', {2}, {3});", strFName, strGeslacht, intKlas, klKlas.Id);
[/csharp]

And I changed it to:

[csharp]
OdbcCommand insertCmd = new OdbcCommand("INSERT INTO zosa_Users(UserVNaam, UserNaam, UserKlasNr, UserKlas) VALUES('?', '?', ?, ?);", zosaDb);
insertCmd.Parameters.Add(new OdbcParameter("", strFName));
insertCmd.Parameters.Add(new OdbcParameter("", strGeslacht));
insertCmd.Parameters.Add(new OdbcParameter("", intKlas));
insertCmd.Parameters.Add(new OdbcParameter("", klKlas.Id));
return insertCmd;
[/csharp]

What did this insert in my database? Well it added a question mark ;)


So, I went looking for what was wrong... Did I add my parameters in a wrong way? Is there something wrong with MyODBC? After having done about everything I could think of, it was in the middle of the night and I went to bed. But today I tried something else, remove the single quotes. And it worked!

[csharp]
OdbcCommand insertCmd = new OdbcCommand("INSERT INTO zosa_Users(UserVNaam, UserNaam, UserKlasNr, UserKlas) VALUES(?, ?, ?, ?);", zosaDb);
insertCmd.Parameters.Add(new OdbcParameter("", strFName));
insertCmd.Parameters.Add(new OdbcParameter("", strGeslacht));
insertCmd.Parameters.Add(new OdbcParameter("", intKlas));
insertCmd.Parameters.Add(new OdbcParameter("", klKlas.Id));
return insertCmd;
[/csharp]

Such a small thing, but nowhere I managed to find this, nobody ever posted to watch out for this. Having no previous experiences with parameters and the question mark, I simply thought it would safely replace the ? with my value, but still would require the quotes for string values.

Don't make the same mistake! It's a stupid one ;)
 
Deze post is geïmporteerd van de oude blog en is nog niet geconverteerd naar de nieuwe syntax.
In response to a thread on the ASP.NET Forums I decided to publish the answers in an overview on my blog.

Someone asked on what the difference were between PHP and ASP.NET and how he did certain things.

My answers are based on using C# as the language for your ASP.NET application.

__________________________________

1. Is there any difference between '' and "" in ASP.NET?

Yes, ' ' is used for characters while " " is for strings.

Take this for example:
'a' = a in memory
"a" = a and \0 in memory

Something useful about escaping in ASP.NET is the following:
@"bla\bla" == "bla\\bla"

A string with an @ in front of it is seen as a literal, where you don't have to escape special characters.

2. How would I do something like: print $variable.'string'; in ASP.NET?

You would use the following: Response.Write(variable + "string");
But it isn't very recommended to use Response.Write, take a look at all the server controls you have, like a Label for example.

3. Within an if language construct, what would be the equivalent of "and" and "or?"

Actually PHP supports the same being used in ASP.NET:

and --> &&
or --> ||

Example:
[csharp]
if (((number == 5) && (number2 != 8)) || (admin == true)) {

// do stuff

}
[/csharp]

Would correspond to:
if (number = 5 AND number2 NOT equal to 8 ) OR we're an admin., do stuff.

4. Would someone be able to tell me how I could make an ASP.NET equivalent of this PHP Function:

[php]
function num($number){
return '#' . str_pad($number, 3, '0', STR_PAD_LEFT);
}
[/php]

You need a function which returns a string, and which formats a string:

[csharp]
public string num(int number) {
return String.Format("#{0}", number.ToString("000"));
}
[/csharp]

5. How do I create a mutidimensional array?

Try this:

[csharp]
// 2 dimensional arrays
int [,] a1;
a1 = new int[3,2];
int [,] a2 = {{1,2}, {3,4}, {5,6}};

// jagged arrays
int[][] a3;
a3 = new int[3][];
a3[0] = new int[5]{1, 2, 3, 4 ,5};
a3[1] = new int[3];
a3[2] = new int[4]{21, 22, 23, 24};
[/csharp]

Loop over them to see the elements.

__________________________________

Got a question yourself? Ask it, and I'll try to help :)
 
Deze post is geïmporteerd van de oude blog en is nog niet geconverteerd naar de nieuwe syntax.
Here I am again, with the last article for my birthday gift to you guys :)

This time we create our own WordWrapper method, inspired by an ASP.NET Forums question.

The last one for today: Custom WordWrapper.
 
Deze post is geïmporteerd van de oude blog en is nog niet geconverteerd naar de nieuwe syntax.
This article is about a question from chopps on the ASP.NET Forums. He wanted to wordwrap a text to a certain width.

It seemed something simple and easy to answer, but I decided to check on Google if anyone else had a good resource on this. Without any luck, I found remarkably little info on creating your own wordwrap method, so I decided to write it myself in C#. He was happy with the answer, I cleaned the code up a bit, and here's the article about it :)


We begin with creating two projects. One Console App (WordWrapDriver) and one Class Library (WordWrap). Reference the library in the console app.

[csharp]
using System;
using WordWrapper = WordWrap.WordWrap;

namespace WordWrapDriver {
class WordWrapDriver {
static void Main(string[] args) {
// TODO
} /* Main */
} /* WordWrapDriver */
[/csharp]

Our wordwrapper will be a static method called Wrap. We're going to support a given width and a prefix (for example "> " to prefix like a reply mail).

[csharp]
using System;
using System.Collections;

namespace WordWrap {
public class WordWrap {
#region Public Methods
public static string Wrap(string originalText, int maxWidth) {
return Wrap(originalText, maxWidth, "");
} /* Wrap */

public static string Wrap(string originalText, int maxWidth, string preFix) {
// TODO
} /* Wrap */
#endregion
} /* WordWrap */
} /* WordWrap */
[/csharp]

Let's begin. In the Wrap method we pass our text as a string to a Wrapper method, which gives us a string array that we loop through and prefix.

[csharp]
public static string Wrap(string originalText, int maxWidth, string preFix) {
string[] wrappedText = Wrapper(originalText, maxWidth);

string wrappedBlock = "";
foreach(string textLine in wrappedText) {
wrappedBlock = String.Format("{0}\n{1}{2}", wrappedBlock, preFix, textLine);
}
wrappedBlock = wrappedBlock.Substring(1);
return wrappedBlock;
} /* Wrap */
[/csharp]

So what does Wrapper do? First we filter out \r\n and \r, after we split our text on \n to create 'blocks'.

[csharp]
originalText = originalText.Replace("\r\n", "\n");
originalText = originalText.Replace("\r", "\n");
originalText = originalText.Replace("\t", " ");
string[] textParagraphs = originalText.Split('\n');
[/csharp]

Now we take each paragraph and check if it's smaller then our maxWidth or not, if it isn't we just add the line. If it is longer we'll have to break it up in separate lines.

[csharp]
for (int i = 0; i < textParagraphs.Length; i++) {
if (textParagraphs[i].Length <= maxWidth) {
// Block of text is smaller then width, add it
textLines.Add(textParagraphs[i]);
} else {
// Block of text is longer, break it up in seperate lines
string[] pLines = BreakLines(textParagraphs[i], maxWidth);
for (int j = 0; j < pLines.Length; j++) {
textLines.Add(pLines[j]);
}
}
}
[/csharp]

And lastly we return our lines.

[csharp]
string[] wrappedText = new string[textLines.Count];
textLines.CopyTo(wrappedText, 0);
return wrappedText;
[/csharp]

The only method remaining is the BreakLines method. Here we split up our string into seperate words. With those words we re-create the text, but with the correct width. Therefore we loop through every word and add it to a temporary string, which we check against the given maxWidth. If it's smaller, we continue, if it's not we add the temporary string we had just before adding the word, and we continue, the word causing the 'overflow' will be the first word of the new line. If we have a line that is inside our required length, we check if it's the last word and if that's the case we add our temporary string.

[csharp]
while (wordIndex < textWords.Length) {
if (textWords[wordIndex] == "") {
wordIndex++;
} else {
string backupLine = tmpLine;
if (tmpLine == "") {
tmpLine = textWords[wordIndex];
} else {
tmpLine = tmpLine + " " + textWords[wordIndex];
}

if (tmpLine.Length <= maxWidth) {
wordIndex++;
// If our line is still small enough, but we don't have anymore words
// add the line to the collection
if (wordIndex == textWords.Length) {
textLines.Add(tmpLine);
}
} else {
// Our line is too long, add the previous line to the collection
// and reset the line, the word causing the 'overflow' will be
// the first word of the new line
textLines.Add(backupLine);
tmpLine = "";
}
}
}
[/csharp]

And here as well, we return our lines.

[csharp]
string[] textLinesStr = new string[textLines.Count];
textLines.CopyTo(textLinesStr, 0);
return textLinesStr;
[/csharp]

In the WordWrapDriver I added some test strings to test out the WordWrapper.

[csharp]
string strText = "The\t\tquick brown fox jumped over the lazy dog bla.";
Console.WriteLine("20 chars, prefixed example.");
Console.WriteLine(strText);
Console.WriteLine();
Console.WriteLine("> #################### (20)");
Console.WriteLine(WordWrapper.Wrap(strText, 20, "> "));
Console.ReadLine();
[/csharp]

And here are the sources as usual. Hope you find it usefull.
 
Deze post is geïmporteerd van de oude blog en is nog niet geconverteerd naar de nieuwe syntax.
Next article is one on how to access Outlook from C#.

Gather Addresses collects email addresses from a given folder in Outlook.

This is the second article for my birthday present ;)

Article #3 will be later tonight, have to format a pc and re-install WinXP first.
 
Deze post is geïmporteerd van de oude blog en is nog niet geconverteerd naar de nieuwe syntax.
For this article I decided to work with Outlook from C#.

I get way too much spam, and not only the commercial kind of spam. But also the jokes crap that 'friends' send you with 40 CC's in.

So here's my idea: We'll write an email gatherer. It'll take a folder and will go trough every mail in it, extract email addresses and save them as a comma delimited file.

Where can we find email addresses in a mail? Well, first of all, the sender. That's one already. Then the recipients of course, all those CC addresses. And lastly the mail itself, all those forwards caused the body to have plenty of addresses as well.

Real usage for this tool? Probably nothing, but you learn to work with Outlook from C# and you can have fun with collecting things, email addresses in this case.

Let's begin. All of this is in a Console App called GatherAddresses.

First we need a reference to Outlook. So add a reference to 'Microsoft Outlook 11.0 Object Library' (or 10.0, if you use 10.0 leave a comment if this source worked for you!)


When you did this you'll have two new reference, just remove the Office Core... so that you have something like this:


Our application has a very simple logic, where the Main controls it all.

[csharp]
using System;
using System.Text.RegularExpressions;
using System.Collections;
using System.IO;
using Outlook = Microsoft.Office.Interop.Outlook;

namespace GatherAddresses {
class GatherAddresses {
static void Main(string[] args) {
// TODO
}
} /* GatherAddresses */
[/csharp]

Our goal is to collect all addresses, and we don't know how many there will be, so we store them in an ArrayList.

[csharp]
private static ArrayList emailCollection = new ArrayList();
[/csharp]

First we ask for a folder. This folder is in the form of a path. Starting from Outlook Today (the root in Outlook) to the folder you want. Example: CumpsD\Inbox would give you my Inbox.

[csharp]
Console.Write("Path to mailfolder: ");
string mailFolder = Console.ReadLine();
[/csharp]

Now we create our Outlook 'connection'.

[csharp]
Outlook._Application appOutlook = new Outlook.Application();

Outlook.NameSpace olNS = appOutlook.GetNamespace("MAPI");
olNS.Logon("", null, null, null);
[/csharp]

We navigate to the given folder with the GetFolder method, we will write later on in this article. This method will return a MAPIFolder which we need to read the Items from.

[csharp]
Console.WriteLine("Searching Folder...");
Outlook.MAPIFolder olMailFolder = GetFolder(mailFolder);
Outlook.Items olMailItems = olMailFolder.Items;
[/csharp]

Next is the real collecting part of our application. We take each MailItem in our folder and save the addresses. To get the addresses from the body we use the GetAddresses method we'll also write later on.

[csharp]
Console.WriteLine("Gathering Addresses...");
foreach(Outlook.MailItem olMail in olMailItems) {
AddAddress(olMail.SenderEmailAddress);
foreach(Outlook.Recipient olRecipient in olMail.Recipients) {
AddAddress(olRecipient.Address);
}
string[] emailAddresses = GetAddresses(olMail.Body);
foreach (string emailAddress in emailAddresses) {
AddAddress(emailAddress);
}
}
[/csharp]

After we have done everything we wanted with Outlook we close it and throw it away.

[csharp]
olNS.Logoff();

olMailItems = null;
olMailFolder = null;
olNS = null;
appOutlook = null;
[/csharp]

And lastly we save the collected addresses.

[csharp]
Console.WriteLine("Sorting & Outputting Addresses...");
SaveAddresses();
[/csharp]

Now onto our private methods:

First the GetFolder method. This will get us our folder we specified with a path.

Again we open Outlook. Then we split the path into the corresponding folders and we look for the root folder.

[csharp]
Outlook._Application appOutlook = new Outlook.Application();
Outlook.NameSpace olNS = appOutlook.GetNamespace("MAPI");
olNS.Logon("", null, null, null);

Outlook.MAPIFolder olFolder = null;
folderPath.Replace("/", @"\");
string[] arrFolders = folderPath.Split('\\');

foreach (Outlook.MAPIFolder olTmpFolder in olNS.Folders) {
if (olTmpFolder.Name == arrFolders[0]) {
olFolder = olTmpFolder;
break;
}
}
[/csharp]

When we have found our root folder, we will look for our first folder and when we find it, we replace our parent object by that folder and go looking for the next folder.

[csharp]
if (olFolder != null) {
for (int i = 1; i < arrFolders.Length; i++) {
Outlook.Folders olFolders = olFolder.Folders;
olFolder = null;

foreach (Outlook.MAPIFolder olTmpFolder in olFolders) {
if (olTmpFolder.Name == arrFolders[i]) {
olFolder = olTmpFolder;
break;
}
}
olFolders = null;
}
}
[/csharp]

And in the end we return our found folder after cleaning up.

[csharp]
arrFolders = null;
olNS = null;
appOutlook = null;
return olFolder;
[/csharp]

Next is the GetAddresses method. This method has been created by Rob Windsor in VB.NET and posted here. Permission was granted to convert it to C# and use it for this article. Thanks!

This method uses a regular expression to extract the email addresses out of a string after which they are returned as a string array.

[csharp]
// Converted from http://www.codeproject.com/vb/net/extractemail.asp
private static string[] GetAddresses(string bodyText) {
// Regex expression garnered from www.regexlib.com - thanks guys!
MatchCollection mcEmail = Regex.Matches(bodyText, @"([a-zA-Z0-9_\-\.]+)@([a-zA-Z0-9_\-\.]+)\.([a-zA-Z]{2,5})");
string[] emailAddresses = new string[mcEmail.Count];
for (int i = 0; i < mcEmail.Count; i++) {
emailAddresses[i] = mcEmail[i].Value;
}
return emailAddresses;
} /* GetAddresses */
[/csharp]

Adding our addresses is as simple as checking if the ArrayList already Contains it and add it if it doesn't.

[csharp]
private static void AddAddress(string emailAddress) {
emailAddress = emailAddress.Trim();
emailAddress = emailAddress.ToLower();
if (!emailCollection.Contains(emailAddress)) {
emailCollection.Add(emailAddress);
}
} /* AddAddress */
[/csharp]

And to close this article, the SaveAddresses method asks for a filename to write to and writes the addresses there as a delimited list which you can import in other applications.

[csharp]
private static void SaveAddresses() {
Console.Write("Path to save to: ");
string savePath = Console.ReadLine();
if (savePath != "") {
emailCollection.Sort();
using (StreamWriter sw = new StreamWriter(savePath)) {
foreach (string emailAddress in emailCollection) {
sw.WriteLine(String.Format("{0};", emailAddress));
}
}
}
} /* SaveAddresses */
[/csharp]

I tested this on 29 'fun' mails I received, and guess how many addresses came out of there? 1473!! I imported them in a small Access table to test the saved format ;)


As always, I've uploaded the project for you.
 
Deze post is geïmporteerd van de oude blog en is nog niet geconverteerd naar de nieuwe syntax.
Today's my birthday, I'm turning 20 :)


And because of that I'm giving you guys a present. In the form of some articles.

Going to write 3 articles today for you, starting with how to create a small console chat server.

The other two articles will follow later on today, got to follow some classes first ;)
 
Deze post is geïmporteerd van de oude blog en is nog niet geconverteerd naar de nieuwe syntax.
In this article we'll write a small ChatServer.

I'll start by explaining the logic we will follow:

We start a Console Application (ChatServer) which will listen on a specified TCP port. When a client connects we create a new object that will represent the Connection. This object has three events, two of those will Add and Remove the client from the connected list when the connection is created and closed. The last one will simply be fired when a message is received.

Our ChatServer will upon receiving a message broadcast it to all clients currently connected. There is no processing, just forwarding to every connected client. A very basic framework for a client/server architecture.

Let's begin by creating a Console App called ChatServer.

[csharp]
using System;
using System.Net;
using System.Net.Sockets;
using System.Threading;
using System.Collections;

namespace ChatServer {
class ChatServer {
static void Main(string[] args) {
ChatServer chatServer = new ChatServer();
} /* Main */

public ChatServer() { }
} /* ChatServer */
} /* ChatServer */
[/csharp]

We are using the System.Net namespace to be able to listen for connections. And System.Threading because we will launch our Listen method in a separate Thread.

What info do we need? We'll need a serverport to listen on, a TcpListener, a Thread where the listener runs in, and we'll use an ArrayList to contain our connected clients.

[csharp]
private int serverPort;
private Thread listenerThread;
private TcpListener socketListener;
private ArrayList chatClients;
[/csharp]

I made properties of these as well, called ServerPort, ListenThread, ListenSocket and Clients.

In our constructor we will assign the port, start the listener and provide some feedback.

[csharp]
public ChatServer() {
this.ServerPort = 54321;
this.ListenThread = new Thread(new ThreadStart(Listen));
this.ListenThread.Start();
this.Clients = new ArrayList();
this.Output("STATUS", String.Format("ChatServer Started on port {0}.", this.ServerPort));
} /* ChatServer */
[/csharp]

Before we go any further in our ChatServer, we'll create a new class called Connection.

[csharp]
using System;
using System.Net.Sockets;
using System.IO;
using System.Threading;

namespace ChatServer {
public class Connection {
public Connection(TcpClient chatClient, int clientId) {
// TODO
} /* Connection */
} /* Connection */
} /* ChatServer */
[/csharp]

Let's see, what does a Connection really need? We need some way to identify it, so we add a clientNumber. We have a TcpClient where we will get a NetworkStream from to create a StreamWriter and StreamReader. We're also going to launch our listener in a separate Thread.

[csharp]
private int clientNumber;
private Thread listenerThread;
private TcpClient chatConnection;
private NetworkStream chatStream;
private StreamWriter chatWriter;
private StreamReader chatReader;
[/csharp]

These are the following properties: Id, ChatConnection, ChatStream, ChatWriter, ChatReader and ListenThread.

Each Connection will be able to fire of events, so let's create those.

[csharp]
namespace ChatServer {
#region Delegates
public delegate void MessageReceived(string msgText, int chatClient);
public delegate void AddClient(Connection chatConnection);
public delegate void RemoveClient(Connection chatConnection);
#endregion

public class Connection {
#region Events
public event MessageReceived eventReceiving;
public event AddClient eventAdding;
public event RemoveClient eventRemoving;
#endregion
[/csharp]

When we first create a Connection we take a TcpClient and a number assigned to us be the server.

[csharp]
public Connection(TcpClient chatClient, int clientId) {
this.ChatConnection = chatClient;
this.clientNumber = clientId;
} /* Connection */
[/csharp]

After our object is created the server will bind the events and will Connect the client.

[csharp]
public void Connect() {
/* If we implement the listener while loop here,
only one client at a time will be able to send.
Therefore we launch a new Thread that is responsible for one Connection. */

this.ListenThread = new Thread(new ThreadStart(Listen));
this.ListenThread.Start();
if (eventAdding != null) { this.eventAdding(this); }
} /* Connect */
[/csharp]

Let's take a look at the Listen method.

[csharp]
private void Listen() {
this.ChatStream = this.ChatConnection.GetStream();
this.ChatReader = new StreamReader(this.ChatStream);
this.ChatWriter = new StreamWriter(this.ChatStream);
bool connOpen = true;

this.SendMessage(String.Format("Welcome to ChatServer. You are client #{0}.", this.Id));

while (connOpen) {
string chatMsg;
while ((chatMsg = this.ChatReader.ReadLine()) != null) {
if (eventReceiving != null) { this.eventReceiving(chatMsg, this.Id); }
}
this.ChatWriter.Close();
this.ChatReader.Close();
this.ChatConnection.Close();
if (eventRemoving != null) { this.eventRemoving(this); }
connOpen = false;
}
} /* Listen */
[/csharp]

We take our Stream, open a StreamReader and a StreamWriter and we wait for incoming messages, and when the client disconnects we remove ourself from the client list.

We also sent some feedback to the client with a SendMessage method. This is a very simple one, it writes a line to the StreamWriter.

[csharp]
public void SendMessage(string chatMsg) {
/* We check if the Writer already exists, else we get an exception thrown
(which doesn't crash the server thou).
This situation can occur when a client first connects. */

if (this.ChatWriter != null) {
this.ChatWriter.WriteLine(chatMsg);
this.ChatWriter.Flush();
}
} /* SendMessage */
[/csharp]

That's all for our Connection class. Let's go back to our server to set up the Listen method over there.

We want to listen on every address on our pc:

[csharp]
IPAddress ipAddress = Dns.Resolve("0.0.0.0").AddressList[0];
[/csharp]

Then we listen on a specific port and we wait for clients. When a client connects we create an object, assign events and Connect it. And then we wait for another client to connect.

[csharp]
// We listen for connections on all available IPs on port 54321.
this.ListenSocket = new TcpListener(ipAddress, this.ServerPort);
this.ListenSocket.Start();
while(true) {
// For every connection we create a new Connection object.
Connection chatConnection = new Connection(this.ListenSocket.AcceptTcpClient(), this.Clients.Count + 1);
chatConnection.eventReceiving += new MessageReceived(this.MessageReceived);
chatConnection.eventAdding += new AddClient(this.AddClient);
chatConnection.eventRemoving += new RemoveClient(this.RemoveClient);
chatConnection.Connect();
}
[/csharp]

When we receive a message we broadcast it to all other clients.

[csharp]
private void MessageReceived(string chatMessage, int chatClient) {
this.Output("MESSAGE", String.Format("[{0}]: {1}", chatClient, chatMessage));
} /* MessageReceived */

private void Output(string msgStatus, string msgText) {
Console.WriteLine(String.Format("{0}: {1}", msgStatus, msgText));
foreach (Connection chatClient in this.Clients) {
chatClient.SendMessage(msgText);
}
} /* Output */
[/csharp]

Adding and Removing a client is just adding it to an ArrayList and removing it. When we remove it we also set the object to null to get it collected.

That's our class. Now just run the server, telnet to it and chat ;)

Server:


Telnet:


As always I've uploaded the project for you too look at.
 
Deze post is geïmporteerd van de oude blog en is nog niet geconverteerd naar de nieuwe syntax.
Today I'll talk about hash functions.

A hash algorithm takes a piece of text and gives a hash as result. This hash is unique for the given text. If you use the hash function on the same text again, you'll get the same hash. But there is no way to get the given text from the hash. This is great for storing passwords.

Now, in PHP it's as easy as using md5() or sha1(). But in C# it takes a bit more work. This is what we want to simplify.

So we'll create a Hash class to create hashes.

Create a new project and add a class (Hash).

[csharp]
using System;
using System.Security.Cryptography;
using System.Text;

namespace Hash {
public class Hash {
public Hash() { }

} /* Hash */
} /* Hash */
[/csharp]

Let's start by adding an enum representing all the hash functions we are going to support.

[csharp]public enum HashType :int { MD5, SHA1, SHA256, SHA384, SHA512 }[/csharp]

Our class will have 2 public methods, one for creating a hash and one for checking a hash against a given text.

First we'll create the GetHash method:

[csharp]
public static string GetHash(string strPlain, HashType hshType) {
string strRet;
switch (hshType) {
case HashType.MD5: strRet = GetMD5(strPlain); break;
case HashType.SHA1: strRet = GetSHA1(strPlain); break;
case HashType.SHA256: strRet = GetSHA256(strPlain); break;
case HashType.SHA384: strRet = GetSHA384(strPlain); break;
case HashType.SHA512: strRet = GetSHA512(strPlain); break;
default: strRet = "Invalid HashType"; break;
}
return strRet;
} /* GetHash */
[/csharp]

And our CheckHash will depend on this so we might as well add it now.

[csharp]
public static bool CheckHash(string strOriginal, string strHash, HashType hshType) {
string strOrigHash = GetHash(strOriginal, hshType);
return (strOrigHash == strHash);
} /* CheckHash */
[/csharp]

As you can see, I created 5 separate methods to create hashes. I'll explain one for this article, the others are the same but use another hashing class. You'll find them in the source at the end of this article.

A hash function works on a byte array, so we will create two arrays, one for our resulting hash and one for the given text

[csharp]
UnicodeEncoding UE = new UnicodeEncoding();
byte[] HashValue, MessageBytes = UE.GetBytes(strPlain);
[/csharp]

Now we create an object that will hash our text:

[csharp]
SHA1Managed SHhash = new SHA1Managed();
[/csharp]

And finally we calculate the hash and convert it to a hexadecimal string. Which we can store in a database for example.

[csharp]
string strHex = "";

HashValue = SHhash.ComputeHash(MessageBytes);
foreach(byte b in HashValue) {
strHex += String.Format("{0:x2}", b);
}
return strHex;
[/csharp]

This is how we test it:

[csharp]
static void Main(string[] args) {
String hash = Hash.Hash.GetHash("This is a sample text :p", Hash.Hash.HashType.SHA256);
Console.WriteLine(hash);
Console.WriteLine(Hash.Hash.CheckHash("This is a sample text :p", hash, Hash.Hash.HashType.SHA256));
Console.WriteLine(Hash.Hash.CheckHash("This is a wrong text.", hash, Hash.Hash.HashType.SHA256));
} /* Main */
[/csharp]

Now we have our sweet and simple methods available as a class, ready to be used in any project.

I've uploaded the sources again, you will see I documented it as well. When you use NDoc on the generated .xml file you get a very sweet MSDN like documentation.

Important Update:
To get the same result as the md5() function in PHP, use ASCIIEncoding!
As in: ASCIIEncoding UE = new ASCIIEncoding();
 
Deze post is geïmporteerd van de oude blog en is nog niet geconverteerd naar de nieuwe syntax.
As a follow up to my C# Script program, I've added an article on how to associate your program with every file by adding a registry key.

I also made a small article about including resources in your .exe as an answer to someone's question about Non-Rectangular Forms.

The Notepad bug issue still spooks around in my mind. So very strange...
 
Deze post is geïmporteerd van de oude blog en is nog niet geconverteerd naar de nieuwe syntax.
As a I reply on my Non-Rectangular Form article, someone asked if you couldn't include the bitmap in the file.

Well, you can. And that is what this little article will talk about. This very little article.

When do you want to include things? If they are small and are vital for your app to run. This bitmap is vital! You could also include icons for example...

How do you do it?

Include your bitmap in your project. Go to it's properties and for 'Build Action' choose: Embedded Resource. This will compile your file into your .exe as a resource.

This was what we had to load our bitmap:

[csharp]
FileStream imageStream = File.OpenRead("Glass.bmp");
Bitmap imageBackground = (Bitmap)Bitmap.FromStream(imageStream);
[/csharp]

This is now:

[csharp]
Bitmap imageBackground = new Bitmap(this.GetType(), "Glass.bmp");
[/csharp]

That's it. Wasn't that simple? Your Bitmap is inside the .exe and it's loading fine.

I've uploaded this version as well.

Note: You can drag the .exe around and press 'q' to close it (for the people who haven't read the Non-Rectangular Form article ;) imagine having to kill it)
 
Deze post is geïmporteerd van de oude blog en is nog niet geconverteerd naar de nieuwe syntax.
In my last article (C# Script) I spoke about adding it to the shell right click menu. Now it's time to implement that.

We'll create a class (ShellExtension) that allows us to associate our program with all files. So, we'll have one public method for that, which I'll call AssociateProgram.

But first, some info about this.

Where are those entries stored? They all reside in the Registry, global ones live in HKEY_LOCAL_MACHINE and per-user ones in HKEY_CURRENT_USER. Our class will only use it per user, as we don't want to spam the system.

Here is a sample registry file that will add a "test" entry which will simply open notepad:

Windows Registry Editor Version 5.00

[HKEY_CURRENT_USER\Software\Classes\*\shell\test\command]
@="notepad.exe"


Run it, and check it out. Not that useful, but it shows you the inner workings.

Let's get started. We need Microsoft.Win32 to access the Registry.

[csharp]
using System;
using Microsoft.Win32;

namespace ShellExtension {
public class ShellExtension {
public ShellExtension() { }

public bool AssociateProgram(string extensionName, string filePath) {

} /* AssociateProgram */
} /* ShellExtension */
[/csharp]

We'll add two 'Helper' methods to read and create RegistryKeys. Someday we could do something when creating a key, like log it somewhere.

The true implies to open it for reading. Otherwise you'd get an UnAuthorizedException when creating our shell extension.

[csharp]
private RegistryKey GetKey(RegistryKey rootKey, string keyName) {
return rootKey.OpenSubKey(keyName, true);
} /* GetKey */

private bool CreateKey(RegistryKey rootKey, string keyName) {
return (!(rootKey.CreateSubKey(keyName) == null));
} /* CreateKey */
[/csharp]


Now, we have to create that key. Because almost nobody has '*' in his CURRENT_USER.

This is the 'biggest' method, after we've made sure our key is there we only have to put our shell extension in there.

[csharp]
private RegistryKey SetupKeys() {
RegistryKey returnKey = null;

RegistryKey currentUser = Registry.CurrentUser;
RegistryKey softwareKey = this.GetKey(currentUser, "Software");
if (softwareKey != null) {
RegistryKey softwareClasses = this.GetKey(softwareKey, "Classes");
if (softwareClasses != null) {
RegistryKey allFiles = this.GetKey(softwareClasses, "*");
if (allFiles != null) {
RegistryKey shellExtension = this.GetKey(allFiles, "shell");
if (shellExtension != null) {
returnKey = shellExtension;
} else {
if (this.CreateKey(allFiles, "shell")) { returnKey = this.GetKey(allFiles, "shell"); }
}
} else {
if (this.CreateKey(softwareClasses, "*")) {
allFiles = this.GetKey(softwareClasses, "*");
RegistryKey shellExtension = this.GetKey(allFiles, "shell");
if (shellExtension != null) {
returnKey = shellExtension;
} else {
if (this.CreateKey(allFiles, "shell")) { returnKey = this.GetKey(allFiles, "shell"); }
}
}
} // HKEY_CURRENT_USER\Software\Classes\*
} // HKEY_CURRENT_USER\Software\Classes
} // HKEY_CURRENT_USER\Software
return returnKey;
} /* SetupKeys */
[/csharp]


The only thing left now is to add our extension caption along with the 'command' key and the filepath.

We use "filepath" %1 to pass the filename along.

[csharp]
RegistryKey shellKey = this.SetupKeys();
if (shellKey != null) {
if (this.CreateKey(shellKey, extensionName + @"\command")) {
RegistryKey extPath = this.GetKey(shellKey, extensionName + @"\command");
extPath.SetValue("", "\"" + filePath + "\" %1");
}
}
[/csharp]

That's it. Compile your class, reference the .dll and call it like this:

[csharp]
ShellExtension.ShellExtension shellAdd = new ShellExtension.ShellExtension();
shellAdd.AssociateProgram("Notepad", "notepad.exe");
[/csharp]

I've uploaded the project again, the ShellExtensionDriver shows you how to associate Notepad with every file (which is very usefull!).
 
Deze post is geïmporteerd van de oude blog en is nog niet geconverteerd naar de nieuwe syntax.
I was playing around with the thought of being able to figure out some other possibilities for C#.

One thing I came up with was, why not make a possibility to quickly write something small in C# and run it. I'm talking really really really small here.

So I decided to write an article about it, maybe someone thinks of something and extends it. Before you tell me it's useless, let me say this is only something done to try out new things and to get ideas.

Here is my version of C#-Script ;)


One frustrating thing that keeps bothering me is. In code i specifically said to not create an executable, and what happens? It creates an executable. Anyone an idea of why it's doing this? Doesn't 'InMemory' mean in RAM, without files on your HD?

Hope you like it :)
 
Deze post is geïmporteerd van de oude blog en is nog niet geconverteerd naar de nieuwe syntax.
There is VBScript, JScript and PHP. But there isn't anything like C#-Script. So, I decided to play around a bit, only as a matter of checking out the possibilities.

The plan:

Create a CS-Script.exe file that we can use to 'launch' a .cs file. Without having to add the file to a solution or anything.

A very basic tool, that can launch one .cs file. View it as some sort of batch scripting tool. Where you can quickly open notepad, write something and run it.

Our goal is to reach it through the right click menu in the shell. For every file! So we'll create a console app (CS-Script) that accepts one argument, the filename.

We want to let the user know when he fucks up and doesn't provide an argument, so we add a reference to System.Windows.Forms and display a MessageBox.

[csharp]
using System;
using System.Windows.Forms;

namespace CS_Script {
class CS_Script {
static void Main(string[] args) {
if (args.Length > 0) {

} else {
MessageBox.Show("You need to provide the filename as an argument!", "Error", MessageBoxButtons.OK, MessageBoxIcon.Error);
}
} /* Main */
} /* CS_Script */
} /* CS_Script */
[/csharp]

Next, we want to check if the file exists. Otherwise, just hit them with another MessageBox.

[csharp]
if (File.Exists(args[0])) {

} else {
MessageBox.Show("You need to provide an existing file as an argument!", "Error", MessageBoxButtons.OK, MessageBoxIcon.Error);
}
[/csharp]

Now we read the file, just use an example from MSDN.

[csharp]
try {
using (StreamReader textReader = new StreamReader(args[0])) {
String textFile = textReader.ReadToEnd();
Console.WriteLine(textFile);
}
} catch (Exception e) {
MessageBox.Show("The file could not be read:\n" + e.Message, "Error", MessageBoxButtons.OK, MessageBoxIcon.Error);
}
[/csharp]

After we have read in the source we're going to compile it and run it. This is the hardest part :) There are some samples out there, but they all seemed to fail on my test data.

[csharp]
try {
ExecuteSource(textFile);
} catch (Exception e) {
MessageBox.Show("The file could not be executed:\n" + e.Message, "Error", MessageBoxButtons.OK, MessageBoxIcon.Error);
}
[/csharp]

The first thing we have to do is setup the compiler. Here I've put some restrictions. Every file should have a class CScript with a public void Main in it. If you want to extend this, be sure to get rid of that ;)

[csharp]
CSharpCodeProvider codeProvider = new CSharpCodeProvider();

ICodeCompiler compiler = codeProvider.CreateCompiler();
CompilerParameters parameters = new CompilerParameters();
parameters.GenerateExecutable = false;
parameters.GenerateInMemory = true;
parameters.OutputAssembly = "CS-Script-Tmp-Junk";
parameters.MainClass = "CScript.Main";
parameters.IncludeDebugInformation = false;
[/csharp]

Another important parameter is the assemblies we involve in compiling our source. A "good" thing would be to put the most important namespaces in your project with using. We're going to include all the ones our project uses.

[csharp]
foreach (Assembly asm in AppDomain.CurrentDomain.GetAssemblies()) {
parameters.ReferencedAssemblies.Add(asm.Location);
}
[/csharp]

And now it's time to compile our source, let's hope everything goes fine.

[csharp]
CompilerResults results = compiler.CompileAssemblyFromSource(parameters, sourceText);
[/csharp]

Of course not everything went fine. Someone messed up his source, let's give him another error.

[csharp]
if (results.Errors.Count > 0) {
string errors = "Compilation failed:\n";
foreach (CompilerError err in results.Errors) {
errors += err.ToString() + "\n";
}
MessageBox.Show(errors, "Error", MessageBoxButtons.OK, MessageBoxIcon.Error);
}
[/csharp]

But some people don't make mistakes, and we run their code.

The compiler gave back an Assembly to use. It's very simply to invoke this one.

One strange issue, even though we have set GenerateInMemory, it does create a file on our harddisk (at least here), so we have to clean that up.

[csharp]
object o = results.CompiledAssembly.CreateInstance("CScript");
Type type = o.GetType();
MethodInfo m = type.GetMethod("Main");
m.Invoke(o, null);
if (File.Exists("CS-Script-Tmp-Junk")) { File.Delete("CS-Script-Tmp-Junk"); }
[/csharp]

If everything was fine, we now launched our program!

Here's a the little program I tested on:

[csharp]
using System;
using System.Windows.Forms;

class CScript {
public void Main() {
MessageBox.Show("I'm being loaded dynamicly!");
}
}
[/csharp]

We reached our goal of running code from a text file for now.

In my next article I'll talk about adding our CS-Script.exe file to the shell menu so we can use it on our files.

As always, I've uploaded the sources for this project.

Update: Here is the article about adding your menu to the shell: Associating your program with every file - ShellExtension
 
Deze post is geïmporteerd van de oude blog en is nog niet geconverteerd naar de nieuwe syntax.
I added another article in the 'Basic C# Examples'-series. ;)


It should answer the question of how to make nonsquare windows?

There is another example out there (which I can't find the link of anymore) that uses pointers to run over the image. Because of performance issues. So, I decided to take the GetPixel approach and see if it worked. And it does ;) Don't notice any performance hit here thou, maybe on weaker computers..

How To Make Non-Rectangular Forms.
 
Deze post is geïmporteerd van de oude blog en is nog niet geconverteerd naar de nieuwe syntax.
I received some good feedback from my previous article (A Console IRC Bot) and here is the next one.

The question for this article was how to make nonsquare windows?.

It's actually very easy according to the MSDN site. You add this piece of code to your form and voila, non-square.

[csharp]
protected override void OnPaint(System.Windows.Forms.PaintEventArgs e)
{
System.Drawing.Drawing2D.GraphicsPath shape = new System.Drawing.Drawing2D.GraphicsPath();
shape.AddEllipse(0, 0, this.Width, this.Height);
this.Region = new System.Drawing.Region(shape);
}
[/csharp]

But that's too easy, right? Well, actually, the setting is easy, it's creating the Region that's difficult. You could go looking for tutorials on how to draw shapes, but it could take a long time before you create your Region with shapes.

So, what we'll do here, is create a class that will allow us to make an image in any graphics program, that will represent our visible area.

Let's start with drawing something we want to use as a form.


Create a WinForm app (NonSquareForm). And immediately add a class to it.

This is were we begin:

[csharp]
using System;
using System.Drawing;
using System.Drawing.Drawing2D;

namespace System.Drawing.Drawing2D {
public class RegionConvert {

} /* RegionConvert */
} /* System.Drawing.Drawing2D */
[/csharp]

The first method we'll create is ConvertFromTransparentBitmap which will take a Bitmap and a Color. The Color indicates which area will be removed from the resulting Region.

To start, we begin with finding the dimensions of our image.

[csharp]
// First we get the dimensions of our image
GraphicsUnit aPixel = GraphicsUnit.Pixel;
RectangleF imageBoundsF = imageRegion.GetBounds(ref aPixel);
int imageWidth = Convert.ToInt32(imageBoundsF.Width);
int imageHeight = Convert.ToInt32(imageBoundsF.Height);
[/csharp]

As you can see from the above MSDN example, we need a GraphicsPath, where we will add all our non-transparent pixels to.

[csharp]
// This will be the path for our Region
GraphicsPath regionPath = new GraphicsPath();
[/csharp]

And for the logic of our method, we'll loop over the image pixel per pixel and determine if it's transparent or not.

[csharp]
// We loop over every line in our image, and every pixel per line
for (int intY = 0; intY < imageHeight; intY++) {
for (int intX = 0; intX < imageWidth; intX++) {
if (imageRegion.GetPixel(intX, intY) != transparentColor) {
// We have to see this pixel!
regionPath.AddRectangle(new Rectangle(intX, intY, 1, 1));
}
}
}
[/csharp]

When we have all our pixels in our path, we'll create a Region out of it, and return it.

[csharp]
Region formRegion = new Region(regionPath);
regionPath.Dispose();
return formRegion;
[/csharp]

Now we go to our Form, you'll have to set the FormBorderStyle property to None.

Add the following code to your Form constructor:

[csharp]
// Read the background file
FileStream imageStream = File.OpenRead("Glass.bmp");
Bitmap imageBackground = (Bitmap)Bitmap.FromStream(imageStream);
Color transparentColor = Color.FromArgb(0xFF, 0x00, 0xFF);

// Make our form fit the background
this.Width = imageBackground.Width;
this.Height = imageBackground.Height;

// Apply custom region with FF00FF as transparent color
this.Region = RegionConvert.ConvertFromTransparentBitmap(imageBackground, transparentColor);
this.BackgroundImage = imageBackground;
[/csharp]

Glass.bmp is a bitmap that lives next to your .exe file. Now you got a non-rectangular form!

Of course you will have to add your own methods of minimizing, closing and moving the form now.

I uploaded the project as an example. You can drag it around and press 'Q' to quit.

Stay tuned for more! ;)


Update: I wrote an article about how to include the bitmap in the .exe, check it out: Including Resources in .exe.
 
Deze post is geïmporteerd van de oude blog en is nog niet geconverteerd naar de nieuwe syntax.
I was thinking last night, all posts here are very great, and made by all those smart people. But why is it that my fellow students hardly read them? Or why don't you hear them a lot?

Some of my possible conclusions were:

  • It's too hard, most of the posts here require background or understanding, which we as students don't have that much yet.

  • No real basic examples. There are snippets, there is a lot of code being posted here, but the target audience here isn't the beginning programmer, we mostly write for people who already know a lot.

  • ...?


And because of that, and because I want to raise interest among the people I know, I decided to ask them for questions they had about C#, and try to answer them by example.

I'm gathering subjects to write on, very basic subjects, appealing to students as well. And I'll try to create an application that answers their question and provides code they could extend.

Hopefully I can keep this up, because I'm learning a lot from it as well. It helps you to think of subjects you wouldn't have thought of otherwise. And I have to check out docs and examples as well to write an article about it from scratch.

The first article is about 'How to get on IRC with C#'. I created a basic Console IRC Bot along with some comments. The example uses tcp connections, streams and events. Source code is provided as well.

I hope other students like the idea... (not only students by the way, everyone can use samples!)

Let me know if this is a good plan. (Or if you have negative comments, go ahead as well ;))
 
Deze post is geïmporteerd van de oude blog en is nog niet geconverteerd naar de nieuwe syntax.
I'm planning to write some articles based on questions I get from fellow students.

The first one is how to get on IRC with C#?. So, here it is, the first article of (hopefully) many.

Let's start by telling what IRC is. This is best done by reading the Internet Relay Chat Protocol RFC. You can find anything you want about the IRC protocol in there.

Getting on IRC is as simple as:

  • Establishing a connection.

  • Logging in.

  • Maintaining a connection and reacting to commands.


As this is an article on how to establish an IRC connection and work with the commands, I'm not going to spent any time on UI. Therefore this will be a simple Console Application (cIRC).

We'll make a seperate class for the IRC functions so we could re-use it later when we want to add a UI.

[csharp]
using System;
using System.Net;
using System.Net.Sockets;
using System.IO;

namespace System.Net {
public class IRC {

} /* IRC */
} /* System.Net */
[/csharp]

Needed info.

Let's think about what info we need for a connection.

First of all, the server and port ofcourse. Then the nickname to be used, and also the userinfo. The userinfo contains the actual username (used in ident), and the Real Name (which you can see when doing a WHOIS).

So, add the IrcServer, IrcPort, IrcNick, IrcUser and IrcRealName properties.

For this example I'm going to create a single channel IRC bot. So we can also add an IrcChannel property. If you would take this further you would split that off. The first thing I'm thinking of is, create a channel object and manage each channel you're on with one of those.

I also added a bool IsInvisible property, as this is the only mode you can set as a normal user (See 3.1.5 User mode message).

The Connection.

Now that we have all our info to make our first connection, let's implement it.

I'll be using this application as an example on how to create events as well.

To start our bot, we will just have one event. The eventReceiving. This will occur every time a command gets received from the IRC server. For now we'll just write it to the console.

What we need is the following. After our namespace we add:

[csharp]
public delegate void CommandReceived(string IrcCommand);
[/csharp]

And right after our class we add:

[csharp]
public event CommandReceived eventReceiving;
[/csharp]

This is how our application will look as a start:

[csharp]
using System;
using System.Net;

namespace cIRC {
class cIRC {
static void Main(string[] args) {
IRC cIRC = new IRC("CumpsD", "#mypreciousss");
cIRC.eventReceiving += new CommandReceived(IrcCommandReceived);
cIRC.Connect("efnet.xs4all.nl", 6667);
} /* Main */

static void IrcCommandReceived(string IrcCommand) {
Console.WriteLine(IrcCommand);
} /* IrcCommandReceived */
} /* cIRC */
} /* cIRC */
[/csharp]

As you can see, we have bound the eventReceiving to a local method, which will handle the data.

I'll supply the source at the end of the article so you can check out the constructor and other details yourself.

The logic behind our bot is that after we launch the .Connect on it, it keeps running, and fires off events when it detects a command. For this article I'll display everything to the console in a nice format.

First, we connect with the server and register ourself.

[csharp]
// Connect with the IRC server.
this.IrcConnection = new TcpClient(this.IrcServer, this.IrcPort);
this.IrcStream = this.IrcConnection.GetStream();
this.IrcReader = new StreamReader(this.IrcStream);
this.IrcWriter = new StreamWriter(this.IrcStream);

// Authenticate our user
string isInvisible = this.IsInvisble ? "8" : "0";
this.IrcWriter.WriteLine(String.Format("USER {0} {1} * :{2}", this.IrcUser, isInvisible, this.IrcRealName));
this.IrcWriter.Flush();
this.IrcWriter.WriteLine(String.Format("NICK {0}", this.IrcNick));
this.IrcWriter.Flush();
this.IrcWriter.WriteLine(String.Format("JOIN {0}", this.IrcChannel));
this.IrcWriter.Flush();
[/csharp]

I don't have any error handling when you pick an already chosen nick. You can implement that in the listener loop and abort the connection, let the user choose another nick, and retry.

After we are connected there is a listening loop which looks like:

[csharp]
// Listen for commands
while (true) {
string ircCommand;
while ((ircCommand = this.IrcReader.ReadLine()) != null) {
if (eventReceiving != null) { this.eventReceiving(ircCommand); }

string[] commandParts = new string[ircCommand.Split(' ').Length];
commandParts = ircCommand.Split(' ');
if (commandParts[0].Substring(0, 1) == ":") {
commandParts[0] = commandParts[0].Remove(0, 1);
}

if (commandParts[0] == this.IrcServer) {
// Server message
switch (commandParts[1]) {
case "332": this.IrcTopic(commandParts); break;
case "333": this.IrcTopicOwner(commandParts); break;
case "353": this.IrcNamesList(commandParts); break;
case "366": /*this.IrcEndNamesList(commandParts);*/ break;
case "372": /*this.IrcMOTD(commandParts);*/ break;
case "376": /*this.IrcEndMOTD(commandParts);*/ break;
default: this.IrcServerMessage(commandParts); break;
}
} else if (commandParts[0] == "PING") {
// Server PING, send PONG back
this.IrcPing(commandParts);
} else {
// Normal message
string commandAction = commandParts[1];
switch (commandAction) {
case "JOIN": this.IrcJoin(commandParts); break;
case "PART": this.IrcPart(commandParts); break;
case "MODE": this.IrcMode(commandParts); break;
case "NICK": this.IrcNick(commandParts); break;
case "KICK": this.IrcKick(commandParts); break;
case "QUIT": this.IrcQuit(commandParts); break;
}
}
}

this.IrcWriter.Close();
this.IrcReader.Close();
this.IrcConnection.Close();
}
[/csharp]

What is happing here is:

First we fetch a command coming from the server.

Then we split it up into parts, delimited by a space and then we decide what action to take depending on wether it's a server command or a normal user mode command.

The server and user codes can be found in the RFC if you want to add more.

Responding to commands.

My plan was just to display data, but let me show you how you can respond to commands. I know this could be solved cleaner, but I'm writing this as a proof of concept and to explain what would be required and how it works.

We want to welcome everyone joining a channel. But we want it by notice. When someone joins the IrcJoin method gets called:

[csharp]
private void IrcJoin(string[] IrcCommand) {
string IrcChannel = IrcCommand[2];
string IrcUser = IrcCommand[0].Split('!')[0];
if (eventJoin != null) { this.eventJoin(IrcChannel.Remove(0, 1), IrcUser); }
} /* IrcJoin */
[/csharp]

Which in turns fires the join event and gets processed in our console app:

[csharp]
private void IrcJoin(string IrcChan, string IrcUser) {
Console.WriteLine(String.Format("{0} joins {1}", IrcUser, IrcChan));
IrcObject.IrcWriter.WriteLine(String.Format("NOTICE {0} :Hello {0}, welcome to {1}!", IrcUser, IrcChan));
IrcObject.IrcWriter.Flush ();
} /* IrcJoin */
[/csharp]

I modified our console app a bit so it would create an object of itself in the Main with our IrcObject as a private variable. That way I can access the IrcWriter I created in there. Ofcourse it is a bad idea to make that writer public. A better practice would be to create methods like NoticeUser, KickUser, etc... to control it's behaviour. But that exceeds the purpose of this article.

This concludes how you use C# to get on IRC.

Here are some ideas where you could extend this application:


  • Listen for certain triggers in the channel, then do some action. (Example: '!google searchterm', have your app do a query and reply the results)

  • Make this bot an opp and listen in PRIVMSG for a user to authenticate and op him. (Authenticate him against Active Directory, that way you'll learn how to work with AD as well)

  • Detect kicks against trusted users and take action to prevent takeovers, or auto rejoin when the bot gets kicked.

  • ...


Hopefully this answered the question, feel free to leave a comment when you have any questions.

I uploaded the source so you could learn from them. Enjoy!
 
Deze post is geïmporteerd van de oude blog en is nog niet geconverteerd naar de nieuwe syntax.
Today I needed to set NTFS permissions in C# on some newly created directories.

No problem I thought, the CLR will have something for it somewhere in Security, so I checked Google in the hopes to find which class to use.

But Google didn't find anything... This amazed me. "Why can't I control NTFS permissions with .NET ?!?"

After looking for an hour or so, I found a GotDotNet User Sample, called 'ACLs in .NET'. Finally I thought, now it's going to be plug in and set rights.

Well this library is great. It makes settings NTFS rights so easy.

But it lacks a bit in documentation. Therefore I'm providing some of the code I used with it, it could help you. (or it could show my possibly bad coding style, as far as my knowledge goes for know, it should be fine)

Reference the dll, and use it.

[csharp]using Microsoft.Win32.Security;[/csharp]

Here's a method to add a dir, and set NTFS permissions on it for a given user:

[csharp]
private Boolean CreateDir(String strSitePath, String strUserName) {
Boolean bOk;

try {
Directory.CreateDirectory(strSitePath);
SecurityDescriptor secDesc = SecurityDescriptor.GetFileSecurity(strSitePath, SECURITY_INFORMATION.DACL_SECURITY_INFORMATION);
Dacl dacl = secDesc.Dacl;
Sid sidUser = new Sid (strUserName);

// allow: folder, subfolder and files
// modify
dacl.AddAce (new AceAccessAllowed (sidUser, AccessType.GENERIC_WRITE | AccessType.GENERIC_READ | AccessType.DELETE | AccessType.GENERIC_EXECUTE , AceFlags.OBJECT_INHERIT_ACE | AceFlags.CONTAINER_INHERIT_ACE));

// deny: this folder
// write attribs
// write extended attribs
// delete
// change permissions
// take ownership
DirectoryAccessType DAType = DirectoryAccessType.FILE_WRITE_ATTRIBUTES | DirectoryAccessType.FILE_WRITE_EA | DirectoryAccessType.DELETE | DirectoryAccessType.WRITE_OWNER | DirectoryAccessType.WRITE_DAC;
AccessType AType = (AccessType)DAType;
dacl.AddAce (new AceAccessDenied (sidUser, AType));

secDesc.SetDacl(dacl);
secDesc.SetFileSecurity(strSitePath, SECURITY_INFORMATION.DACL_SECURITY_INFORMATION);
bOk = true;
} catch {
bOk = false;
}

return bOk;

} /* CreateDir */
[/csharp]

The AceFlags determine the level of inheritance on the object.

And the DirectoryAccessType is used to create a AccessType with some permissions not in the AccessType enum.

I hope this is useful.